Most PC monitors come with an array of adjustments such as brightness, contrast, and color settings which can usually be tweaked via a set of clunky menus using buttons tucked away either at the side or bottom of the display. However, this is seldom easy and can often turn into quite a chore. Thankfully, there are a number of third-party programs that allow users to make these adjustments far more easily and quickly. One such program is ClickMonitorDDC which is not only free and portable but also very powerful.
Click taskbar notification icons to adjust the real monitor-backlight-brightness/contrast or use mouse wheel over notification icons to increase/decrease corresponding value, much more comfortable and faster than manually messing around with monitor buttons, works with external monitors (DDC-protocol) and Laptop-LCD-Display. ~ CLickMonitorDDC developer
Windows Night Light
Before we get into the ins and outs of ClickMonitorDDC, if you are a prolific computer user — spending time at the computer both day and night — I would suggest turning on Windows 10’s native “Night light” setting which I have found to be extremely useful. The “Night light” setting changes the display to invoke warmer colors that are far easier on the eye — causing less eye strain during night viewing — and can be set to come into play automatically via a user-defined schedule. Go to Settings > System > Display to turn it on:
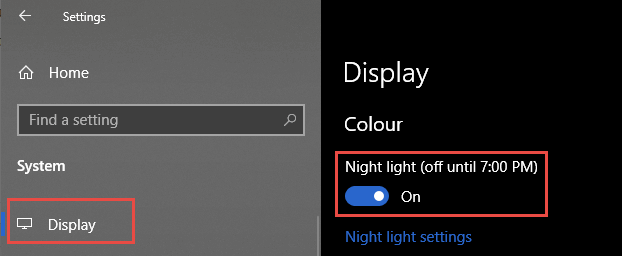
Click Night light settings to adjust the hours when Night light is active. I am an insomniac by nature and, if you haven’t already done this, you’ll be amazed at how much difference it makes. Set your display for night time in Windows 10.
ClickMonitorDDC Download & Usage
ClickMonitorDDC is free and available in both installer and portable versions, as usual, I opted for portable. The download is a mere 233 KB extracting to 647 KB. Running the extracted executable places an icon in the notification area of the Taskbar. A left-click on the icon opens the interface and a right-click opens a menu to access various options including a Settings menu:
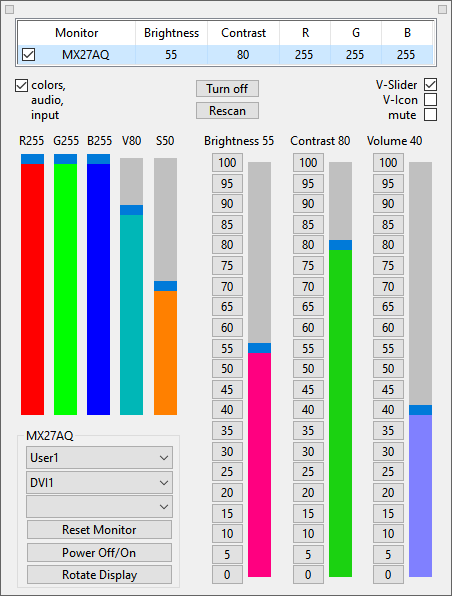
As you can see from the above screenshot, adjustments can be made by simply moving the appropriate sliders up and down. ClickMonitorDDC supports multiple monitors, keyboard combinations, and command line:
You can create powerful command lines, which can be used in batch files or popup menu entries or be appended in icon properties shortcut target. Command-lines can also be executed automatically by defined times. You can define hot keys or mouse wheel combinations for executing command-lines, this even works in fullscreen-games! Command-lines can be executed automatically, if selected programs are running in fullscreen, exiting fullscreen restores original values. You can change color-profiles, select monitor-inputs, reset monitor, power off/on monitor, dim monitor, set monitor-speaker-volume, set system-volume, rotate display and set saturation/vibrance. You can do this by user-interface or by command-arguments.
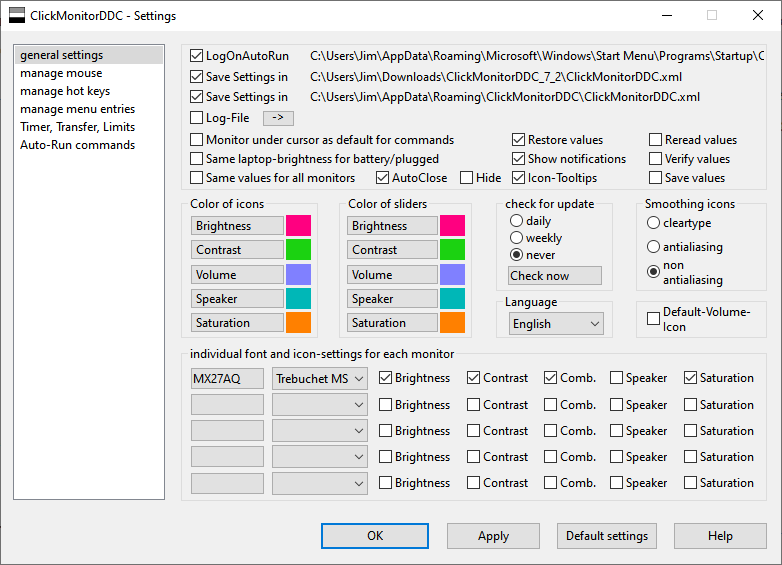
If you go to ClickMonitorDDC’s settings, you can click on Manage Mouse, Manage Hot Keys, or Timer Transfer Limits to customize your mouse shortcuts, keyboard shortcuts, or schedules. This allows you to (say) adjust the brightness with Ctrl+Shift+MouseWheel or set the brightness to automatically dim 50 percent at nighttime. There is a heap more useful information on the ClickMonitorDDC Home Page.
To be honest, a lot of this is somewhat above my pay grade, and overkill for someone like myself who uses a single monitor and doesn’t game at all. However, even in its simplest functionality, ClickMonitorDDC is sure a lot easier than messing about with the monitor’s fiddly little buttons and clunky menu system. A definite keeper for me.
NOTE: ClickMonitorDDDC is named after Display Data Channel (DDC), the communication protocol that monitors use to communicate with a PC’s graphics chip. To use ClickMonitorDDC, your monitor needs to support the DDC/CI command interface. Most modern monitors do, but you need to be aware that it may not work with every display currently on the market and especially older displays.
FURTHER READING:
How To Fix Monitors Not Going To Sleep
How To Manage Dual Monitors In Windows
How To Share Monitor With Multiple Computers
How To Span Pictures Over Multiple Monitors
—
Brian:
Thanks for posting this review. It’s actually something I was looking for.
.
Too bad it was a disappointment. I have a dual monitor, laptop and external. Both are identified, but I haven’t found a way to handle them separately. The tool shows the same settings for both. Which is NOT TRUE. I was hoping to synchronize the 2 displays. I haven’t been able to do it with the native controls so I had high hopes this tool would allow me to do it.
.
The app only showed the 3 columns on the right of your screen cap, not the ones on the left.
.
Oh well, it was worth a try.
PS: the rotate button caused me a lot of grief when I hit it accidentally. I had to resort to the Windows Settings pain to undo the scramble.
At least the price was right
Hey Ron,
Did you read the information on the ClickMonitorDDC home page I linked to? It describes how to set different parameters for multiple monitors via command-line. ClickMonitorDDC is a powerful tool but it does require quite a learning curve.
Yes, I read through the page. I turned on the mouse-over setting. No change. All changes are applied to the laptop monitor only. I imagine there is some way of setting up separate sections in the TXT or XML settings files. But I don’t see instructions, and the file format is not clear.
I have sent off an email to the developer and, hopefully, he’ll respond with the appropriate advice.
Sorry I can’t be of more help Ron.
Ron, I heard back from the developer and he has advised that dual monitors need to be set to Extended mode in Windows 10 not Duplicate mode:
https://davescomputertips.com/how-to-manage-dual-monitors-in-windows/
I was disappointed that I did not find an option to adjust color balance. Maybe I just didn’t dig enough, but I’m finicky about color. Fortunately, it only took me a couple of minutes with the clunky buttons and menu to get my screen back to a custom color balance that appeals to me and produces reliable printer results on edited photos.
Sorry, but if you could not find an option to adjust color balance why would you need to get your screen back to a custom color balance?
Another way to get to the display settings in Windows 10 is to
right click the desktop somewhere and select ‘display settings’
and there you can turn ‘night light’ on & off plus other settings.
Thanks for the ClickMonitorDDC software, I shall have a play with it,
I am using my laptop & 1 monitor ATM while I get all my bits together for my next build 🙂
Hey Bear,
I used the portable version and the colors (RGB) settings were displayed by default when I ran it so I naturally assumed that was the default behavior. However, a couple of earlier comments have suggested that the colors settings is not being displayed. If that is the case; to display color settings (RGB), place a checkmark in the box next to ‘colors’ at top left of the main interface.
I installed the portable version and I have 2 monitors, 1 laptop & 1 monitor, and ‘colors’ was displayed on all 4 settings in the system tray; the main number and the other 3 that were on 100 all had ‘colors’ on the top left hand corner. I don’t know what the other people did, but I have ‘colors’ like you.
Thanks for confirming I am not going crazy Bear, appreciated. 🙂
Well now, I’m glad I made that comment, because when I opened the app to answer your question, I saw something I’d swear was not there the first time, but … my eyes are getting old (or is it my mind). I found the RGB columns on the left. My opinion just changed. I shall put this on my laptop and see if it can warm up that display.
LOL. I know exactly what you mean, I walk into a room these days and then stand there wondering why I went there in the first place. 🙂
Anyway, hope it does the job for you.
I was not inattentive. If I could paste in a screen shot, I’d show you that it’s no longer there. I stupidly hit the Reset Monitor button despite the warning to not do that if I didn’t know what I was doing. DUH! That killed the RGB adjustment bars.
Now, in that space, I see the message R G B sliders only available in User-profile. That’s the way it was the first time I opened it. Before I fiddled with the display options buttons. Hopefully that will work magic again, or I’ll have to dig around to find out how to access that User-profile.
It looks like the website where this was hosted is no longer there, do you have any idea if the application is still available available?
Yep, the site is no longer reachable. No idea what’s going on there, very strange.
However, the software can be downloaded from MajorGeeks: https://www.majorgeeks.com/files/details/clickmonitorddc.html