
Optimize Windows 10. Try out these 10 simple steps to help speed up your PC and make it less prone to performance issues. These simple tips probably won’t make all that much difference if you’re running a machine with high-end specs but can certainly help boost performance with older and/or average home PCs.
1. Disable Programs That Start With Windows
For some reason, most software developers like to set their programs to start with Windows so they are running in the background. In most cases, this is entirely unnecessary and merely consumes valuable system resources. It’s very easy to disable these automatic startups:
- Open Task Manager: Right-click any blank space in the Taskbar and, from the menu, click Task Manager. Or right-click on the Start button and select Task Manager from that menu
- In Task Manager, open (click) the Start-up tab and you will see a list of all programs set to start with Windows and their status– either Enabled or Disabled
- For any Enabled items that you want to disable, simply click on that entry to highlight it and then click the Disable button

This doesn’t disable the program completely; it merely prevents it from launching at startup and you can always manually run the application later. If you’re not familiar with a program in the list, right-click the entry and then click Search online to learn about the program and what it does. If still uncertain, go to a site called Should I Block It? and search for the file name. This will usually present very good information about the program or service. The more items you disable the better. Rule of thumb– always leave any security-related programs which include real-time protection enabled, plus anything else you need to be running. All the rest are open to being disabled.
2. Change Your Power Plan
In Windows 10, you can choose between three different power plans:
- Power saver: conserves power but at the cost of reducing performance
- Balanced (recommended): Balances power consumption with performance
- High performance: Favors performance over power consumption
- Go to Control Panel: Open the Start menu, type Control Panel, and then press Enter:

- In Control Panel click Power Options and enable your power plan of choice:
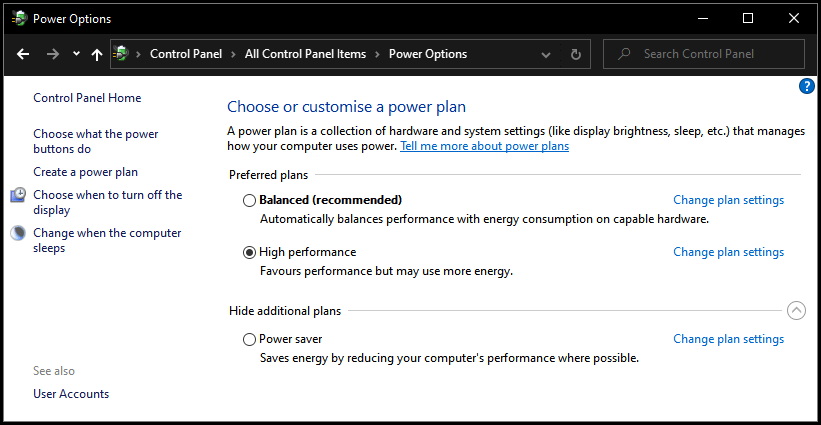
For laptop users, I would generally suggest the Balanced power plan when on battery. For desktop users and when laptops are connected via mains power I would definitely suggest going with High performance, especially for those running machines with lower-end to middling specs.
3. Turn Off Windows Search Indexing
Windows 10 indexes your hard drive(s) in the background providing a faster search than if no indexing were being done, in theory anyway. However, the search indexer uses CPU and RAM resources so, with it switched off, you will generally gain a performance boost. You can selectively disable certain areas for indexing but, in almost all cases, I would suggest to completely disable indexing altogether.
- Open the Start menu and type services then press Enter
- Scroll down and locate Windows Search in the list of services. Double-click on that entry and a new window will pop up
- Click the Stop button and then set the service’s status to Disabled. Click OK

4. Disable Visual Effects
Windows 10 includes some pretty nice animations and visual effects. On faster, newer PCs, the impact will be negligible, but on older and/or slower PCs, they can have a noticeable impact on system performance. It’s quite simple to turn these effects off:
- Open the Start menu, type sysdm.cpl and press Enter. That launches the System Properties dialog box
- Click the Advanced tab and then, under Performance, click Settings. You’ll now see a full list of visual effects
From there, you can selectively disable specific effects but your best option would be to simply enable the Adjust for best performance option and click OK. Windows will then automatically disable all the effects that are slowing down your system:

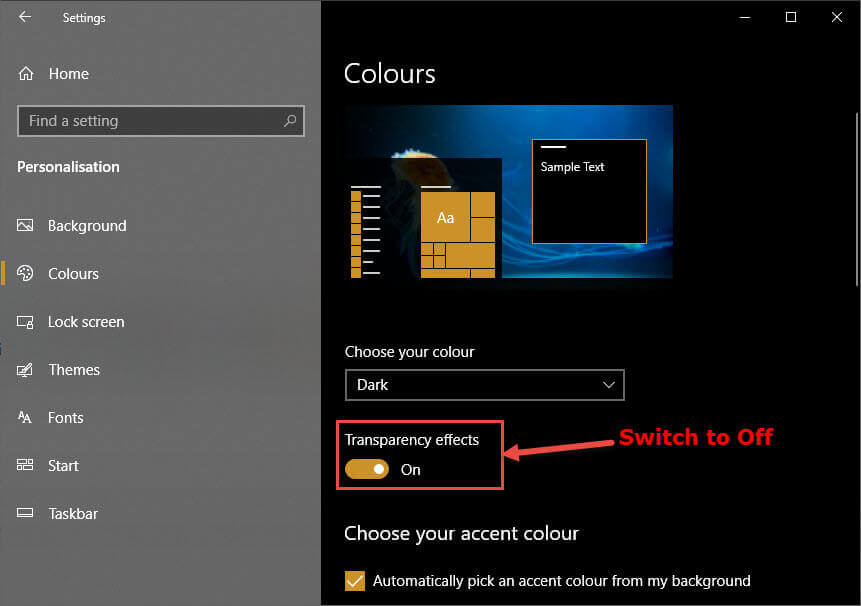
5. Disable Transparency
While you’re at it, you should also disable the transparency effects that Windows 10 applies to the Start menu, Taskbar and Action Center. It uses a surprising amount of resources to create these transparency effects and turning them off can help improve system performance.
Navigate to Settings > Personalize > Colors and set the Transparency Effects switch to Off.
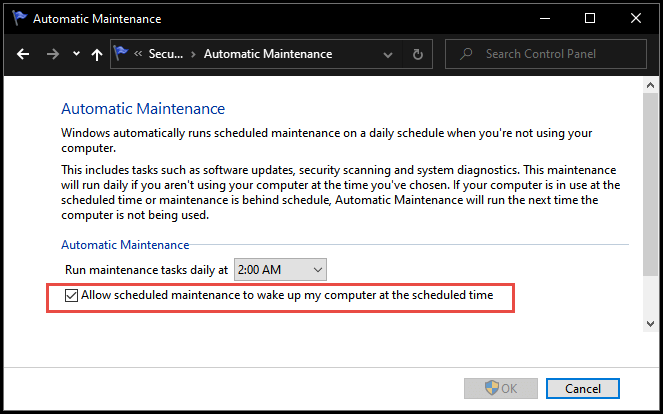
6. Make Sure Automatic Maintenance Is Enabled
In Windows 10, Automatic Maintenance is a feature that helps keep your computer healthy and optimized by running maintenance tasks on a daily basis. This automated optimization takes place when you’re not actively using your device, at 2:00 a.m every day by default. During a maintenance session, the feature will run specific tasks, such as disk optimization, system and app updates, security and malware scans, diagnostics, and other tasks with the sole purpose of keeping your device healthy and running at peak performance.
- Go to Control Panel > System and click Security and Maintenance in the bottom left corner
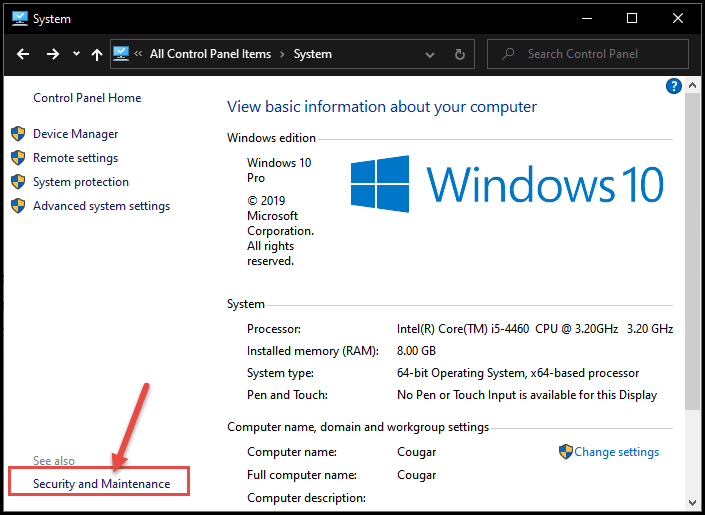
- Now click on Maintenance to expand that section
From there, you can change the scheduled hour for automatic maintenance, run the maintenance process manually if it hasn’t been done for a while, and make sure that automatic maintenance is enabled.
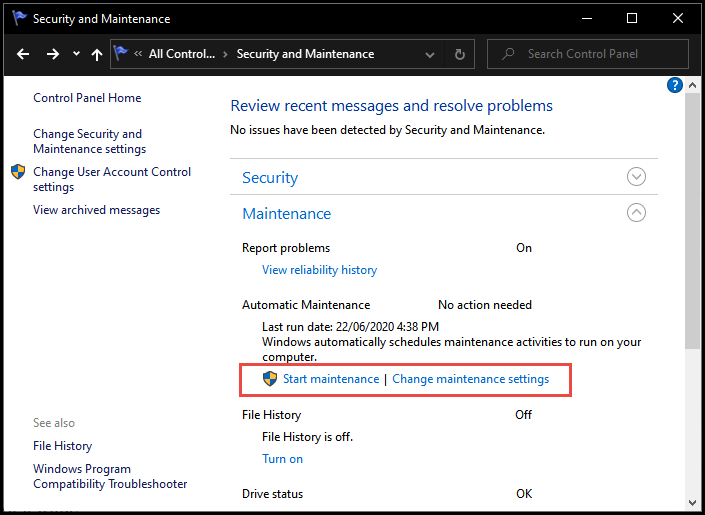
If automatic maintenance hasn’t been performed for a while because the machine has been turned off, you should manually run the maintenance ASAP. To run maintenance manually, simply click Start maintenance. To change the scheduled time for the automatic maintenance to run, click Change maintenance settings, and adjust the time accordingly via the associated drop-down menu. Also, while you’re there, make sure the option to Allow scheduled maintenance to wake up my computer at the scheduled time is enabled.
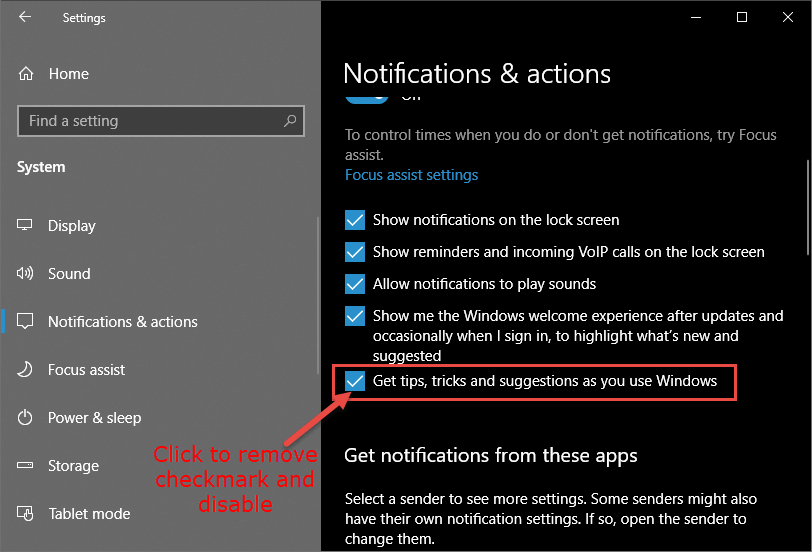
7. Turn Off Tips, Tricks, And Suggestions
As you use your PC, Windows keeps an eye on what you’re doing, or trying to do, and offers tips, tricks and suggestions. These are rarely all that helpful and Windows keeping an eye on what you’re doing and offering advice can also make your system more sluggish.
- Navigate to Settings > System > Notifications & actions
- Locate the option to Get tips, tricks and suggestions as you use Windows and disable it– remove the checkmark
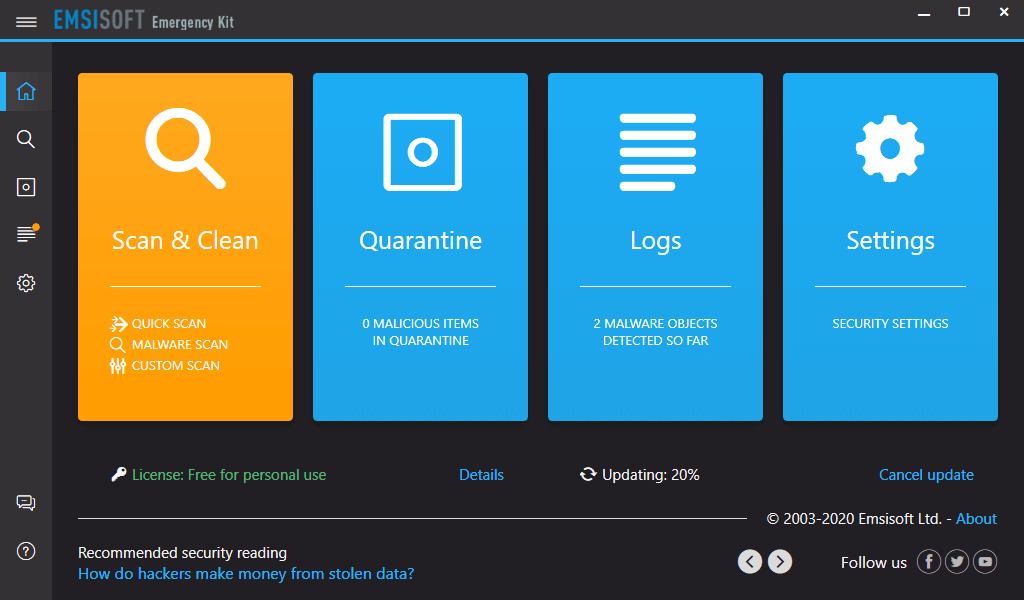
8. Scan For Malware And PUPs
PUPs (Potentially Unwanted Programs) and malware, in particular, can severely impact system performance. Running a regular malware scan periodically can help keep the system free from these pests. I’m guessing many would have Malwarebytes Free already installed and this will do as good a job as any and better than most. However, you should be aware that Malwarebytes does falsely flag certain harmless software as PUPs for removal, the most notable of which is IObit’s popular Advanced SystemCare.
Malwarebytes and IObit have a history of conflict stemming from an incident years ago and continuing to this day. Personally, I am not a fan of IObit or their software but, as far as I am concerned, Advanced SystemCare is not a PUP and shouldn’t be flagged for removal. It’s always a good idea to check through the items flagged for removal following a malware scan anyway and Advanced SystemCare users need to be particularly on guard when using Malwarebytes. If you don’t have Malwarebytes Free installed, I can strongly recommend Emsisoft Emergency Kit scanner. EEK is free and portable plus updates its definitions from within the program. NOTE: At 334MB EEK is a large download but, in my opinion, well worth it.
I would suggest scanning the system with a second-opinion malware scanner once per week.
9. Clean Up Your Hard Drive
Windows 10 stores a lot of useless files that you don’t really need and which, when accumulated over time, can slow the system down. Cleaning out this clutter can often contribute to a more responsive system. There are several very good free and portable drive cleaner tools available but I tend to recommend Wise Disk Cleaner which I’ve found to be both effective and safe. One component included in these types of tools that users often are not aware of, or fail to utilize properly, is a scheduling mechanism whereby the user can set a time, day, and intervals for the cleaning process to run automatically.
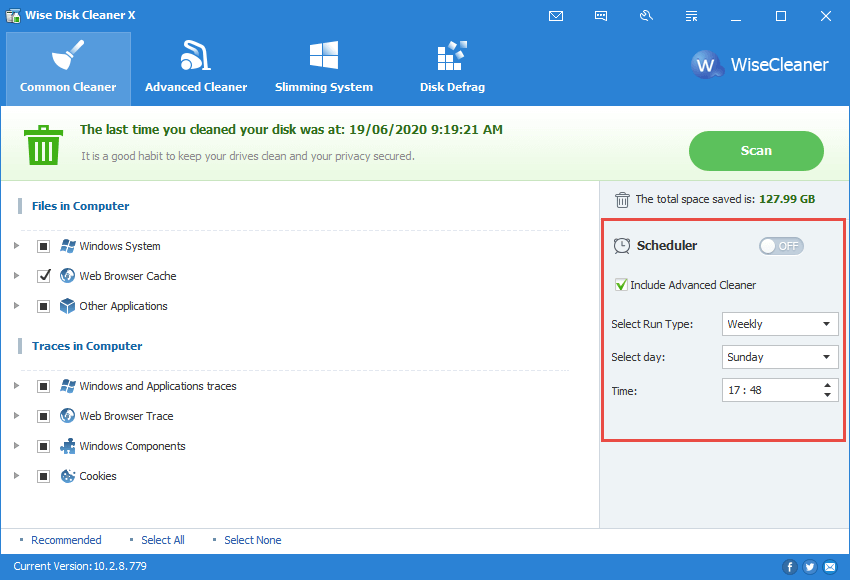
This set and forget approach is a great way to help users maintain a lean, clean machine.
10. Bonus – Unresponsive & Freezing System
This is something I come across quite regularly: If an older Windows 10 machine is extremely unresponsive and everything tends to freeze up periodically, keep an eye on the disk activity light. If that light is constantly glowing solid, it is a fair indication that the hard drive is on the fritz– usually that the hard drive contains a number of bad (unreadable) sectors and needs replacing. With a healthy hard drive, that activity light should be blinking on and off as the operating system loads, rapidly at first and slowing to more intermittent blinking as the boot process nears completion until, finally, the light goes out. So, the disk activity light can provide a pretty good guide as to the health of your hard drive and why the operating system might be so sluggish and/or constantly freezing up.
NOTES:
- With the possible exception of malware infections, none of these individual steps are going to provide much in the way of a noticeable performance boost on their own. However, when all applied together, you should notice quite a difference in overall speed and responsiveness
- As mentioned earlier, these types of tweaks are mainly for the benefit of users running older and/or somewhat underpowered machines. Users who are running newer and/or high-end machines are unlikely to notice too much of a difference
FURTHER READING:
- How To Speed Up Your Cell Phone
- Windows 10 Quick Tips – Prefetch/Superfetch/SSD
- Windows 10 Quick Tips – Indexing Options
- 3 Best Methods to Clean Up Malware
—
Hi Jim,
Some great tips in your article to be spread around.
My one and only clean-up tool is Privazer, still free and no annoying ‘Buy Pro’ popups as with other clean/maintenance tools.
I do not trust Malwarebytes due to past issues and it has also spoiled a great programme by taking over AdwCleaner.
Regards,
Jonno
Hey Jonno,
Yes, PrivaZer is excellent. The only reason I don’t universally recommend PrivaZer is because it is geared more toward more advanced users. We have to be careful with our recommendations as they need to suit all levels of users, simple but effective is key.
I feel the same as you regarding Malwarebytes as, I suspect, do many others. It used to be number one malware cleaner, but, these days, it seems to have gone off the rails somewhat.
Cheers… Jim
Hello Jim. Totally agree PrivaZer is excellent in cleaning, yet the program does allow average users (providing they set the correct switches) a less aggressive cleaning approach. Love the new interface. As for Malwarebytes, been using it for many years (the Pro version), and though it might flag some programs as pups, still continue to use and trust it, Mindblower!
Some nice tips in there. I have an old Core 2 Quad with a Geforce 7300se, enough to browse and some Youtube. Can’t afford anything new for a while, sadly. I followed your guide to disable search indexer, visual effects and transparancey. I notice that when I watch Youtube, one of the most busy tasks (except browser ofc) is window-manager. I hope these tips will help with that. Nowadays my system struggles to play 720p Youtube consistently.
One thing to note: When turning off visual effects, make sure to leave smooth edges for Windows fonts activated. Text will look terrible without, that was my experience whn I just switched it off.
Hey hackisack,
Have you tried going through the Windows Clear Type process? https://davescomputertips.com/how-to-fix-fuzzy-text-using-cleartype/
It should help.