
Thanks to the onset of the coronavirus outbreak, there isn’t much in the way of good news at the moment. That said, on a positive note, most now have time on their hands to learn a new skill, and there is no better or more useful new computer skill to learn than how to create and restore system images.

Regular readers will be well aware that I have been a staunch advocate of image backups for many years, it is the most important security/safety measure any computer user can implement. Imagine the ability to recover your system almost immediately from any disastrous situation — failure to boot, serious malware infections, system corruptions — all of these and more are easily overcome once you’ve adopted a system image backup strategy. Instead of taking your computer to the repairman and paying dollars to rectify these situations, simply restore an image you’ve created earlier and you’re back in business in no time.
I’m not sure why so many users still tend to shy away from system imaging, maybe because it sounds complex and beyond their capabilities. However, these days, nothing could be further from the truth. Even Microsoft has acknowledged the importance of system image backups, first introducing its built-in system imaging feature in Windows 7 and carrying it through to today’s Windows 10. However, while I have nothing against this method, I prefer to use dedicated software from the experts for this purpose rather than an add-in from Microsoft. Plus, the Windows method is certainly not the most straightforward.
What is required here is utter simplicity, so system imaging is within the realm of every user, regardless of their level of proficiency. Plus, of course, reliability. Over the years I’ve found that Aomei Backupper provides both these key elements, and it is by far the easiest to use image backup software I have ever come across… and it’s extremely reliable too.
Getting Started With Aomei Backupper
![]()
Obviously, you’ll need to download and install Aomei Backupper Standard first. The software comes in two versions, Aomei Backupper Standard (the free edition) and Aomei Backupper Pro (the premium edition). Aomei Backupper Standard might be free but it is a full-featured imaging program that will do everything required without limitations.
Next, you’ll need some sort of media on which to save your images– either a second internal hard drive or an external USB hard drive. Do not save system images to the system drive (usually ”C” drive). I am using a second internal hard drive on which I save data only but an external USB hard drive would be ideal.
Prior to running the Aomei Backupper software and creating your first image, you need to make sure you are imaging a clean and trouble-free system. Here is the routine I suggest you go through:
- Clean the hard drive: use any reputable hard drive cleaner to clean up unnecessary junk files. I use and recommend Wise Disk Cleaner (portable). However, any good hard drive cleaner will do.
- Scan your system for possible malware using a third-party on-demand scanner: I use and recommend the excellent malware scanner that comes with Emsisoft Emergency Kit (free and portable). If you have Malwarebytes Anti-Malware installed, that will do just fine. Why a third-party scanner and not your resident antivirus program? What you are doing here is just double-checking to make sure your resident antivirus hasn’t missed anything.
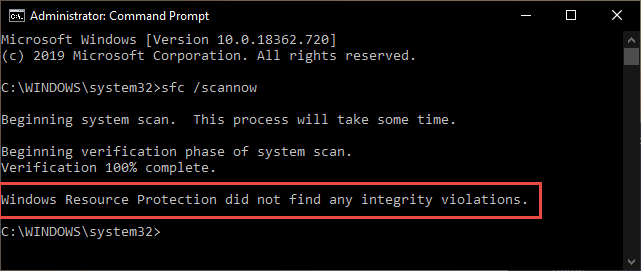
- Check for system corruptions: Open an elevated Command Prompt– right-click the Start button and choose Command Prompt (Admin). In the command prompt window, type sfc /scannow and hit Enter. The System File Checker scan will take a little while to complete and, at the end, this is the message you want to see:
Once you are satisfied that your system is clean and corruption-free, you’re ready to create your first image.
Creating Your First Image
Connect your external USB hard drive and create a new folder on that drive– this is where you are going to save your images so name the folder something appropriate, such as Windows 10 Images. Now fire up Aomei Backupper. I’m running the premium version but the screenshots will be the same as in the free version– or near enough. Make sure you are in the Backup window– as per the option in the left-hand menu, then simply click the System Backup button:

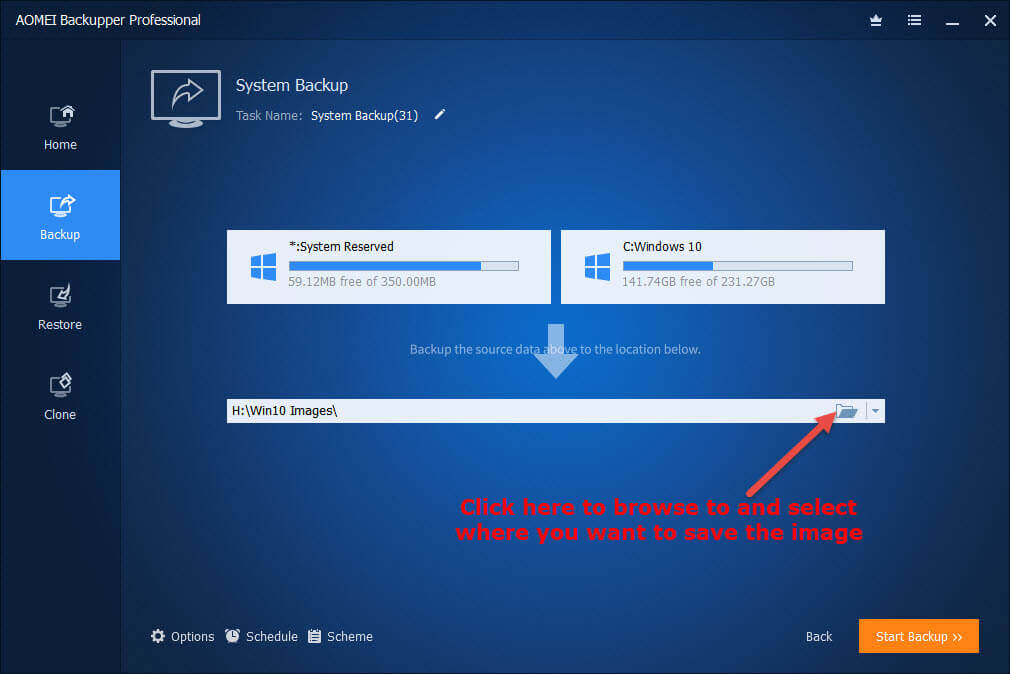
Aomei Backupper will automatically select all system-related partitions for you, all you need to do at this stage is tell Aomei Backupper where you want to save the images. Click the folder icon at far right of the lower box, under the downward arrow, then browse to and select the folder you created earlier on the external hard drive. You will only need to do this once, at first run, from then on Aomei Backupper will remember your chosen location and it too will be automatically selected. Once you’ve set the save location to your external hard drive, click the Start Backup button and that’s it.
From then on, every time you create a new system image, it is just a 2-click operation — click System Backup, then click Start Backup — what could be simpler?
Creating Bootable Media
The bootable media is absolutely essential for restoring images and you should create your bootable media as soon as possible. Images can be created and saved from within the operating system but for restoring an image later, following some disastrous situation, you’ll need the bootable media. Don’t worry, this process is built into Aomei Backupper and is easily achieved via the Tools menu. You can create a bootable disc (CD) or USB flash drive but by far the best option is to create a bootable USB flash drive. The space required is quite small (around 400MB) so any USB flash drive from 1GB and upwards will do the job. NOTE: This process will wipe the flash drive so don’t use any flash drive containing data/files you want to keep.
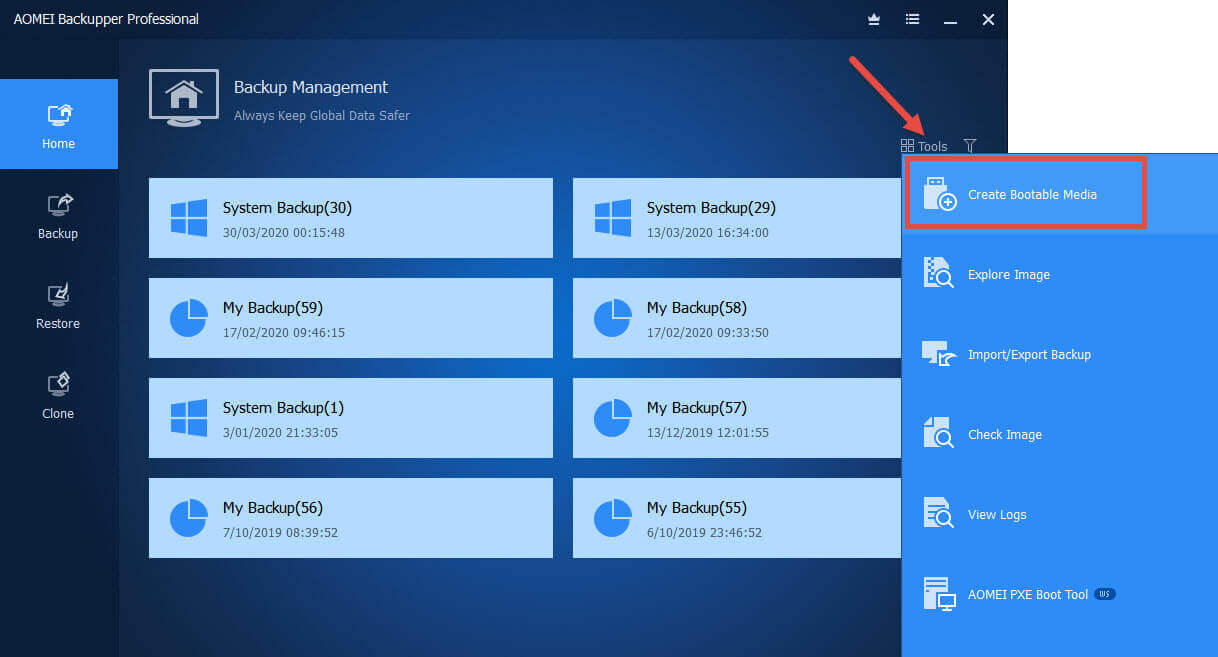
Connect your USB flash drive and then click Tools and select Create Bootable Media:
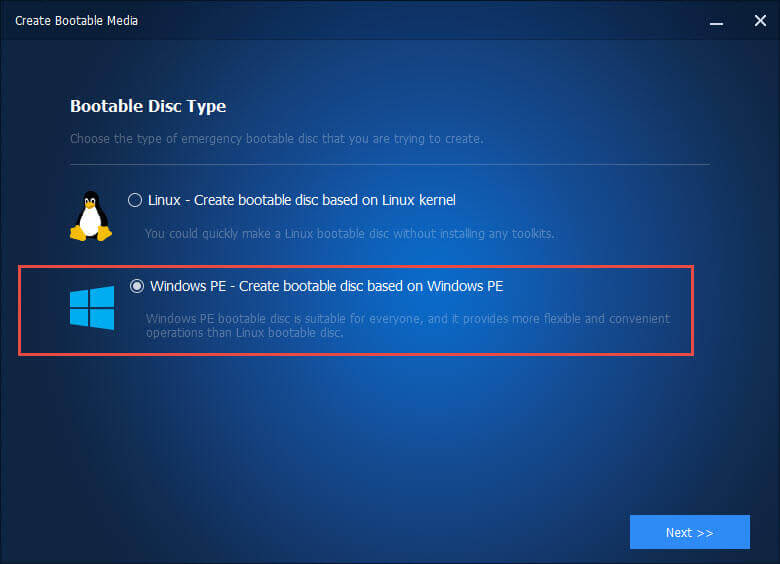
Your best bet here is to create a bootable USB flash drive using the Windows PE option, which provides greater flexibility and is more reliable than the Linux based option:
Click Next and choose either Legacy bootable or UEFI bootable (this refers to your BIOS type). With the release of Windows 8 in October 2012, Microsoft’s certification required that all new computers must include firmware implementing the UEFI specification. This means that newer machines, purchased after 2012 will likely be running UEFI, anything prior to that will likely be running legacy BIOS.
If unsure, you can check if your PC uses Legacy BIOS or UEFI via System Information. Open the Start Menu and type System Information. Click on System Information in the results:

In the System Information window look under BIOS Mode.

Select whichever option is applicable, make sure to enable the option to Download WinPE creating environment from the internet, and then click Next:

Select USB Boot Device, then click Next:
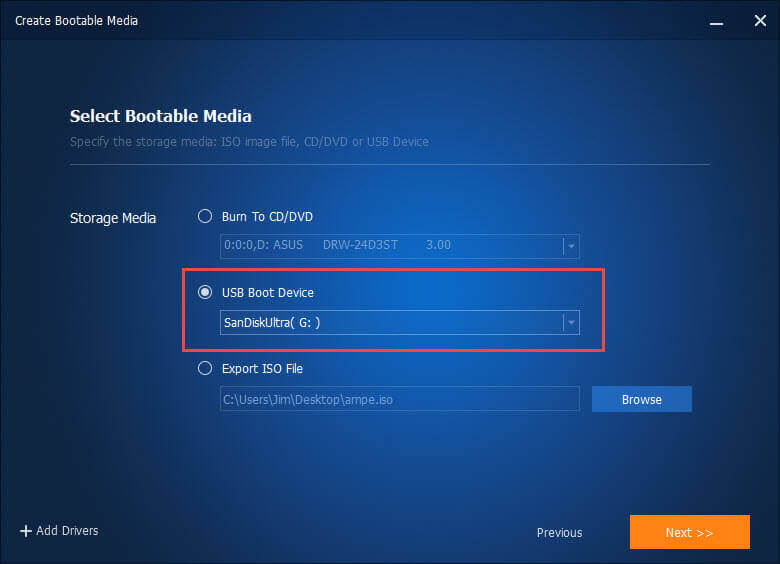
If you’ve already connected your flash drive as instructed, it should be automatically listed. Click Next and the bootable flash drive will be created– the process will take a little while. On completion, safely remove the flash drive and keep it in a safe/secure location.
NOTE: As stated earlier, the bootable media is mega important so I would advise testing it immediately to make certain it is working as expected. Better to make sure it is working properly beforehand rather than discovering it is not working properly when you need it after a disaster has struck. I’ll explain how to boot from the bootable media you’ve created in the next installment: Simple Guide To Creating & Restoring System Images – Part 2
Aomei Backupper includes the usual options to compress images (to save space) and verify images following creation. However, these options, and others, are already set to the optimum by default so the user need not worry about even looking into the settings. Everything is ready to go straight out of the box.
More Aomei Backupper Guides
Aomei has published a slew of easy to follow guides covering just about every aspect of Aomei Backupper, all categorized and clearly labeled: Aomei Backupper Help Guides
This is part one of a two-part article. Please read through Part 2 to learn how to restore an image using Aomei Backupper.
—
Excellent tutorial Jim…Thank you!
You’re most welcome John. Part 2 coming next week.
Excellent tutorial Jim…Thank you!
I’ve been using Aomei Pro for a number of years to do image incremental backups to a external HD. Wonder if in part 2 you could touch on the procedure of restoring an image from the bootable usb as I’ve (thankfully) never had to restore. Thanks again and stay safe Jim!
Hey John,
Part 2 is all about restoring images using the bootable media. I’ll also be discussing the difference between full, differential, and incremental backups.
Good to hear you have an image backup strategy in place. Smart move. 🙂
Morning Jim. I decided to do a trial test on this mornings’ boot to make sure it would do what was needed (can’t see you doing all the work for me). I’m glad to say it worked flawlessly — media files booted and it found my latest image backup on the HD quickly. As you so accurately mentioned, Aomei is a breeze to work with and I’ve tried quite a few others in the past. Thanks again for your work and as always, look forward to your future posts/tutorials.
Best Regards,
John
Good man. Now you have the peace of mind knowing that, if your system ever needs recovering, you will have no problems restoring an image using the bootable media.
I appreciate you providing what is needed and describing step by step specifically how to do these things such as getting to system information to find the Bios type. With getting older the aging brain tends to forget things that are not done too often, not to mention Windows changing where to get to and how to locate something. This makes it a lot easier to go right ahead and do it when seeing that it’s not difficult or time consuming.
Hey Bern
Thank you. I hear you; being an old geezer myself, I can appreciate where you are coming from. I work with Windows pretty much every day and still have to occasionally look up how to do this or that when the old memory refuses to cooperate.