
If you are running any version of Microsoft Outlook, it’s a good idea to occasionally run a check of all Outlook data files to make sure there are no errors. This is particularly true if Outlook is misbehaving. There are various ways to repair Outlook, such as running a Microsoft Office repair, but here we are focusing on a direct repair of the file or files where your Outlook data resides.
First, Let’s Find The Outlook Data File(s)
The Outlook data files have a “.pst” extension. The default name for your data file is “Outlook.pst”. However, you may have several “.pst” files. For example, I have an “Outlook.pst” file and an “Archive.pst” file where emails are archived after they are a year old. The location of your “.pst” file(s) depends on your version of Outlook, your version of Windows, and how you set up your account or created the “.pst” file. Here are the paths where you should be able to find your “.pst” file(s):
For Windows 10:
drive:\Users\<username>\AppData\Local\Microsoft\Outlook
or
drive:\Users\<username>\Roaming\Local\Microsoft\Outlook
For Older versions of Windows:
drive:\Documents and Settings\<username>\Local Settings\Application Data\Microsoft\Outlook
In my case, I’m running Windows 10 Home 21H2 and Outlook 2013. The “Outlook.pst” file is located at this path:
C:\Users\Stu\AppData\Local\Microsoft\Outlook\Outlook.pst
Next, Let’s Find the Repair Program
The repair program is named “ScanPst.exe” and is included with all versions of Microsoft Outlook. Here is where you will find the path to “ScanPst.exe”:
For Outlook 2019 (Office 365):
For a 64-bit version of Windows:
drive:\Program Files\Microsoft Office\root\Office19
For a 32-bit version of Windows:
drive:\Program Files (x86)\Microsoft Office\root\Office19
For Outlook 2016:
For a 64-bit version of Windows:
drive:\Program Files\Microsoft Office\root\Office16
or
drive:\Program Files\Microsoft Office\Office16
For a 32-bit version of Windows:
drive:\Program Files(x86)\Microsoft Office\root\Office16
or
drive:\Program Files(x86)\Microsoft Office\Office16
For Outlook 2013:
For a 64-bit version of Windows:
drive:\Program Files\Microsoft Office 15\root\office15
or
drive:\Program Files\Microsoft Office\Office15
For a 32-bit version of Windows:
drive:\Program Files(x86)\Microsoft Office 15\root\office15
or
drive:\Program Files(x86)\Microsoft Office\Office15
For Outlook 2010:
For a 64-bit version of Windows:
drive:\Program Files\Microsoft Office\Office14
For a 32-bit version of Windows:
drive:\Program Files\Microsoft Office(x86)\Office14
For Outlook 2007:
On a 64-bit version of Windows:
drive:\Program Files\Microsoft Office\Office12
On a 32-bit version of Windows:
drive:\Program Files(x86)\Microsoft Office\Office12
Now Let’s Repair An Outlook Data File
1. Close Outlook if it is open.
2. From the information above, find your “Outlook.pst” file and copy the path to that file to your clipboard. In my case (Windows 10 and Outlook 2013), the path is:
C:\Users\Stu\AppData\Local\Microsoft\Outlook\Outlook.pst
3. Run the Repair Program “ScanPst.exe” located as described above by going to it in File Explorer and double-clicking on it.
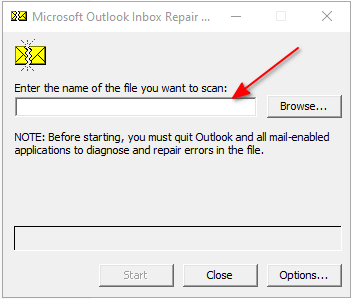
4. Paste the path you copied in Step 2 above into the “Enter the name of the file you want to scan” field shown below and click on “Start”.
5. When it is finished examining your PST file, it will look like this if there are errors:

6. If this is the first time running scanpst.exe, LEAVE the checkmark at “Make backup of scanned file before repairing”. It will then save the original file to “Outlook.bak” at the same location as “Outlook.pst” before fixing it just in case you need to restore the original file.
7. If this is the second or later time running scanpst.exe, REMOVE the checkmark at “Make backup of scanned file before repairing” because you already have a backup file that was created on the first run.
8. Repeat steps 3 through 7 above until it doesn’t report any errors. If it reports “Minor Inconsistencies”, that’s okay, you can stop. I typically need to run the “ScanPst.exe” three or four times before the “.pst” file is completely fixed.
If you have any questions or concerns, please use the comments section below.
—
Hi Stuart,
I trust your New Year has started well. Hoping you can shed some light on an Issue we ran into. Our ISP was sold, and the new company changed our email from SMTP to POP3. This was very vexing to me as the last change they did some years before was the exact opposite, but the result was the same. I was able to import the inbox and sent mail but nothing else that we had in our created folders is accessible now. I made backups of our *.pst files so we have it (I think). Any suggestions would be appreciated.
Thank You
Hi Les,
I’ll try to “shed some light” on your situation.
First, it’s important that I explain the different types of email servers. An “SMTP” server is used for sending emails, not receiving emails. A “POP3” server is used for receiving emails, not sending emails. So your statement that “the new company changed our email from SMTP to POP3” can’t be true. I’m going to guess that the new company changed the Internet address of the SMTP server and changed the Internet address of the POP3 server. Those are relatively easy changes to make in Microsoft Outlook. If you need me to describe step-by-step how to do that, I would be happy to.
Concerning your statement “nothing else that we had in our created folders is accessible now”, you did the EXACT right thing by backing up your “.pst” files. This is my suggestion for recovering your “created folders”:
1. Close Outlook if it is running.
2. Using the latest backup with your created folders that you have of your “.pst” file, recover it to the same location of your current “.pst” file, BUT with a different name like “OLD_Outlook.pst”.
3. Now run Outlook again.
4. Go to File > “Open & Export” > “Open Outlook Data File” and navigate to your “OLD_Outlook.pst” data file and choose it.
5. You should now see at the left at the very bottom of your data folders the “OLD_Outlook” data file with the missing folders. If this is acceptable to you as a replacement for your current “.pst” date file, follow the next instructions below.
6. Left-click on the “OLD_Outlook” in the left column, then right-click on it, and choose “Close OLD_Outlook”.
7. Now close Outlook.
8. Using File Explorer, navigate to “Outlook.pst” and change the name to “Outlook_backup.pst”. While you are there, change the name of “OLD_Outlook” to “Outlook.pst”.
You should now be all set. When you open Outlook again you should see your created folders.
Please let me know how it goes.