Windows Defender Offline
We all know by now that the Internet is a dangerous place. You may be set up with all the latest security software on your computer and still get infected by rootkits, malware, viruses, and other possibly unwanted software. Windows Defender Offline is a Microsoft tool that will let you scan your computer when you boot up your system. This is sometimes necessary when the malware interferes with a proper scan while running Windows.
What You Will Need
In order to create your bootable CD/DVD or USB Flash Drive, this is what you should have at the ready:
- A blank CD/DVD or,
- A USB Flash Drive (at least 256MB); this will be formatted in the process so be sure to back up anything you care about
- An Internet connection
- The MS Tool (32/64 bit- ~800KB)

Which Windows Version?
If you are not sure whether you’re using a 32-bit or 64-bit version of Windows, then you can find out by following these instructions courtesy of a Microsoft explanation:
Computers running Windows XP
- Click Start, right-click My Computer, and then click Properties.
- If “x64 Edition” is listed under System, you’re running the 64-bit version of Windows XP.
- If you don’t see “x64 Edition” listed under System, you’re running the 32-bit version of Windows XP.
- The edition of Windows XP you’re running is displayed under System near the top of the window.
Computers running Windows Vista or Windows 7
- Click the Start button, right-click Computer, and then click Properties.
- If “64-bit Operating System” is listed next to System type, you’re running the 64-bit version of Windows Vista or Windows 7.
- If “32-bit Operating System” is listed next to System type, you’re running the 32-bit version of Windows Vista or Windows 7.
- The edition of Windows Vista or Windows 7 you’re running is displayed under Windows edition near the top of the window.
It is important that you choose the right one or it simply won’t work
Running the Tool
You must run the MS Tool with Administrator Rights invoked. In order to do this, right-click on the program file and choose the Run as administrator option in the menu that pops up.
The MS Tool will run you through a few windows. You’ll first be shown a screen telling you what you need to complete the process, then a EULA you must accept, and finally a Window asking what type of media you would like to use. That one looks like this:
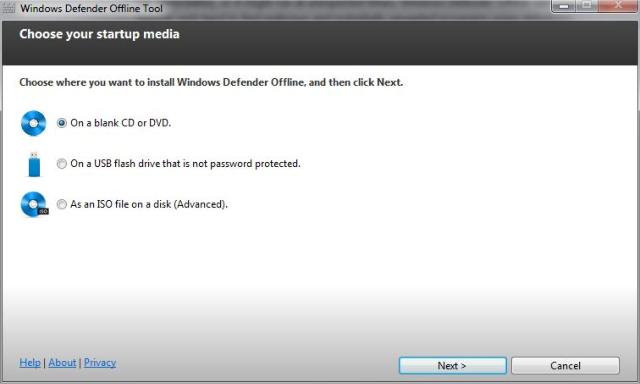
The ISO option will not be discussed here. Since I haven’t tried it, I would not be in a good position to explain it to you.
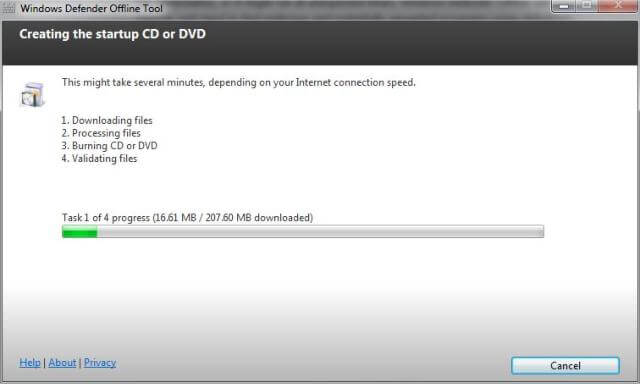
Once you have chosen your media and clicked the Next button the MS Tool will begin a rather large download of the current virus definition files. My download was ~207MB. That will vary greatly depending on the number of definitions and the version of the MS Tool. The time it will take to download this file will vary dependent on your Internet connection speed as well.
There is a distinct advantage to choosing the USB option. If you want to run the tool again at a later time you won’t have to re-install everything to your USB drive- only the updated definitions will be downloaded and your USB drive won’t be re-formatted. That sounds like a real time-saver particularly on a slow connection.
Another advantage is that you will have the opportunity to update the virus definitions at the beginning of the boot-time scan. This cannot be done with the CD/DVD option.
For the purposes of this article I chose the CD/DVD option on a 10Mbps internet connection. Including the CD burn the whole thing took less than 20 minutes. I have done this before on a much slower connection and it took well over an hour- closer to two, actually.
Scanning your computer at boot-time
In order to boot your computer from the CD/DVD or USB drive you have created it is necessary that you set this up in your computer’s BIOS. It is nearly impossible for me to explain this in detail to you since every BIOS has different menu configurations.
The best advice I can give you is to consult your Motherboard’s User Manual for the proper settings. Your goal is to tell the system to boot from the device you have chosen. You’ll be looking for something similar to “Boot Device Priority”, or “Boot Order”. Something along those lines.
If you are at all familiar with Microsoft Security Essentials then you’ll be right at home with the Windows Defender Offline program.
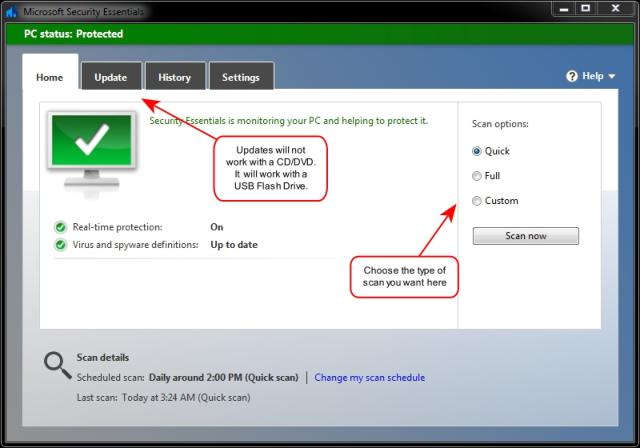
Note: The above image is not of Windows Defender Offline. It is a screen grab of Microsoft Security Essentials. Both programs operate in nearly identical ways.
Caveat: You should not use the same CD/DVD that you create today for future scans. The definition files will have been updated by then and will no longer provide you with an up-to-date scan. That’s the basic reason the USB Flash Drive option is the better choice.
How long does the scan take?
That, too, will vary considerably. It is entirely dependent on the capabilities of you computer.
Just so I could give you an idea I ran a Quick then a Full scan on my computer.
- The Quick Scan took about 2 minutes and scanned roughly 70,000 files.
- The Full Scan was at around 75% when I hit the Cancel button. It had scanned about 1,000,000 files and had run for about 30 minutes when I stopped it. I just got tired of waiting. I even went to the store for a few minutes to grab a cup of joe and to kill some time. I couldn’t take it anymore. I’ve never been very good at waiting.
Not to brag here but I’ve got a pretty fast computer and it still took, or would have taken, a long time to complete the Full Scan. If your computer isn’t too huffy and tends to snort at the slightest burden, then you might anticipate 2 or more hours for a Full Scan to complete. Maybe an overnight task would be in order?
Conclusions
I will refer to everything from Root Kits to PUP’s (Potentially Unwanted Programs) as malware.
It doesn’t matter what types of security software you run on your Windows system. If your computer is ‘infected’ you can never be 100% certain that running scans with antivirus and anti-spyware software is not being compromised by these ‘nasties’. (The term ‘nasties’ is a high-level technical term with which you may or may not be familiar. In my profession it is used all the time.)
The only way to know for sure is to run scanning software before Windows begins running, hence carrying the malware along with it.
Microsoft, so beleaguered in the past for its poor attention to security issues, seems to have taken a more positive and aggressive approach of late. The ill-fated Vista UAC, the much better Windows 7 version of same, and finally the most secure being the latest Windows 8.
Windows Defender Offline stands as evidence of their commitment to an attempt towards solving this very real problem by providing it to everyone at no cost.
I highly recommend taking the time to set up and run this program. Isn’t an hour or two worth a little peace of mind?
One final thought
There is only one, sure-fire, bullet-proof way of knowing your Windows system is infection-free and it’s not pleasant. It’s a complete, clean, re-installation of Windows. Sorry.
Running every malware scanner in the world will never guarantee that you’ve gotten rid of everything. That’s the sad reality of our online life.
When I think of the billions of dollars spent to thwart the malicious behavior of a few <bleeps> out there it makes me want to throttle every one of them. Just think of how all that time and effort could be spent towards the greater good. Probably the saddest part is that these very same <bleeps> are for the most part intelligent, robust young minds wasting their time on this costly frivolity.
—
There is an error in your otherwise superb article above. The passage “Caveat: You should not use the same CD/DVD that you create today for future scans. The definition files will have been updated by then and will no longer provide you with an up-to-date scan. That’s the basic reason the USB Flash Drive option is the better choice.”
Both versions can in fact be updated. A live internet connection should be available and an update done before the scan is started. They will both update with the latest definitions, the difference is that the usb stick will retain that update whereas the cd version will not so a live internet connection should always be available when using the cd version of the cleaner.
Regards
Benn
Hello Benn,
You make a good point and I agree with you that an internet connection should be maintained during a scan.
I was merely trying to point out that the CD version will carry old data.
Thanks for clearing up my otherwise blurry statement.
Richard
My BIOS does not allow booting from a flash drive – any way around that?
Dan
Hi Dan,
I guess you’ll just have to use a CD or DVD, then.
Another possibility would be to check the motherboard manufacturer’s site for updated BIOS firmware. Be very certain to heed the warnings regarding the risks when doing this.
My advice has always been to only do this type of update if the newer version actually provides a feature set that you need.
Hope this helps,
Richard