You may be asking why you would want the ability to install Windows 7 from a USB flash drive. Here are a few reasons:
- A flash drive is less likely to be damaged (scratched, broken, etc).
- A flash drive is less likely to be lost in the growing pile of computer CD’s and DVD’s that you’ve amassed over the years.
- A flash drive is less likely to be physically lost because they cost more than a CD/DVD and more care will be used.
- Many smaller and/or cheaper computers do not come with a CD/DVD drive.
- Installation from a flash drive will usually be quicker that from a CD/DVD drive.
All you need is a 4GB USB flash drive ($11 online), Windows 7 ISO image or DVD, WinRar, and a few minutes of your time.
Gather up the items needed before you start
Before we start let’s make sure we have our needed supplies!
- If you don’t have one already 4GB USB flash drives are available in a wide variety of styles. Any flash drive with a capacity of 4GB or more will work. You can find them at almost any chain store, but will find more choices and better prices at specialty stores.
- You will a need Windows 7 DVD or ISO image. If you do not have a DVD or ISO image you can download one from the following locations. Choose either 32 bit or 64 bit. Once downloaded follow the instructions in the January 15th newsletter to unlock.
- Windows 7 Professional 32-bit download
- Windows 7 Professional 64-bit download
- Those who created the ISO previously, or just downloaded the ISO and followed the instructions from last issue, will need to extract the ISO to their hard drive. This may seem like an extra step, but working with the files on your hard drive will be much faster. It will also create a final unlocked USB drive that contains all editions of Windows 7.
We will use WinRar to extract the ISO because it follows the ISO standard and respects the steps completed earlier to unlock the Windows 7 Editions. There are other programs that will extract ISO images, but they will undo any changes done when we created the edition unlocked ISO. Download WinRar. Click the Download Demo button on the right side (no need to purchase unless you want a great utility). On the next page skip the area labeled Step 1 or 2 (no need to enter your email address) and proceed directly to the Step 2 or 2 area on the web page. Click the blue download button. Choose to save or run the program. If you save the file install the program when the download is complete. The default settings should be sufficient for our needs.
Create a bootable Windows 7 USB flash drive
Now that everything is in place let’s get to it!
Extract the ISO files
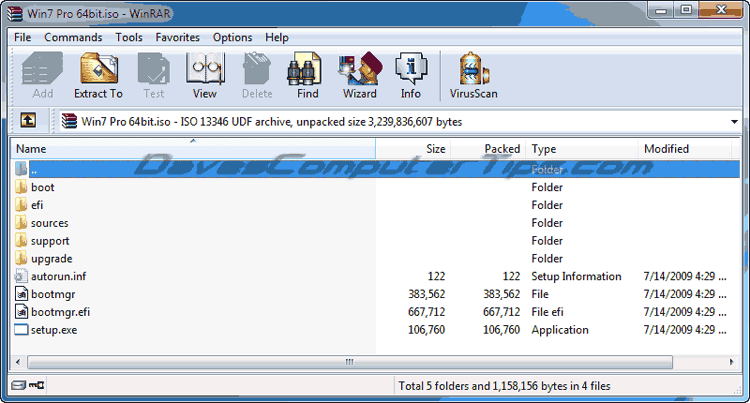
- Locate your unlocked Windows 7 ISO and double click. This should cause WinRar to open and show the contents of the ISO. If it does not you will need to manually open WinRar and use File | Open Archive to navigate to the ISO and select it to open. WinRar will display the contents of the ISO file

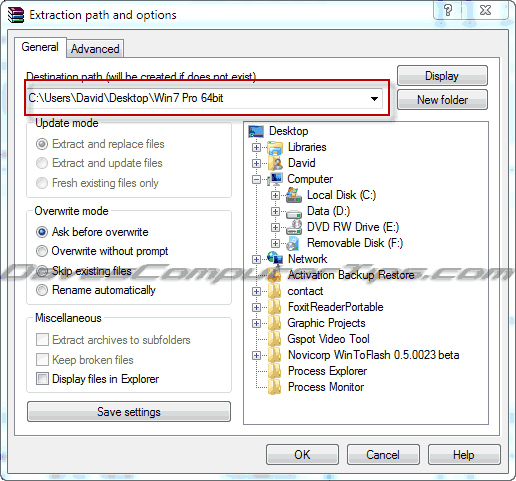
- Click the Extract To icon and the following window will open.

Notice that WinRar will extract the files to my desktop in a folder with the same name you gave your ISO image. Make sure yours shows a similar, easy to find, location. If it does not use the folder tree on the right to select a location where you can easily find the extracted files. Click OK at the bottom of the window.
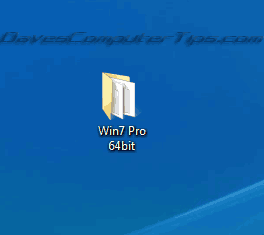
- WinRar will open a window to show the progress as it extracts the contents of the zip file. Once it is finished the progress window will close. You can close WinRar. You should now have a new folder on your desktop containing the files!

The following instructions may seem complicated, but if you follow along it is pretty easy! As always – some of these commands can have dire consequences if entered incorrectly. Backup your computer beforehand if you have doubts.
Format the USB drive
- Insert your 4GB or larger USB flash drive into a USB slot on your computer. Windows will install drivers for the device. You should hear a tone and see a message indicating the USB drive is ready to use.
- Open My Computer (or Computer in Win 7) and note the drive letter of your flash drive. You will need this later so you may wish to write it down. In my case it is F.
- Right click on your flash drive and select Format.

- A new window will open. Change the highlighted areas to match the picture below then click Start.

- You will receive a warning that all data on the device will be lost. If you right clicked on the correct drive above click OK. If you are unsure click Cancel and return to step 6.

Windows will begin formatting the USB drive. This will take a few minutes, so be patient.
Use the Disk Partition tool
NOTE: the diskpart utility is only available in Vista and Windows 7. XP users would need a third party tool such as MBRWizard and that method is not covered in this article.
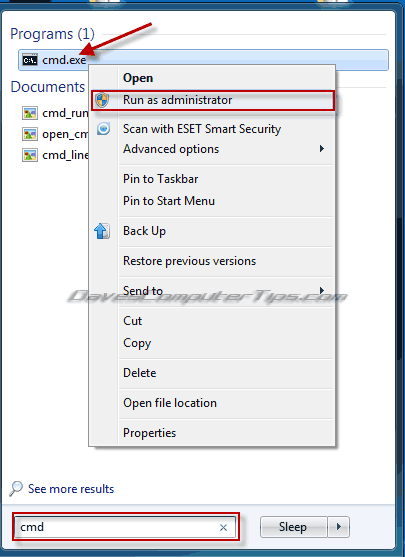
Next we need to open a command prompt with administrator privileges. Click the Start Orb in Vista or Windows 7. Type cmd in the search box. “cmd.exe” should be the top result. Right click on “cmd.exe” in the results and select Run as Administrator.

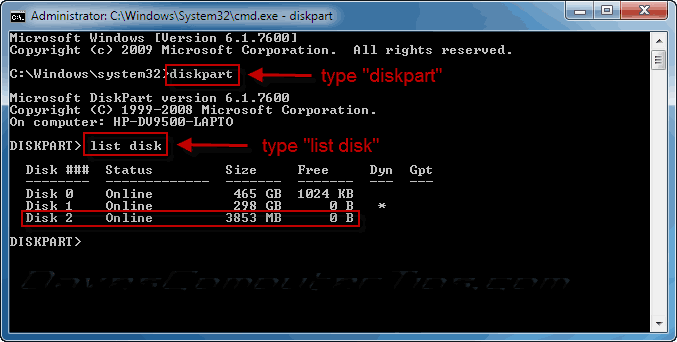
- A Command Prompt window will open with a flashing cursor. Type diskpart at the cursor followed by the Enter key. This starts the disk partition utility and displays DISKPART followed by a flashing cursor. Type list disk at the cursor followed by the Enter key.

A list of disks will be displayed. As you can see above my flash drive is disk 2. Depending on how many drives you have in your computer this number will probably be “1”, but it could be different. It will be the smallest drive and probably listed in MB instead of GB. Note this number as you will need it later!
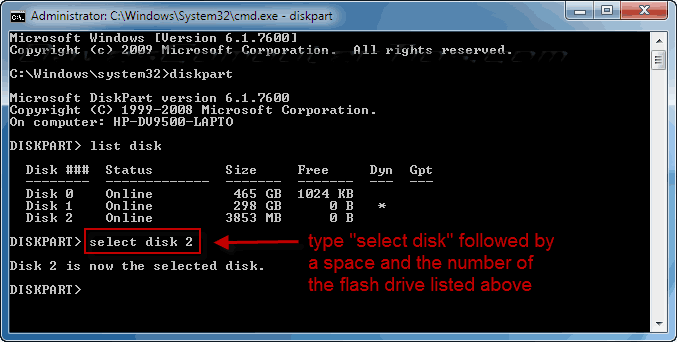
- At the flashing cursor type select disk followed by a space and the drive number from above. Press the Enter key.

You will receive a confirmation message – Disk 2 is now the selected disk, however your number will be the number of your flash drive from above.
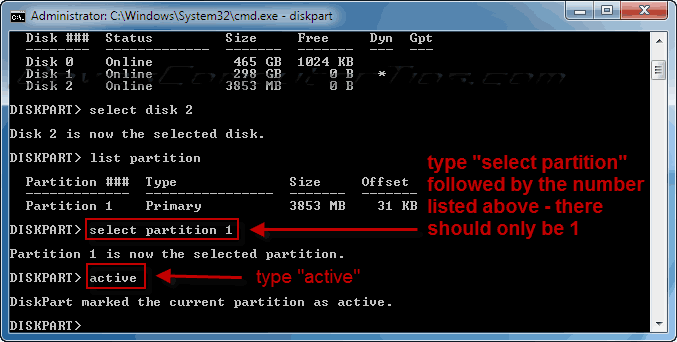
- At the flashing cursor type list partition followed by the Enter key. This will return a list of all partitions on the drive. There should only be 1 unless you have previously partitioned the drive.

- At the flashing cursor type select partition followed by a space and the number from above. In my case it is “1”. Press the Enter key.

You will receive a confirmation – Partition 1 is now the selected partition. Type active followed by the Enter key. You will receive another confirmation – DiskPart has marked the current partition as active. Congratulations! You have just created an active boot partition on your flash drive.
- Type exit followed by the Enter key. This will exit the disk partition utility, but keep the command prompt open

Make the USB drive bootable
Next we need to make the folder containing the extracted Windows 7 files the working directory. If you look at the command prompt on your computer you will notice the cursor is flashing in front of “C:\Windows\system32>” making the system 32 folder inside the Windows folder the working directory. The easiest way to accomplish this is with the “cd” command.
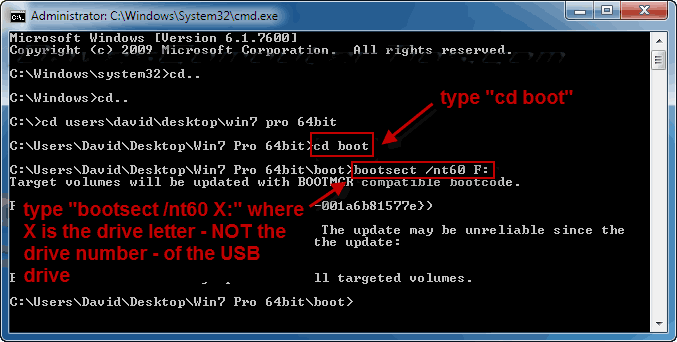
- At the flashing cursor type cd.. (letter c – letter d – period – period) followed by the Enter key. You will see the working directory change to “C:\Windows>”. Once more type cd.. followed by the Enter key. The working directory will change to “C:\>”.

- Type cd followed by a space and the location of the folder containing the extracted Windows 7 files followed by the Enter key. Since you are currently at the “C:\>” prompt you do not need to enter that part. You can see an example on the third line in the above picture. If you are having problems use explorer to navigate to the folder containing the extracted Windows 7 files and use the address bar as a guide to show you what to type. My command was “cd users\david\desktop\win7 pro 64bit”.

- Type cd boot followed by the Enter key. This will change the working directory to the boot folder within the Windows 7 files.
- Type bootsect /nt60 followed by a space, the drive letter of the USB drive, and a colon. Use the drive letter you noted earlier when formatting. In my example I typed “bootsect /nt60 F:”. This command uses the files in the windows 7 folder to make the USB drive bootable.
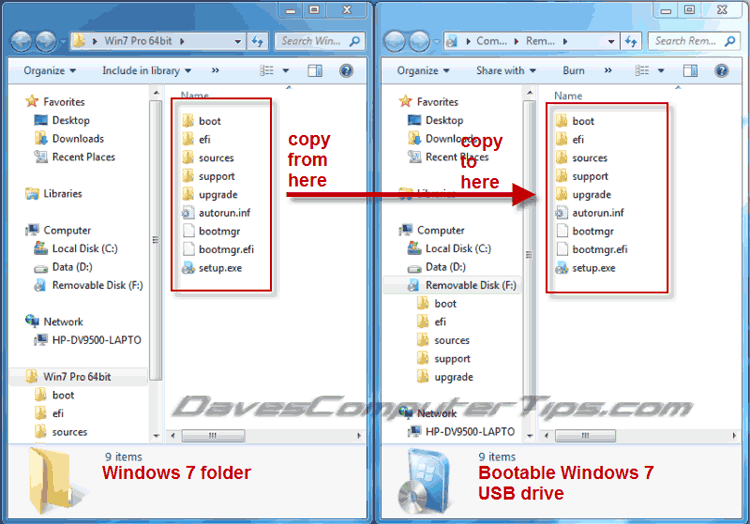
- Since you have an explorer window open with the Windows 7 file go ahead and open another and navigate to the USB drive. Select all files in the Windows 7 folder and copy them (drag and drop or copy/paste) to the USB drive.

You now have a bootable USB flash drive that will install any edition of Windows 7! I know it seems like a lot of work, but the fruits of your labor are worth it!. When you use this tool to install Windows 7 remember the BIOS of the computer needs to be changed so that USB is the primary boot device.





‘Bootsect’ is not recognized as an internal or external command, operable program or batch file.
What OS?
Windows 7 Home Premium 64 bit. I tried the cmds on 32bit and 64bit but the same error arises.
WHEN ACCESSING THE DISK DRIVE JUST TYPE IN D:\(WHAT EVER YOU DISK DRIVE IS) HIT ENTER. THEN TYPE CD BOOT-ENTER THEN BOOTSECT.EXE/NT60 F: (what letter drive usb is)
Asus UL30VT-X1; SanDisk 8 gb flashdrive. Thanks Dave.
You can use RMPrepUSB to format and make bootable any USb drive for Vista/Win7. There are also tutorials to show you how to just have the Win7/Vista.SVR2K8 ISO files all on a bootable Flash drive and install from USB. You can also install Win 7 TO USB and boot from an external USB drive straight to Windows 7.
http://www.youtube.com/watch?v=uvWGV9YJxfQ
On the part where I have to type ‘select partition 1′ it just says:
There is no partition selected’ and it won’t select whatever I try.
I have created a bootdisk by following your guide. Thanks a lot!
The unlock guide from January 15th link wont work, any help?
I followed your directions and everything went smooth until I got to the part where I typed “bootsect /nt60 f:” Then after hitting Enter I got “Target volumes will be updated with BOOTMGR compatible bootcode. Could not map drive partitions to the associated volume device objects: Access is denied.”
I am using an 8 gb stick, which actually only has 7.54 gb.
Do you have any suggestions? Thanks
I used the 64 bit Windows 7 Professional download.
I figured out what I did wrong. I didnt run the command prompt as administrator. Works great now. Thankyou so much.
I have a 64 bit system with a 32 bit win xp on it. Can I fdisk and reformat the hard drive and use the bootable windows 7 usb flash drive to install win7?
You should be able to accomplish this directly during the Windows 7 installation process.
The “ISO unlock guide” link doesn’t work?
Jayesstee,
This article is older and we really can’t guarantee that all the sites we link to will be operational. There is also a possibility that the link in question linked to our old site (we moved to a blog in 2011).
If you are trying to make a bootable USB Win 7 I suggest you try Yumi – http://www.pendrivelinux.com/yumi-multiboot-usb-creator/. Simply install, choose Win 7 installer from the list, and point the installer to your Win 7/8 ISO and it will take care of the whole process.
I use this, about 4 steps, easy, fast and from Microsoft and no need to extract the iso.
Use it all the time and had no problems
http://download.cnet.com/Windows-7-USB-DVD-Download-Tool/3000-18513_4-10972600.html
Awesome work, I love the detail and the screenshots. It made it really simple to get a fresh install on my computer, I was already running win7 home premium 64 bit, but getting the computer second hand I needed this fresh install. Thank you very much for this info, saved me a huge headache!
thanx
PERFECT! After days of research this was the ONLY complete process that had all the steps and worked from a-z. Thank you for taking the time and helping non-geeks like myself (i hope)
Dear All;
After I reach the step of BOOTSECT.EXE/NT60 E: or bootsect /nt60 E: it respond me with the following answer;
Target volumes will be updated with BOOTMGR compatible boot code.
could not map drive partitions to the associated volume device objects:
Access is denied
please help me how to fix the above problem. my flash drive couldn’t be bootable right now
Thanks in Advance!
Try Yumi. It’s a quick automated method. http://www.pendrivelinux.com/yumi-multiboot-usb-creator/
Thanks a lot, very useful and helpful for me .
Sir, you are so kind and helpful. Thanks a lot. It helped me lot…!!! It released my tension. God is Great…!!! May God Bless you and Prosper you…!!!
Thanks for the guide! Btw the bootsect part should be “bootsect.exe /nt60 f:”
I am currently running windows 8 and trying to create a USB bootable windows 7 home premium to install. Unfortunately every step works perfectly with the exception of the last step where I have to type: bootsect\nt60 f: because it continues to say “This tool can only be run on systems using PC/AT Bios. This system was booted using EFI or some other firmware type.” So what can I do?
Thanks bro, your method helped me in Installing windows 7 through USB..
Easy peasy , just do as provided steps nd baaam you got it 😉 worked for me 100%
David,
Two questions:
1) Based on the title of your article should I assume that none of this applies to Vista?
2) My VISTA BIOS does not support booting from a flash drive. Do you know if it’s common for manufacturers to have upgraded their BIOS so that it would? I couldn’t find any info at the manufacturer’s website for my specific BIOS version.
Thanks,
Dan
Dan,
1) It should work just fine for Vista, but you can take a shortcut and use a program named Yumi – http://www.pendrivelinux.com/yumi-multiboot-usb-creator/. It’s a very versatile program that simplifies the process.
2) Strange. Booting from USB is a very common option, and has been for quite some time. If you’re sure there is no such option in the BIOS I would look at the manufacturer’s site for a BIOS update.