WordPress And XAMPP – A Perfect Match
If you have ever felt the urge to try building a website or blog or just wanted to test your abilities without any added costs like ![]()
XAMPP
![]()
As I mentioned, we don’t really need to know how it works but if you do want to know the complete breakdown the best place to start is the XAMPP website.
Installing XAMPP
The first thing we need to do is download a copy of XAMPP. Once we do that, we install a hard drive. The program will install all necessary folders and files, so you don’t have to worry about a thing.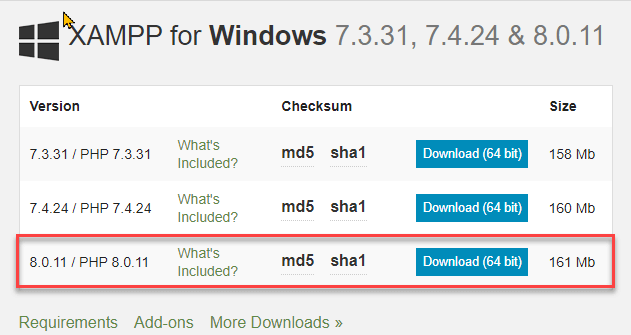
To download the XAMPP installer go to the Apache site. and download the latest version of XAMPP. Choose the version for your Operating System (in our case, Windows). Click on the bottom link to download the version 8.0 installer program.
Bitnami
Bitnami is the actual installer that will install XAMPP and all the subcomponents. It allows us to perform an installation with one click. It can install WordPress, but we will be using a different method for this tutorial. If you wish to know more about Bitnami, visit What is Bitnami?
XAMPP And WordPress Step-By-Step Installation
At this point, I am assuming that you have already downloaded the XAMPP installer and are ready to go.
- Run the installer program.
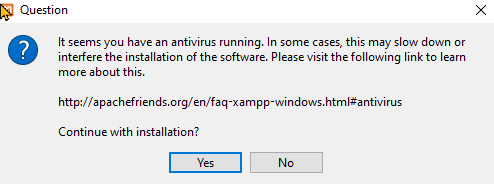
- If you receive a notification that an Antivirus has been detected, you may ignore it and try installing or temporally disable the firewall and any other live protection, then install.

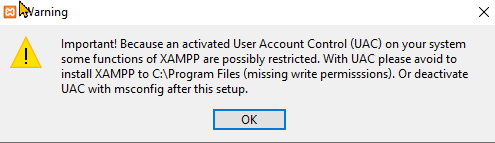
- Click OK on the first UAC Notification.

- Click Yes on the UAC Screen. I do not recommend deactivating UAC at any time.

- When the Bitnami installer opens, click on “Next”.

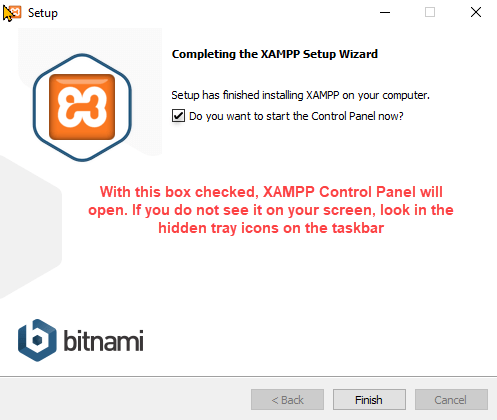
- When completing the XAMMP setup you may keep the checkbox clicked to open XAMPP right now.

- On the next screen, we will only check Apache, MySQL, PHPMyAdmin, and PHP. Leave the rest unchecked and click “Next”.

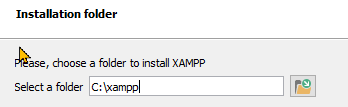
- Ensure you install it in your root drive as shown.

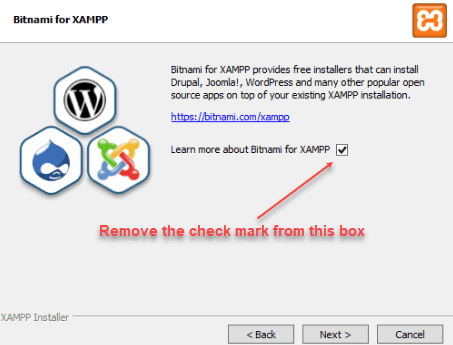
- Uncheck the box “Learn more about Bitnami for XAMPP.” We will install WordPress later. Click “Next”.

- Click “Finish” to open XAMPP.
- The only Modules we will activate are Apache and MySQL. Click on Start for each one.


- Open the Config tab and
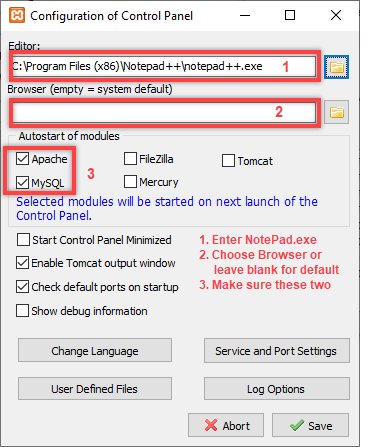
- Indicate which editor you wish to use. Note: This should be something like exe which is in the C:\Windows folder. Or download Notepad++. Do not use Word, WordPad, etc.

- Enter the browser you want to use or leave it blank for the default browser.
- Check the Apache and MySQL modules to AutoStart them in the future.
- Indicate which editor you wish to use. Note: This should be something like exe which is in the C:\Windows folder. Or download Notepad++. Do not use Word, WordPad, etc.
- Open your selected browser.
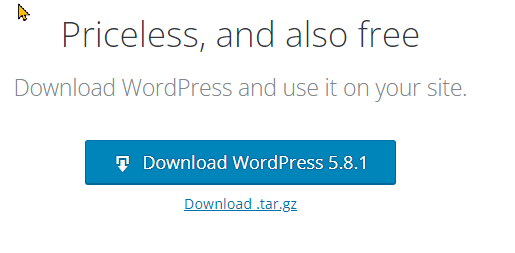
- Click on this WordPress.org. link or enter it into your browser. Note: Do not go to WordPress.com as there are no downloads there.
- Scroll down until you see the download. Click to download WordPress. The download may take a while.

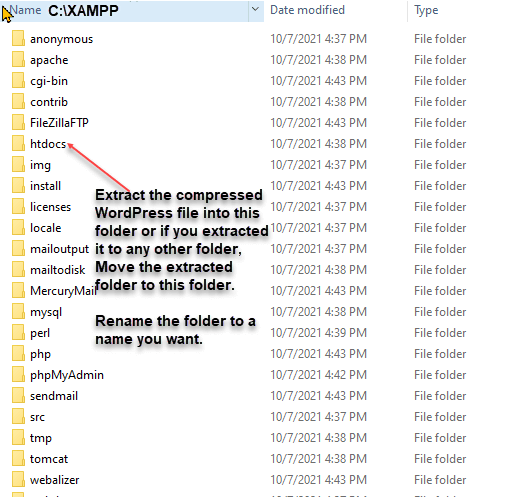
- Extract the contents of the file. If you select the download folder to extract the files, you will see a folder with a zipper and one as an open folder. Or see Option 2 marked below. *

- Open the XAMPP folder in your root drive. You will see a list of folders but the only one we care about now is the htdocs folder.

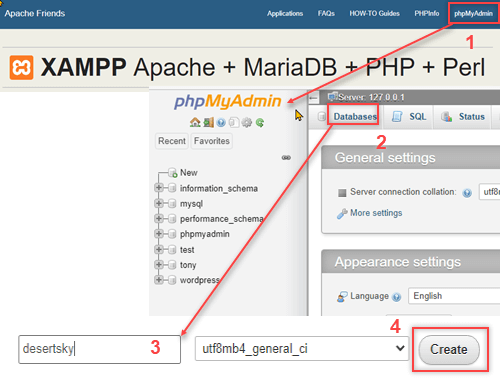
- Type localhost in the address bar. This will open the XAMPP dashboard and give you access to phpMyAdmin which is in the upper right-hand corner. The image below is actually three partial images, the top portion is how your browser window will look. Once you click on phpMyAdmin, the middle windows will appear. After clicking on the Databases button, a window will appear in which you may enter your database name.

- Click on phpMyAdmin Number (1).
- Click on Databases Number (2).
- Enter the name you selected; in my case, it was “desertsky” Number (3).
- Click on Create Number (4).
- In your browser address bar, enter localhost/ (your chosen name) i.e. “localhost/desertsky”.
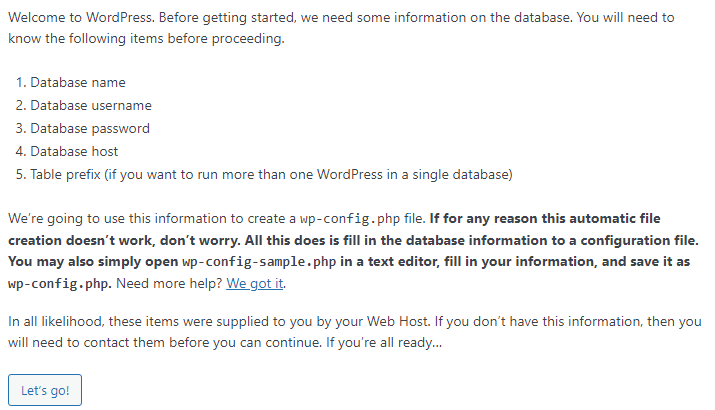
- WordPress will recognize that this is the first time you have entered this database and present you with a set of screens that will create the WP-admin file that is in your Database folder. The first one is just a welcome screen.
- Enter your chosen language or click Continue for English
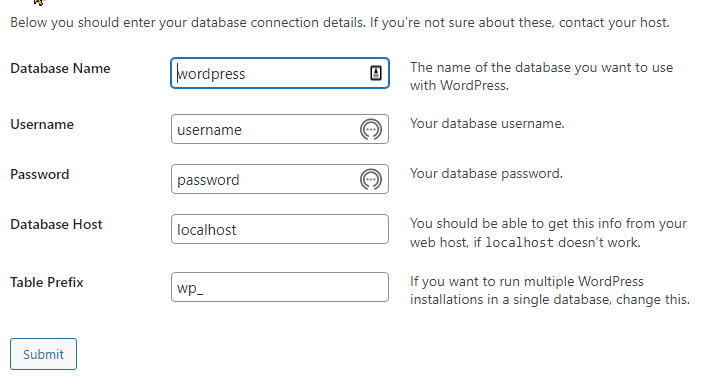
- For the requirements listed enter this information.

- For your database name, it must be the same as you entered previously.

- Enter “root” for username.
- Leave password blank.
- Press Enter.
- Once you receive the “alright sparky” notice you are good to go.

- The newly created WP-admin file will open giving you a chance to enter additional information.
- Enter your site title which can be the same as your database name.
- For now, keep root as your username.
- Enter a password. If your plan is to eventually publish this website, enter a strong password.
- Confirm the weak password if one was entered.
- Enter your Email.
- Click on Install WordPress.
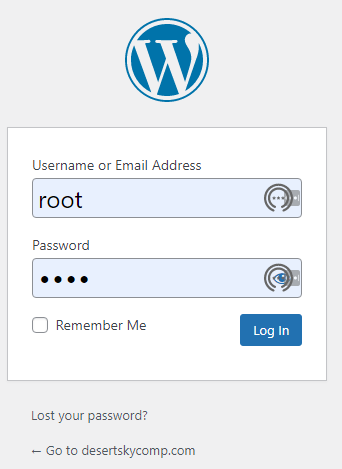
- Use your new sign-in credentials to sign in to your new database. Click “Log In”.


Congratulations! You have installed WordPress into a XAMPP server on your computer. Nothing you enter will reach the web. It is all contained on your hard drive. I’m sure at this point you are asking yourself, “what do I do now?”
Good question but it will have to wait until part two of this tutorial. In part two, we will be covering the basics of the WordPress Dashboard and what each menu item means. We will be covering plugins and themes. Without a doubt, looking at it right now can be overwhelming.
It is important to remember that plugins are just programs that contain functions that can be added to WordPress.
Summary
I have been building HTML5 websites for a while. With the growth of WordPress, I thought I would just start creating WordPress websites as an extension of that knowledge but in truth, they are very different animals. I initially had problems understanding the overall concept of putting the information together and then laying it out. There are a lot of free templates, but they seldom capture your idea of what a site should be. Paid templates can get you closer but can be expensive. I wanted a simple way of understanding WordPress and hoped that I could create websites in a couple of days. I did my homework and found that you can. I will be showing you in one article what took me months to find. If you have the data available: photos, articles, colors, and fonts you want to include in your site, it really can go by fast. As a matter of fact, having the information to fill your site will take you much longer than creating the site.
—