[message type=”warning”]
Following the instructions in this article requires that you make changes to the Windows Registry.
Make Backups before you proceed!!
[/message]
Missing in Action
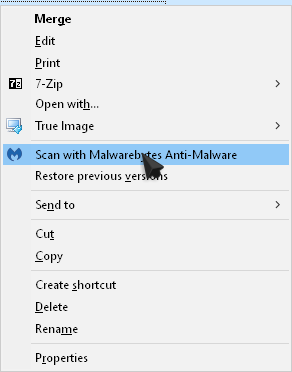
What’s wrong with this picture?
Well, I see a Malwarebytes option to scan a file or folder, but where is Windows Defender?
I’m sure it was there in previous versions of Windows, that is, pre-Windows 10.
I wanted that option back in the context menu to scan individual files and folders and, after some digging, I came up with this solution.
Of course, I am presuming you are using Windows Defender and not some other third-party antivirus/anti-malware solution. Also, this post is directed at Windows 10 users.
You probably noticed the warning at the beginning of this post but it bears repeating– BEFORE applying any changes to your Windows Registry, MAKE A BACKUP!!
The Download
This involves a rather complicated set of Registry changes. Given the ease at which we humans are capable of making critical errors when tampering with the Registry, among other things, I have provided a quick download of the necessary file to accomplish this task. It is only about 850 bytes in size.
Simply Click on the following Download Button and the file will be saved to your default downloads directory.
The file is in “.zip” format and will have to be extracted. Windows 10 understands “.zip” files and a simple Right-Click on the file will open a menu with an option to extract it. I’ll show you that in a minute, but first, click this pretty blue button to download the file.

Extracting the Files
Using your favorite File Manager, navigate to your Downloads Folder. Once there, you should see a file called WindowsDefenderContextMenu.zip.
- Right-Click that file
- In the menu that opens, Click on Extract All…
You should be presented with this window:
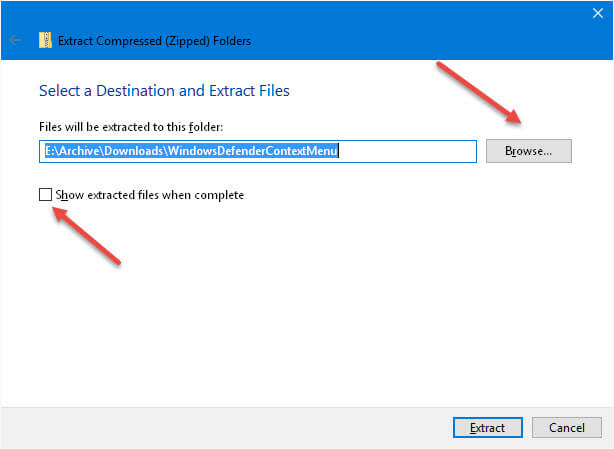
When the files have been extracted, which should only take a second, you should see two files in your extraction folder of choice:
- AddWindowsDefenderToContextMenu.reg
- RemoveWindowsDefenderFromContextMenu.reg
The first one will add the needed Registry entries and, in case you change your mind, the second will undo those changes.
Make a mental note of where these files are located– you will need to know that a bit later.
One More Hurdle
As many of you are already aware, there are a lot of files and folders in the Windows operating system that require Administrator Rights to make any changes to said files and folders. The same is true in the Windows Registry structure. Unfortunately, some of the changes we need to make require these elevated privileges.
There are more than a couple of ways to accomplish this, but I will steer you in the direction I think is the least painful.
- First, you need to open a Command Box with Administrative Rights. Use the Windows Key + X to open the so-called Power Menu:
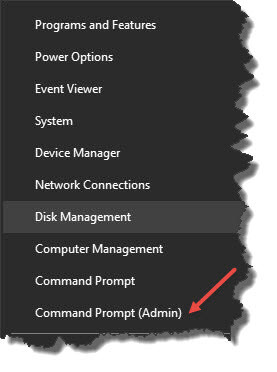
- Click the Command Prompt (Admin) option.
You should have a Command Box (with Admin Rights) open:
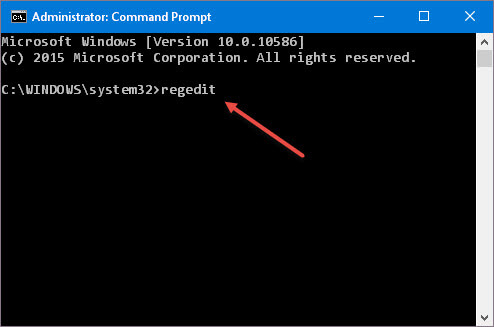
- Type regedit and hit the Enter key
The Windows Registry Editor should open:
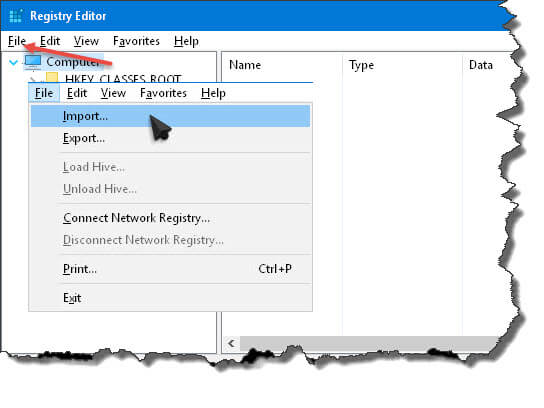
- Click the File Menu, then choose Import… from the Drop-Down Menu
This is why you had to remember where you put those files.
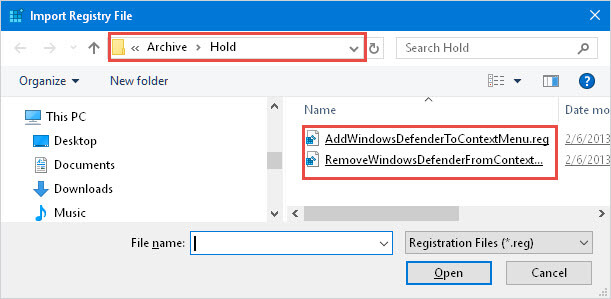
Use the Navigation Box to go to the directory where you extracted those files. When you get there, you should see them in the right pane as indicated.
- Click the file named AddWindowsDefenderToContextMenu.reg, to merge it with your Registry
- Click the file named RemoveWindowsDefenderFromContextMenu.reg, if your are reversing the above procedure
At this point, you will probably get a warning from Windows about ” Adding information can cause the Apocalypse”, or something along those lines.
If you have heeded my warnings about making a backup, then Click Yes, otherwise, please backup your Registry before proceeding. Probably, nothing will go wrong, but if it should, you will have a fail-safe to protect you. Registry backups don’t take that long so there’s really no excuse for not doing it.
And Done
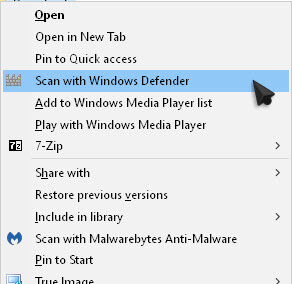
What’s right with this picture?
Unlike many Registry changes that require you to re-boot your system for the changes to take effect, that is not the case here. The effects are immediate and rewarding. Especially rewarding when considering all the monkey-business it took to get here.
There is one small disappointing downside to all this. Windows Defender will only show up if you Right-Click a folder. On my machine, at least, it won’t work on individual files. That’s not really much of a problem, though. All you have to do is put the file you want Defender to scan in a folder all by its lonesome and you’ve accomplished the task just the same.
If you’ve kept up with me through this arduous journey, then your are, indeed, a stalwart soul.
I can only hope you feel it was worth the effort. I know I do.
UPDATE: It has been brought to my attention that many seem to have Windows Defender in the Context Menu in Windows Version 1511 Build 10586.218, which is the version I am running.
I cannot explain the discrepancy.
Richard
—