

It is another week, and I get to teach you something new and helpful! Last week we covered how to stop Steam from stealing bandwidth. If you missed that, you can find it here:
How To Stop Steam From Stealing FPS
I’m going to jump over to a different subject this week. I’m going to teach you something about your Windows computer that should be helpful to you. What could you be teaching this week? Great question. We are going to teach you how to free up some space on your hard drive. I already know how to do that, Jason! Yes, but I’m going to show you how to clean out the hidden junk/temp files easily without using a program. Many times, those programs are filled with bloatware, but this is a process your computer can handle on its own. Sounds exciting, doesn’t it? Before I get this lesson started, make sure to check out these other articles I have written for everyone:
- How To Use Windows Focus Sessions
- How To Turn Off Scheduled Maintenance – Windows 11
- How To Copy And Paste Faster
- How To Stop AI on Instagram
- How To Use TikTok Accessibility Features
Time to pull out those Windows laptops and learn something new and useful.
How To Delete Hidden Junk Files In Windows
I will be showing you how to do this on a Windows 11 computer. What this will do for you is clear up some space on your hard drive.
Step 1: Turn on your Windows computer and look to the bottom left of the screen. Here you should see the search box.

Step 2: Type “Command Prompt” in the box, and it should bring up the Command Prompt app.
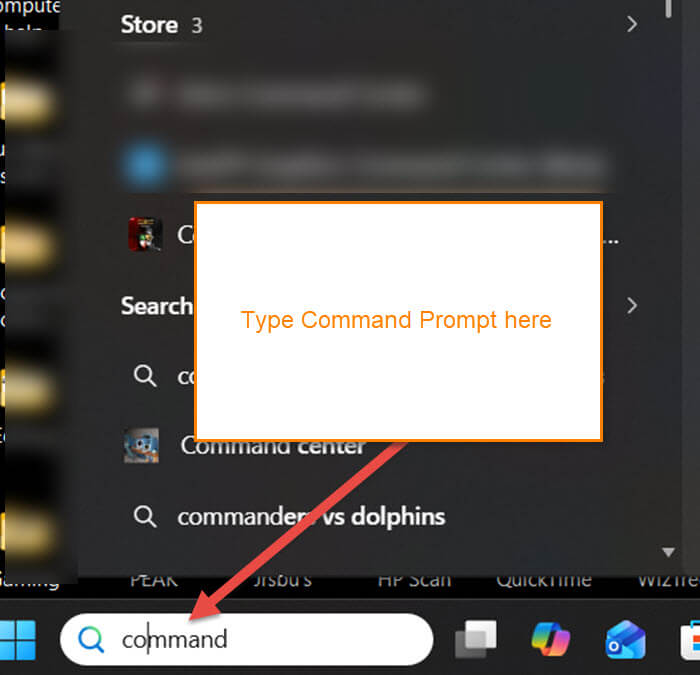
Step 3: Right-click on Command Prompt, which will give you a menu. From that menu, choose Run as Administrator at the top…
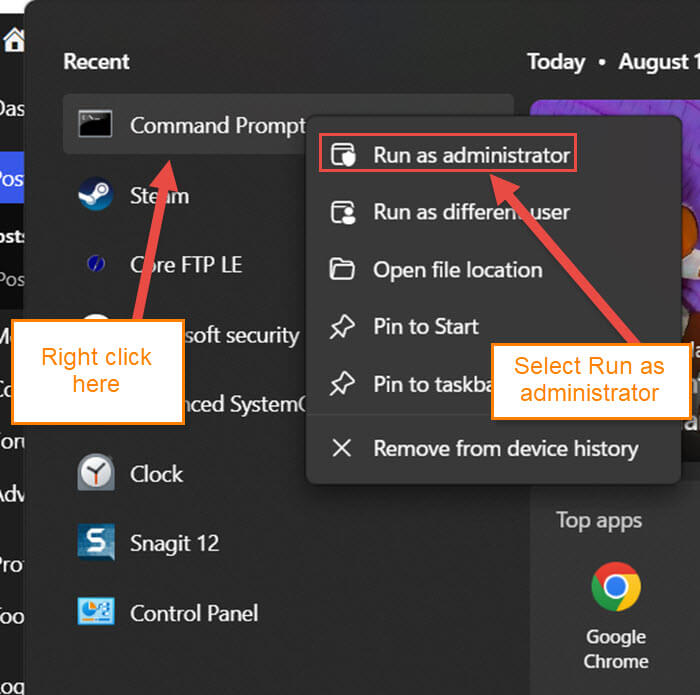
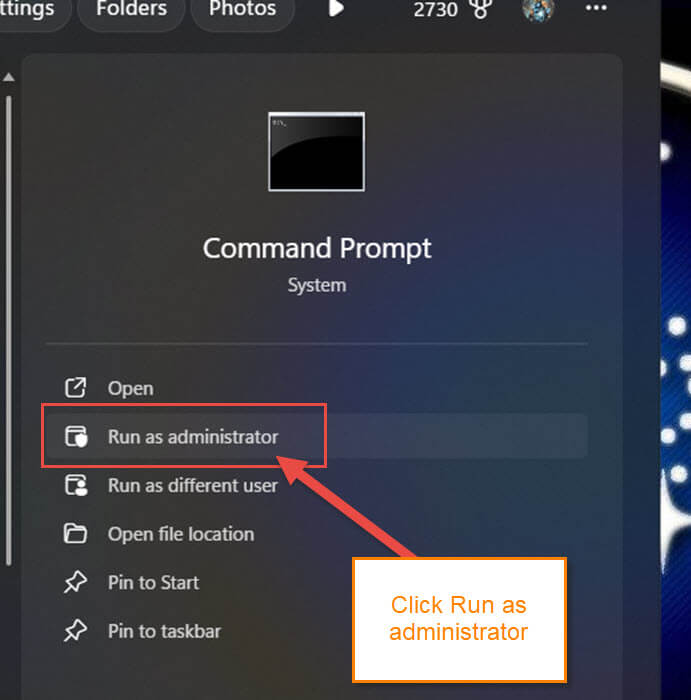
Or you will see Run as administrator to the right of the programs. It will give you a menu of choices like you saw right-clicking the Command Prompt icon. All you need to do now is click on Run as administrator.
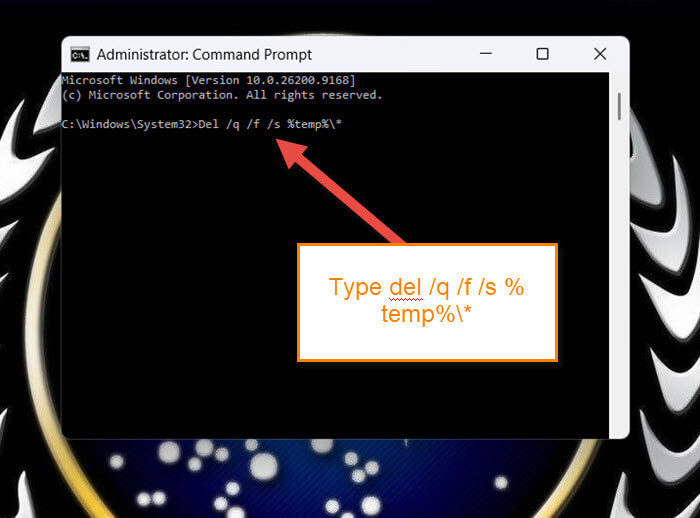
Step 4: Now the Command Prompt window will appear. You need to type Del /q /f /s %temp%\* next to C:\Windows\System32>. So it should look like this.
C:\Windows\System32>Del /q /f /s %temp%\*
After doing that, hit Enter on your keyboard.
Step 5: The system will run the command that deletes all files and subfolder contents inside your current user’s temporary (%temp%) folder.
del /q /f /s %temp%\*is a Windows command-line instruction that forcefully and quietly deletes all files and subfolder contents inside your current user’s temporary (%temp%) folder.
That is all you need to do. Done!
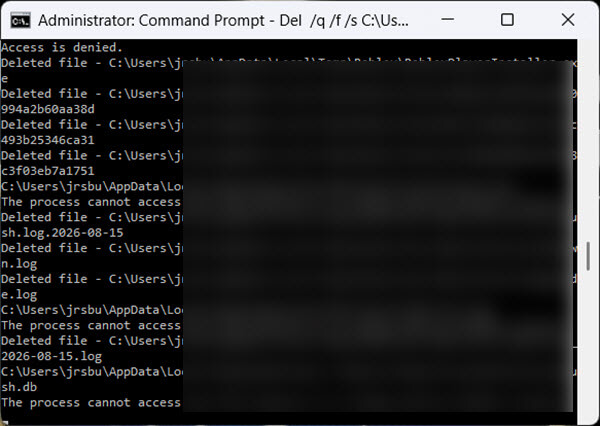
Now you know how to clean up those hidden junk files. Time to share your new knowledge with the world.
—

I am using Power Shell and had to run this command cmd /c “del /q /f /s C:\Windows\Temp\*” !!
Hello Jason. Do you get to see the junk files that are about to be deleted prior to deletion, and is this something that can be handled by PrivaZer, Mindblower!
Jason
You are missing the “s” in System (Sytem32 instead of System32). Windows won’t recognize that directory path.
Cheers
Reg
Fixed – Thanks Hawk-Eye! 😉
Well I tried really hard and worked very carefully with my ancient w10 laptop that is on its last legs, partly due to this very issue. Basically it’s full with stuff very hard now to delete for many reasons.
I have to be very careful about the number of keystrokes I use as the laptop has a limit these days. After which the cursor sticks some place I can’t see it and there be an end to proceedings.
I got all the way through to typing the command and all the way to the end of the command but discovered it no longer has a backslash [\].
Very unfortunate and I actually remember the day that backslash disappeared and what I went through to try to correct it. That was quite some years ago now.
Afterall a computer is just a machine that tries very hard to do what it’s told.
And even when it’s full to the brim it still tries to shuffle stuff around to make some space.
And the problem is usually the operator!
But try as I may to go back to fix the keyboard, nothing worked. It was the first of many (innumerable) fits it had before I said “well we’ve reached the end of the line with this machine.”
Oh well, it did try for me but with no internet connection for it, there is precious little help it can receive because my mind has gone past it’s peak and I am beginning to forget stuff.
Thanks for offering me the opportunity to attempt a partial fix.
The old laptop is full of precious photos I long to get off it. But they are stuck.
No worries I did try.
Cheers
Hi Clissa
If is only an issue with your laptop keyboard that isn’t working properly anymore you can just get a second hand or cheap USB keyboard and plug that in to the laptop USB port (as long as your laptop came with one). Then you should b able to type on that instead of the built-in keyboard. That will at least allow you to access your laptop and hopefully rescue your photos to save safely elsewhere.
Cheers
Reg
Oh that’s an interesting fix. Thanks for the idea, Reg.
The other thing I thought of was to just hand it to a computer mechanic to get the photos off.
But sometimes that’s fraught with danger because they don’t take any responsibility for losses.
If they are going to be lost Id rather be the one responsible for it.
But on the other hand a computer person knows a lot more than I do about failing machines.
Hi again Clissa
Yes pros and cons to weigh up ! The only data I really care about though is my photos and having them stored in more than one place for security. If your laptop is old and just about ready for a pension then I’d be thinking sooner rather than later to get them duplicated off the laptop and safely protected elsewhere – multiple copies of irreplaceable photos is cheap insurance. Even new hard drives, SSD drives and USB sticks can fail without warning and then recovering photos or any other important data from them after that can be very costly (if at all) as you may well need to pay for a proper recovery service.
Unless you are very confident in getting the photos properly backed up from the laptop (or you have a IT whiz of relative or friend) I’d be tempted to get a recommendation on a professional, reasonably-priced computer tech in your local area who will know what he/she is doing. If your Windows 10 operating system is in good health and it is just the keyboard issue you mentioned previously, it should be a relatively quick and easy job for any tech. If it were me I’d also be looking at uploading the photos to a secure and free cloud service like Google Photos or Microsoft One Drive etc (“free” depends on how many photos you have as they both have data limits) in addition to keeping them on another hard drive or SSD – as you can tell I am paranoid about losing my precious photos and better safe than sorry 🙂
Laptop plus external drive plus “Cloud” equals pretty good protection. Good luck !
Cheers
Reg
Typed the command exactly and when it executed, I got the message “Access denied” on every file. I did run it as Administrator.
Hi Reg,
I do have my photos backed up in multiple places but the catch is without a computer I can’t see them.
I have 90Gb of photos and yes some that can go now as they aren’t needed anymore. But still a mound of photos far more than for a cloud situation.
They are on another hard drive, an external hard drive, multiple sticks to that volume, and the old laptop.
But I haven’t been able to back up the latest round for a few months and I wanted to make sure I had everything since I moved here 3 yrs ago.
That’s when I stopped using a computer as this house doesn’t have an internet connection. And I can’t be bothered to get one.
Anyway sometimes when the planets line up Ivan get the old laptop to talk to other hardware for aback up.
But no way to confirm it was successful.
No worries I will do what I can.
I feel so sorry for the guy who got his command typed then the files said “no, not doing that today, or ever”.
Lol, I was waiting for that with my old one too.