

In last week’s lesson, we talked about how to Check Battery Health on your Windows 11 laptop. If you missed that one, you can find it here:
How To Check Battery Health In Windows 11
This week we are continuing our Windows 11 subject. ‘What are we learning this week, Jason?’ Always a great question! I’m going to go over some Windows Settings that can help with performance. As we all know, Microsoft loves to have certain settings turned on that no one really needs. Plus, these Default Settings can hurt our computers’ performance. Since I know a few Settings that could help when turned Off or On, I will share that knowledge with you. Before we start our lesson today, make sure to check out these other articles I have written for you:
- How To Cast Your Computer To TV Wirelessly
- How To Disconnect App From Facebook
- How To Fix Missing Thumbnail Images In Windows
- How To Delete Hidden Junk Files In Windows
- How To Stop Steam From Stealing FPS
Guess it is time to show how this will work.
How To Get Better Performance From Windows
This will be shown using my Windows 11 laptop.
Step 1: Turn on your Windows computer and sign in to your account.

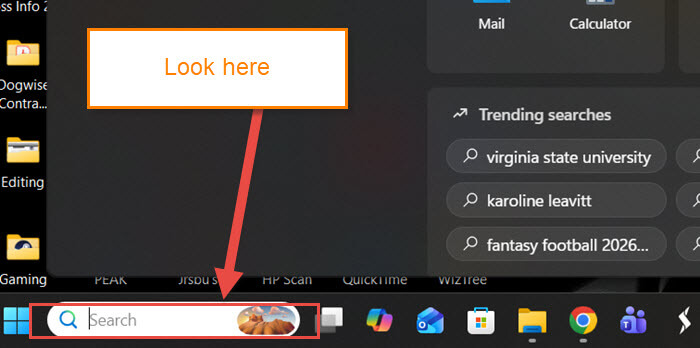
Step 2: Once on your Home Screen, look down to the Search Box.
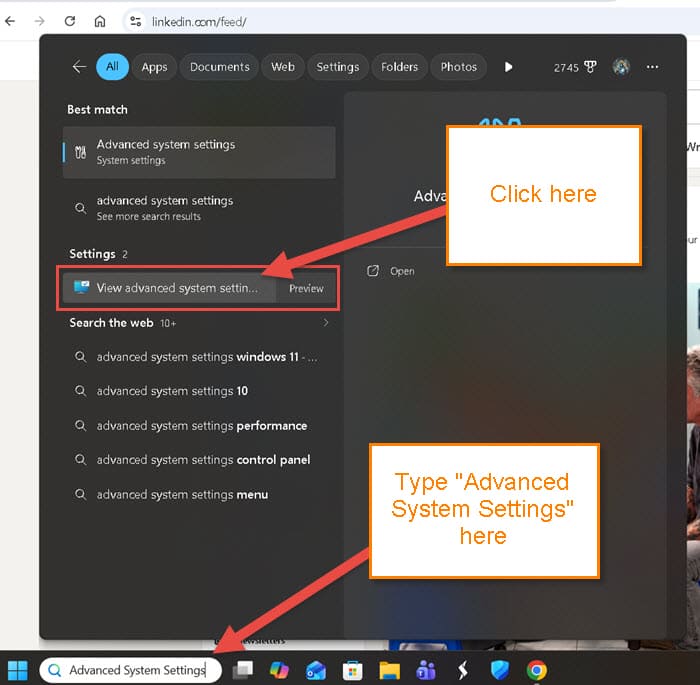
Step 3: You will need to type in “Advanced System Settings.” Click the one under the Settings title. It says View Advanced System Settings.
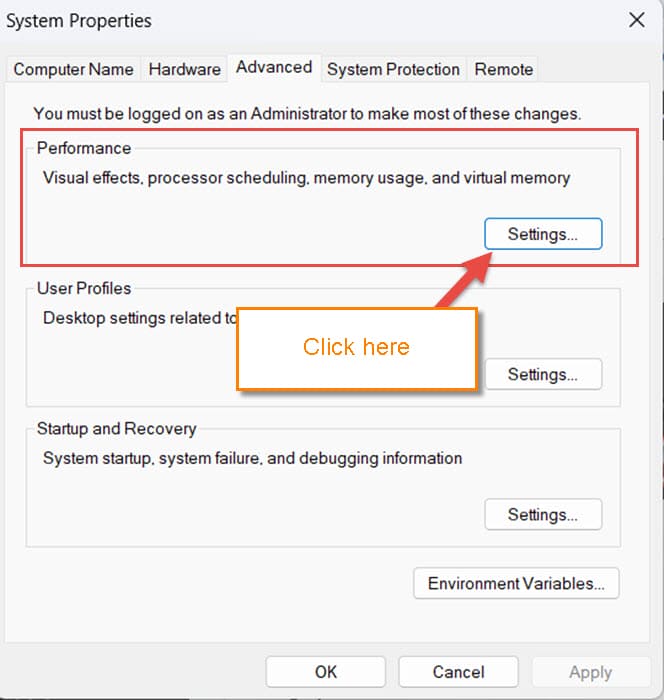
Step 4: This will bring up a window called System Properties. Make sure that you are on the Advanced tab. On that tab, you will see Performance.
Visual effects, processor scheduling, memory usage, and virtual memory
Click the Settings button next to that.
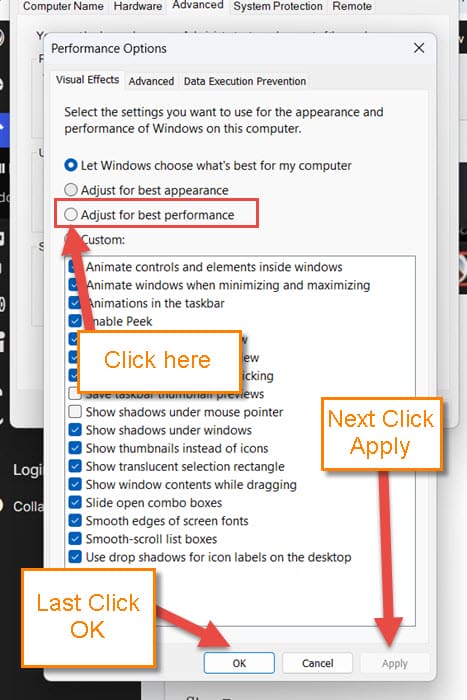
Step 5: The Performance Options will appear showing Visual Effects. That is the tab you should be on.
Select the settings you want to use for the appearance and performance of Windows on this computer.
Under that, you are given a few choices:
- Let Windows choose what’s best for my computer
- Adjust for best appearance
- Adjust for best performance
- Custom
We will want to click on the circle next to Adjust for best performance. After you have selected it, look to the bottom and click Apply. Then all you have to do is click OK.
Step 6: Next, go back down to the Search Box and type Visual effects. Click that option when it appears.
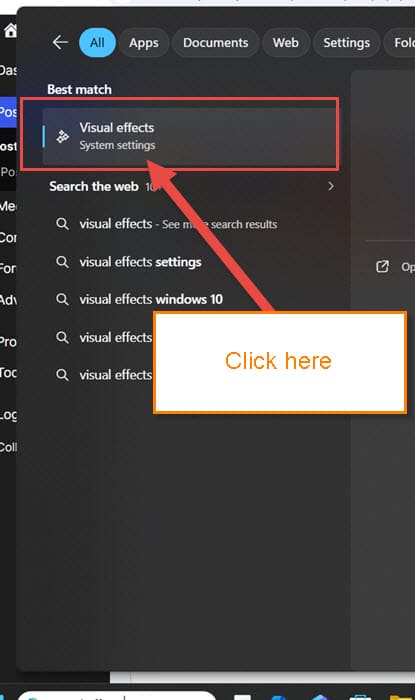
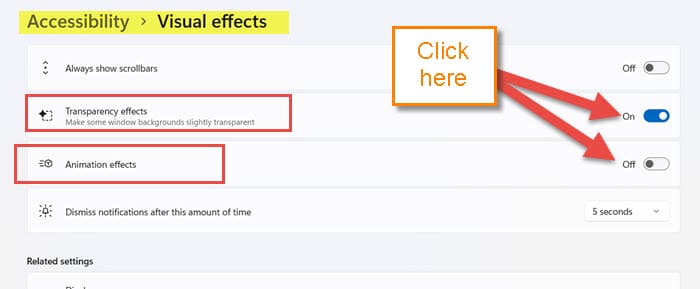
Step 7: Here, under the Visual effects your have two choices:
- Transparency effects
- Animation effects
There is a switch to the right of these two options. Click those switches to disable them. You will notice that the Animation effects are already disabled. That is because you already took care of that in the last step!
Step 8: Now that we are done with that one, look to the top search bar. Type in Graphics Settings and hit Enter.

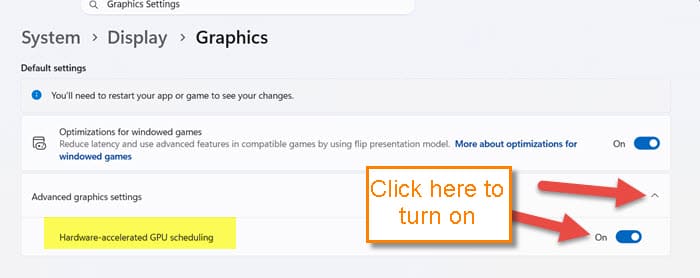
Step 9: On this screen, look at the Advanced Graphics settings in the top section. Click on the down arrow to the right of it. You might be wondering what this option does for your system.
The GPU takes direct control of its own memory management and task scheduling instead of relying on the OS kernel/CPU to queue and coordinate every step. The result is lower CPU overhead, reduced latency, and smoother performance. (GMIcloud)
All you need to do is click the switch to the right of this option to enable this setting. DONE!
These adjustments can help your system run a little smoother. Which, in turn, will help with the performance of your system. Time to share all your new knowledge with the world.
—

A tool I’ve found helpful for intensive tasks constrained by available RAM, such as processing hundreds of books at a time in Calibre, is Wagnardsoft’s Intelligent standby list cleaner (ISLC). Though intended to make game-playing smoother, I’ve found that it allows some other tasks to complete more quickly (or at all!) on Windows.
Since it’s free and needs no installation, it’s worth a test for specific jobs that have issues.
Thanks Adelaide
That makes a lot of sense. When you throw thousands of small files at Calibre Windows goes overboard caching every single book into RAM. Then it gets stubborn and runs out of memory then starts dumping stuff onto your hard drive which can make your system crawl crawl especially if you have a less powerful system. By dumping that cached RAM before it fills up, ISLC stops Windows from tripping over itself. Great workaround for a non-gaming task that the software was originally designed to fix. I’m definitely filing that one away for when I need to do something similar !
Cheers
Reg
When I got to the Advanced graphics settings, it was already turned on. Is there any particular reason that would be, and I’m asking because I don’t recall ever turning that on or off.
(with apologies to Jason for jumping in here)
Nicke, this feature is enabled (turned on) by default for modern GPU’s that support HAGS (hardware accelerated GPU scheduling). So, it has been enabled automatically, without any need for input from yourself.
Thank you for clarifying that, Jim. Appreciated!