
Defragmentation and Trim are both methods to optimize a drive; the former is used to optimize HDDs and the latter to optimize SSDs.
Windows includes a feature that automatically optimizes drives; the feature is enabled and set to weekly optimization by default. Windows identifies each drive type and applies the correct form of optimization process accordingly – defragmentation for HDDs and Trim for SSDs.
What Is Trim
There has been a lot written about how Trim works, much of which is quite technical. What follows then is a simplified explanation in layman’s terms.
Most of you will be aware that when you delete a file, it is not actually removed from the drive, but rather the space it occupied is marked as free to use. However, there is an important difference between the way in which HDDs and SSDs handle this situation.
SSDs cannot simply overwrite existing data in the way an HDD can. Instead, any invalid (unused) data needs to be erased. The Trim command tells the SSD what specific areas contain data that is no longer in use and can be removed. The next time the computer is idle, Active Garbage Collection will then delete that data.
What Is Garbage Collection
Garbage collection is a mechanism common to all SSDs that works in conjunction with Trim. Trim first identifies unused data, and Garbage Collection then clears out that unused data.
In order to clear unused data, any valid data within those blocks must first be written to a new block, and then both valid data (still in use) and invalid data (unused) can be cleared from the original blocks, thereby freeing up those blocks for rewrites.
If the drive were not to go through this process of moving valid data so that invalid data can be deleted and, instead, just keep writing new data to new blocks, the drive would eventually (and comparatively quickly) fill up with data.
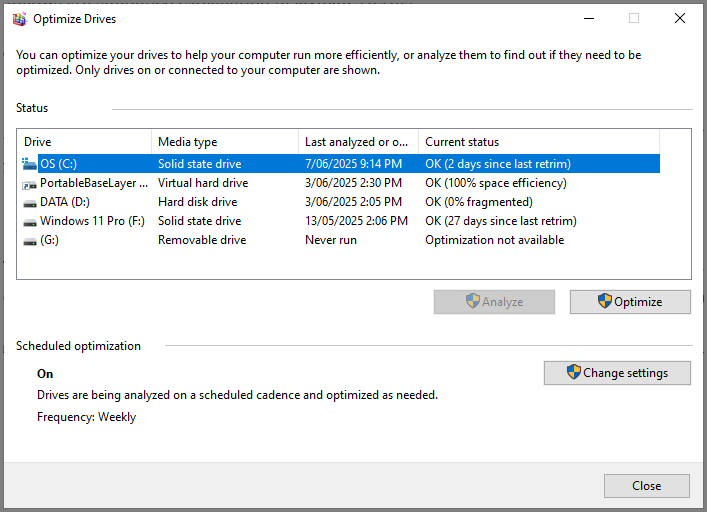
How To Check Drive Optimization Status
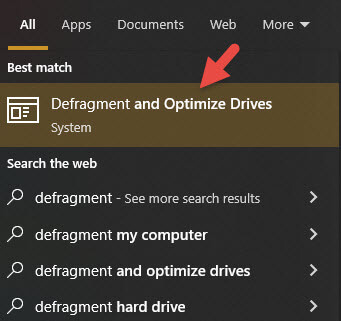
Drive optimization plays an important role in maintaining an overall responsive system. To make sure automatic drive optimization is enabled on your system, open the Start menu and type defragment, then click on the top result:
—
Thank you Jim for the easy to read explanation (as always). I prefer to keep the Trim in the Off position and do the task manually every month. Not sure if the automatic process can interfere with something else the computer is doing, Mindblower!
Hey MB,
Automatic optimization should only ever activate when the system is idle. It’s set that way specifically so it won’t interfere with other activities.
Thanks Jim. Switch On, Mindblower!
I have 2 old SS drives, but defrag doesn’t recognize them as such, so they are not trimmed. defragmentation thinks they are regular hard drives. Can this situation be fixed?
Hey Jack,
So, in the “Optimize Drives” window they are listed as “Hard disk drives”?
What brand of SSD are they?
Crucial
Jim, All was well until I checked the optimization status of my drives.
I have one external drive that reports “Optimization not available…”. If I open the properties of the drive and try to “Optimize” it under the Tools tab I get the following;
“The Disk Defragmenter is not installed on your computer. To install it, double-click the Add or Remove Programs icon in Control Panel, click the Install/Uninstall tab, and then follow the instructions on your screen.” The instructions don’t make sense, I can uninstall any program, but I cannot install “Disk Defragmenter”. I didn’t find a way on the Microsoft site to install it either.
A check of my other drives where I try to “Optimize” any of them under the Tools tab, results in the same error message that “Disk Defragmenter is not installed”. Yet, they as OK in the Optimize Drive window.
Hey Tom,
This feature is built-in to Windows and, as such, does not require a separate install. Check to make sure the following services are set correctly:
Optimize drives: set to Manual and then start the service
DCOM Server Process Launcher: should be set to Automatic and running
RPC Endpoint Mapper: should be set to Automatic and running
If that doesn’t fix the issue, check for corrupt system files:
Open an elevated Command Prompt (admin), type in sfc /scannow and then hit Enter.
There is one more step you can try but I’d rather you try the above first.
Jim,
Optimize drives: was set to Manual, I started it.
DCOM Server Process Launcher and RPC Endpoint Mapper were both set to Automatic and running.
I ran “sfc /scannow” and it came back 100% complete with “Windows Resource Protection did not find any integrity violations.”
I ran “Optimize Drives” again and got the same result. I do not know how to send you a screen clip, so I put it online for you to view at
https://drive.google.com/file/d/17RkRrL92nLcFfugvZRjQcj5CYVy0TKLJ/view?usp=sharing
The message that “Disk Defragmenter is not installed” is likely a false alarm. Disk defragmenter is an integral part of Windows and doesn’t need to be installed. The fact that all drives (except for “I”) are obviously being optimized, as per your screenshot, would also indicate that everything is working as it should.
The message associated with drive “I” typically indicates that there is a problem either with that drive’s file system or the drive itself. It could mean that the drive is failing.
Can you access data on that drive? If so, I strongly suggest you transfer all that data to a new drive asap. If not, and you have any really important data stored on that drive, I suggest you take it to an expert first to see if that data can be extracted.
You could try running a chkdsk but, if the drive has damaged sectors you do run the risk of losing access to data on that drive.
You can either run chkdsk by clicking the “Check” button in that drive’s “Properties” window or from an elevated Command Prompt (admin): chkdsk I: /f /r
NOTE: The specific drive letter following “chkdsk[space]”
Jim,
Continuing on. I backed up the contents of the “I” drive to another external drive. Selecting the Properties for the “I” drive, I ran Error checking which came back “Windows successfully scanned the drive. No errors were found.” When I tried to run “Optimize and defragment drive”, I go that same error as before “Optimization not available…”
I then shutdown and removed all the external drives on my computer so I could determine which drive was causing the trouble. The “I” drive is a SEAGATE “Backup Plus Slim” , Model SRDOVN2 rated at 931 GB.
After reinstalling the external drives, I formatted the “I” drive. Checking again, the “I” drive has the exact same error, “Optimization not available…”
Well, the drive appears to be OK except Windows cannot optimize it. Could it be something in this model?
The drive is about 2 years old and has worked fine that whole time. The data on the drive is not critical. I guess I will continue to use it.
That is all pretty weird Tom. The good news is that data drives rarely need optimizing (defragmenting) anyway. System drives, where programs are being installed and uninstalled and files are continually being written and deleted are far more susceptible to data fragmentation.
No, there is nothing specific to that particular model drive that would indicate it cannot be optimized.
It’s entirely up to you, of course, but as a precaution I would be running a surface scan to see how many bad sectors are on that Seagate external drive. I recommend Macrorit Disk Scanner, it’s free and portable: https://macrorit.com/disk-surface-test/disk-surface-test.html#compare
Run the scanner and select the Seagate external drive, then click the “Scan Now” button. The scan is presented as a graphical display with individual sectors turning Green if okay and Red if not okay. The scan will take quite some time to complete but, if you’re trusting data to that drive, it might be worth the effort.
Jim,
Thanks for the link to MACRORIT Disk Scanner. I ran it and tested both SEAGATE external drives I have. Both came up “healthy” for all sectors.
So, I am not going to worry how one drive behaves likes it is not normal with Optimize Drives and continue to use it.
Thanks for your help. I am open to any other suggestions you might have.
No more suggestions Tom. Considering the drive has passed the surface scan test it should be fine.
Windows does tend to come up with these strange anomalies from time to time. 🙂
Jim, I’m getting in late on this one. As you say, Trim is set to do its things once a week. Do you suggest leaving it there or are there times you would suggest setting it to Daily?
Hey Nicke,
No, I wouldn’t recommend setting drive optimization to daily, once a week is more than adequate for most. In fact, light uses (those who only use the PC once in a while to check email, etc.) could set it to monthly.
Optimization becomes necessary when users perform a lot of installing and uninstalling software and/or are consistently saving and deleting files.
Good! Thank you for the advice Jim!