Welcome back to Amazon training 101. That is what I have decided to call these Amazon How-To articles. Here are a few of them for your reading enjoyment:
- How To Create And Share An Amazon List
- How To Change Amazon Wish List Address
- How To Create Amazon Order History Report
- How To Change Email Preferences On Amazon
- How To Clear Your Browsing History
- How To Set Up, Change Your Amazon Video Pin
Recently, a reader of ours asked a question. The question was about how you could edit/delete lists that you have created. This question came up on one of my how-to videos called, “How To Create And Share An Amazon List.” In that one, I covered how you can create the list and share it with others but not how you can edit or delete them altogether. Since they asked, I decided to share this knowledge with all of you. There will be a video on this soon after this article is released. Some of us need a visual and that is what I do. Time to get this training session underway.
How To Edit Your Amazon Wish Lists
We will be showing you how to do this on my Windows Laptop on the Amazon.com website.
Step 1: Head over to Amazon.com and sign in to your account.
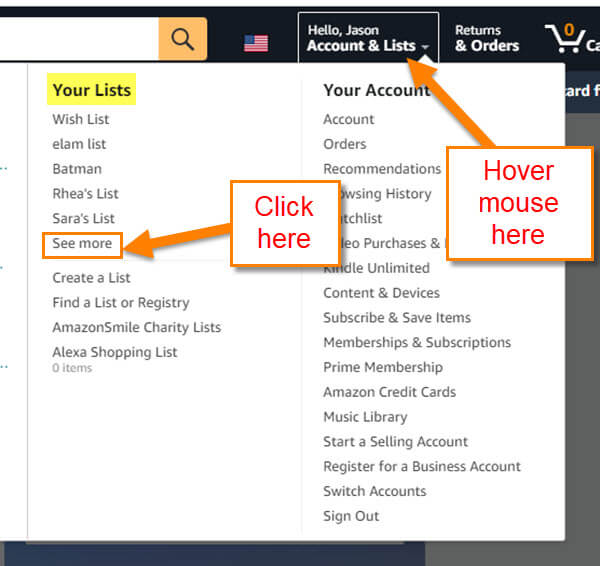
Step 2: Once you are signed in, look to the top right and hover your mouse over the Hello (Name here) Account & Lists option. A menu will appear and look under the Your Lists section. Choose the list you want to edit. If you do not see it here, click on the See More link. We will use the see more link for this article.
Step 3: Here is where the lists you have created reside. Look to the list menu on the left. Choose the one you wish to edit. Click it.
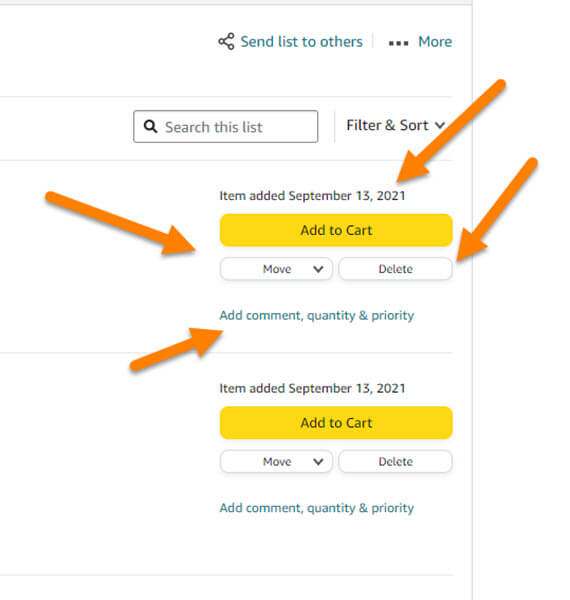
Step 4: Now that we are on the list, these are some things you can do to manage it. Let us start with editing an item. Here are the options you have to edit the item:
- Move (move an item to another list)
- Delete (trash it)
- Add to cart (buy it)
- Add comment, quantity & priority
Let’s show you the two that I think need to be explained in more detail: Move and Add comment, quantity & priority.
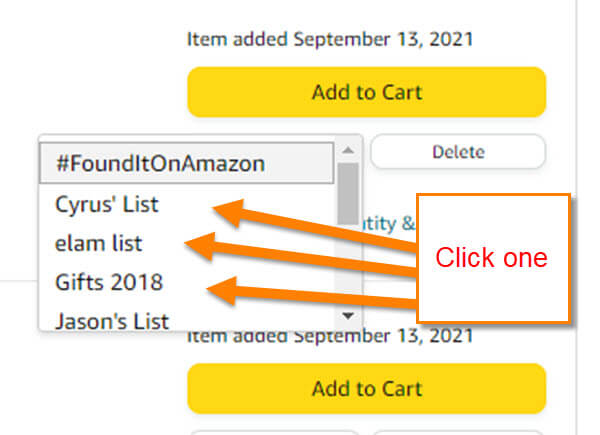
Step 4.1: Once you click Move, a menu of all the other lists will appear. Choose the one you wish to move the item to. Done…
Step 4.2: Now click on the Add Comment, quantity & priority option. You will get a window where you can add a comment. Then you can set the priority this item is to you. Click the arrow and you can make it Highest Priority to lowest. Next to that, you can say how many you need 1, 2, or even 100. Then the last choice tells them how many you already have (if it was already bought for you or you already have). That way, they know how many more you need. After you are finished, click the Save button.
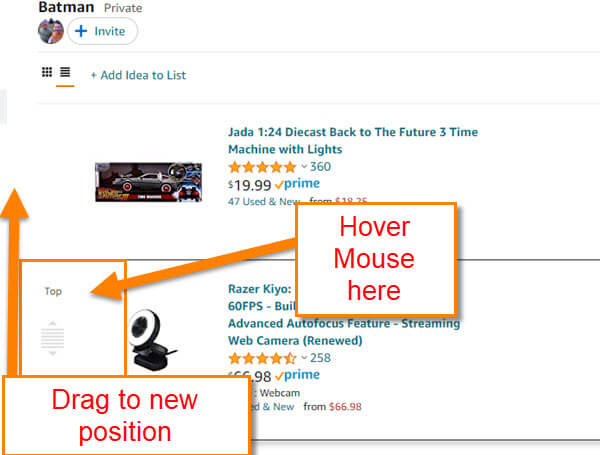
Step 5: The next thing you can do is change the order of the items on your list. You can do this by hovering your mouse on the left side of the item you want to move. Hold down your left mouse button to drag the item up and down the list.
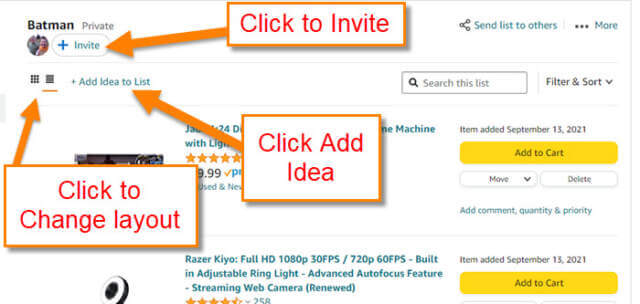
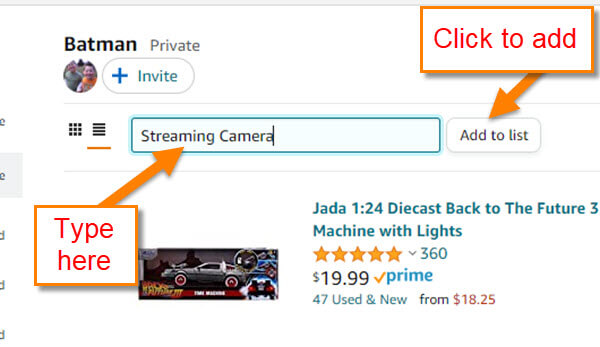
Step 6: Another couple of options you have are to invite people to your list, change layout of the list and Add idea to list. To invite, click the Invite option at the top, then follow the directions. To change the layout, click the icons at the top left of the list under the list name. This will change it to either list layout out or box layout. Then, to Add Idea to list, click the link at the top. Type the idea you have in the Edit Box like Streaming camera and click the Add to list button, This will not have an image since it is an idea that is added and not the item itself. A great way to add to the list if you have not found the item yet.
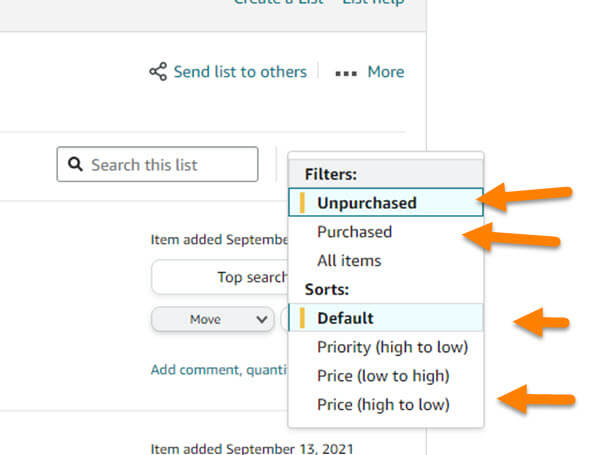
Step 7: You can also filter the list by looking to the top right of this list and click on the Filters option. Here, they let you sort by Price, Priority, Purchased, Unpurchased, and All items. Choose one.
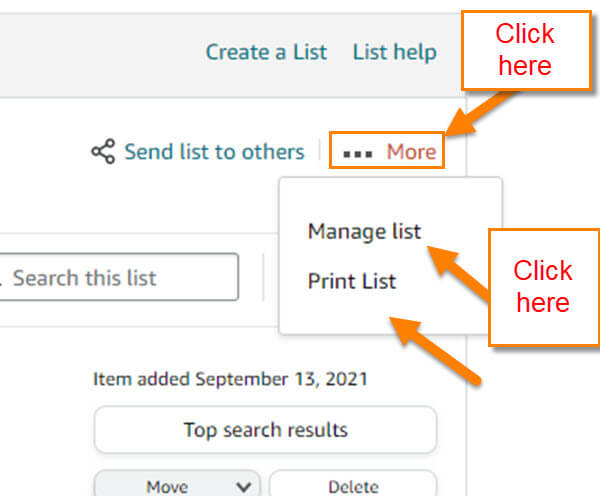
Step 8: This step is the big one since it will also let you delete the whole list altogether. Look to the top and click or hover the More option. Here you can print the list which is nice but we want to click the Manage List. Click it.
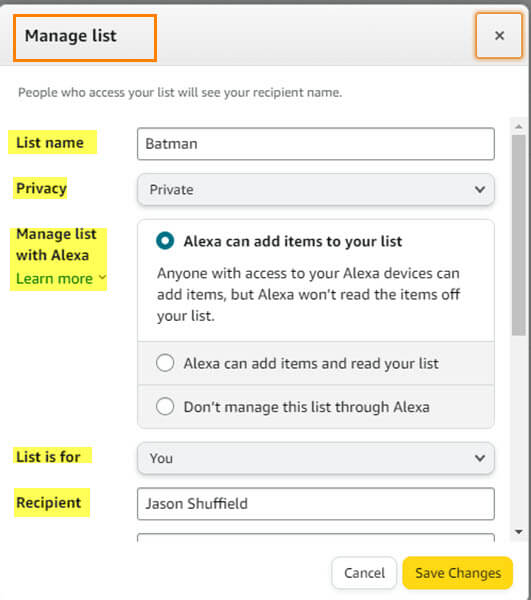
Step 9: In this window which you will remember from my other article, How To Change Amazon Wish List Address, the options they give you here go like this:
- List name (here you can change the name of your list)
- Privacy (here you can change your list from Private, Public or Shared), Click the down arrow
- Manage List with Alexa (make the right choice)
- Lis is for (you or an organization)
- Recipient (who this list is made for)
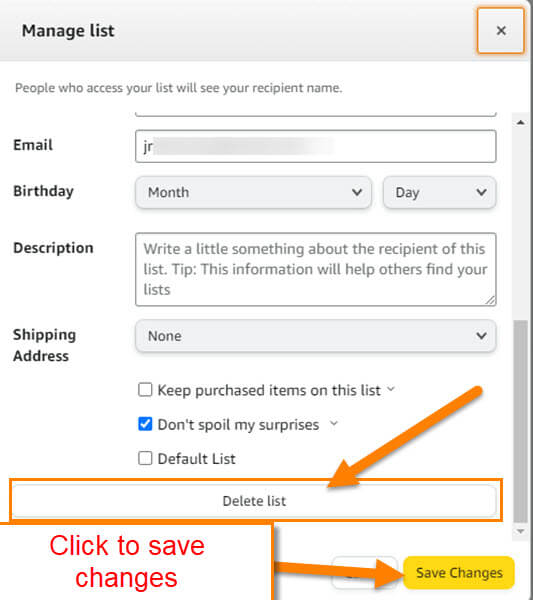
- Email (always important to have)
- Birthday (I never add this)
- Description (type whatever you like here)
- Shipping Address (where do you want the items shipped. Click the down arrow and all your addresses will appear.)
- The option for Third-Party shippers is important. (Read it.)
- Now for the big option, Delete list
The two on here that I think need more detail are the Address and the Delete options. Scroll down to the address part.
The address can be tricky since after you choose an address from the drop-down list, you get some options. After choosing the address, you will be given a choice to allow third-party shipping. Here is what that actually means:
At Amazon, third-party sellers (i.e., sellers other than Amazon) offer many items. If you instruct Amazon to share your List shipping address with these third-party sellers, then customers can purchase items for you off your Wish Lists that are sold by these sellers and have them automatically sent to your confidential Wish List shipping address.
If you choose to enable this feature, you acknowledge that Amazon will provide the seller of your item with your Wish List shipping address, and the seller may disclose this address to the buyer (for example, when sending the buyer a purchase confirmation). Further, because an item may often be purchased from more than one seller, the sellers offering the item at the time of purchase may be different than the sellers offering the item when you placed the item on your Wish List. Also note that returns to third-party sellers will be refunded to the gift purchaser only at this time.
The other ones are Keep purchased items on this list, and Don’t spoil my surprise. Pick the one that works for your list. I like the Don’t spoil the surprises myself.
Once you have that all done, you can click the Save Changes button at the bottom right. But before we end this article, I want to make sure you know where that Delete list option is. Yep, right at the bottom of this window. If you want to delete the entire list click this button. Done!
If you want more detail on the Manage List section, then check out the article, How To Change Amazon Wish List Address. This will go over it in a little more detail. Now you know how to edit and delete those Amazon lists you have been saving. Time to share your knowledge and go edit those lists.
—






Thanks. Not sure if you’re monitoring this months later, but is there a way to change the list-icon? In your example, this would be the picture associated with the batman list.