We all like to search on Amazon throughout the day for items, looking for that gift for a friend or yourself. All of us are guilty of this, even me. You might have even saved some of these items to your Wish List hoping that one day you could buy it. Now, some of you might be wondering, “What is a Wish List?”
This is a list you can create on Amazon to save all those items you want and is a great way of keeping track of the cool items you found. You might already have a list set up, but did you know you can create your own personal lists? Yep, you can name it and share it with others to give them ideas on what they can buy you. Either way, I’m going to show you how you can create and share your own Lists through Amazon. Before I get started on all the steps, make sure to check out a few of my articles about this same website:
- How To Create Amazon Order History Report
- How To Change Email Preferences On Amazon
- How To Clear Your Browsing History
- How To Set Up, Change Your Amazon Video Pin
I have many more articles about Amazon but this will get you started. Now it’s time to show you the steps toward creating and sharing those lists.
Create And Share An Amazon List
Step 1: Go to Amazon.com and sign in to your account.
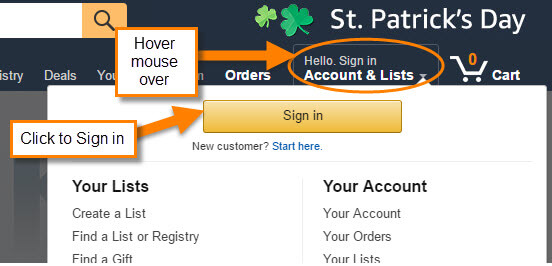
Step 2: Once you have signed into your account go to the Hello, (Name) at the top right. Hover your mouse there and a menu will appear. From this menu, you will need to look under the Your Account section and click on the Your Lists link. There are other ways to get to the next steps like clicking on Wish List on the right of this menu but we are going this way to make it more simple.
SIDE NOTE: You can cheat and click on the Create a List link on the left side now. If you do this, head to Step 4.
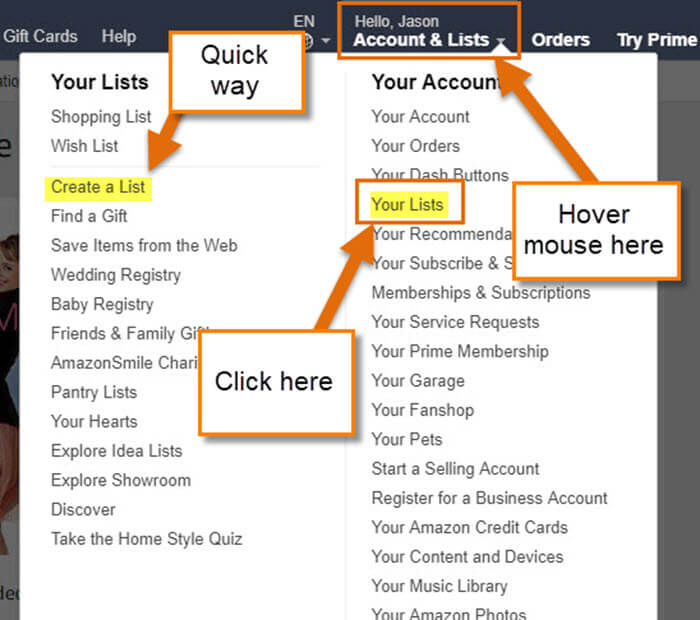
Step 3: Now that we are on the Your List screen we need to find the Create a List link. The Create a List link is at the top, right next to List Help. Click it.

You might see this screen if you do not have a list already set up. You will only have to click the Create a List button in the middle of the screen.

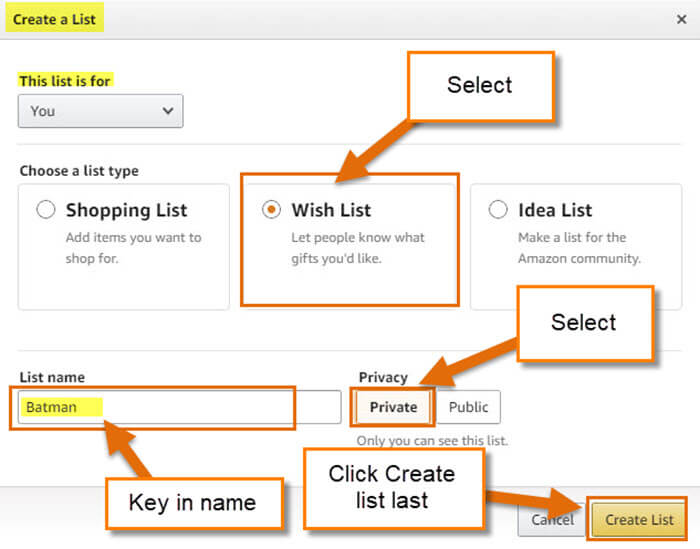
Step 4: In the Create a List window you have three options to choose from:
- Shopping List
- Wish List
- Idea List
For this article, we are going to choose Wish List. At the top, you will notice a This List is for option. We are keeping it set to You. You can make a list for someone else but I’m not going into that. Now, for the next thing– name your List because they give you the default name which is Wish List and no one wants that as the name for their list and we need to be more creative. I’m calling this list Batman because I can. Now you will need to select either Private or Public to the right of the list name. After that, all you need to do is click the Create List button at the bottom.
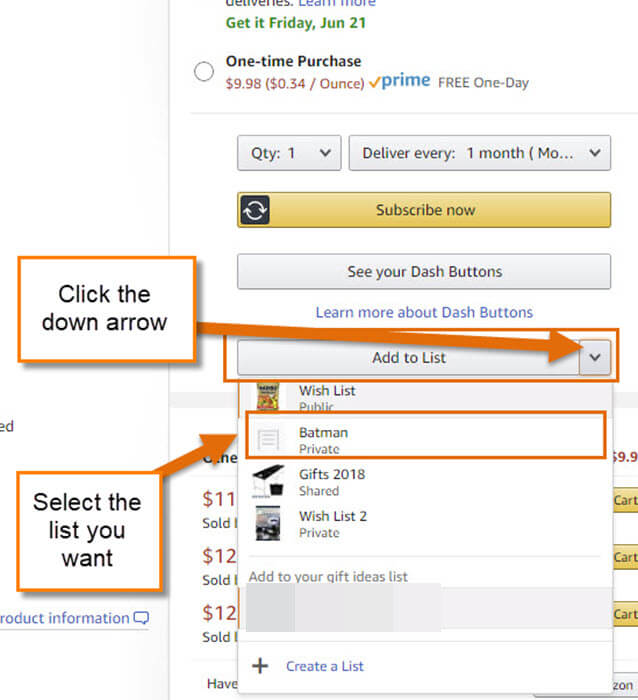
Step 5: Now that your list is created we need to start adding items to it. This is really easy so I will give you a quick guide to doing it. Find an item you like on Amazon. Once on the product page, look to the far right and under the Buy Now or Add to Cart or Subscribe buttons. You should see Add to List. Click the down-arrow next to that and the selection of lists will appear if you have more than one. Choose the Batman list or whatever cool name you called it. Done. Now search around and add as many items as you want.
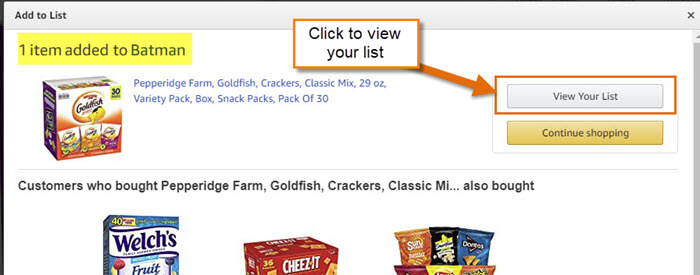
Every time you add an item to your list you will see this window. In this window, you can click View Your List to see all that you have added to it.
That is how you create and add to the list in your account. It’s time to show you how you can share this with your friends and family.
How To Share Your List
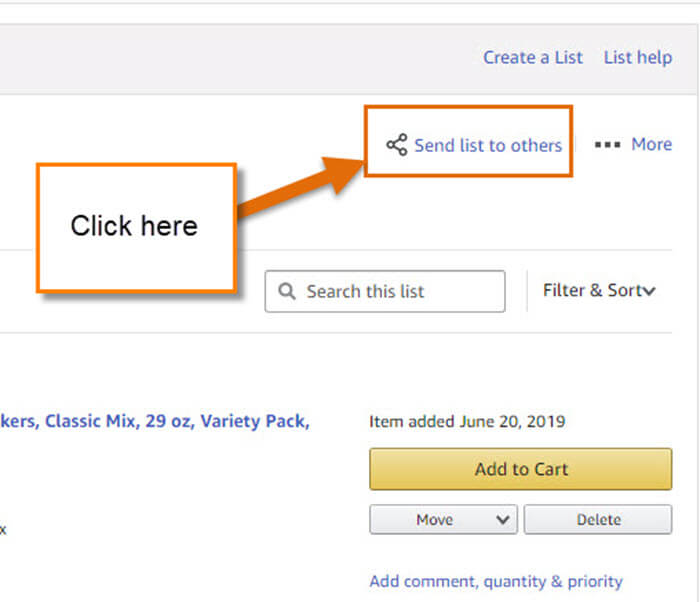
Step 1: Head back to Your Lists as I showed you in Step 1. Once there, make sure to select the list you wish to share from the left menu. After choosing your list, look to the top right and click the link Send list to others.
Step 2: Here you can say if the person can View Only or View and Edit the list. I’m choosing View Only for this article.
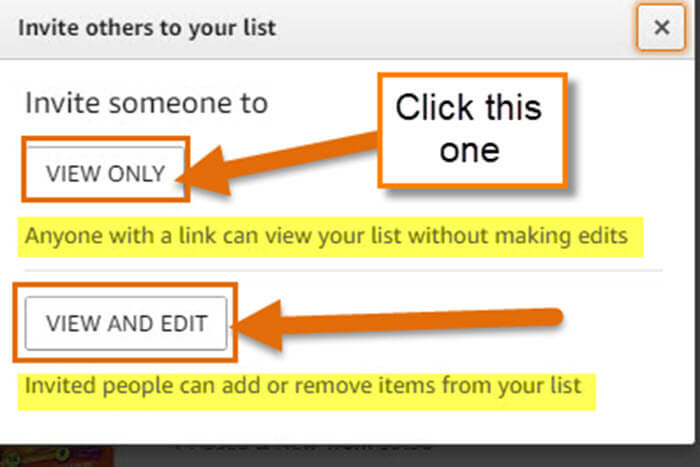
Step 3: After selecting the View Only option some choices will appear below. You can either choose Copy link and send it to them that way or Invite by email. Done!

Now you know how to create a new list and share it with the people who can never figure out what to buy you.
Here Is A Short Video Demonstrating The Process
To watch more How-To videos like this one, check out our Dave’s Computer Tips YouTube Channel. We’ll be adding more videos in the future.
—