 Domain Name Servers (DNS)

In a previous article, Faster DNS – Improve Online Experience, we discussed improving your internet experience by customizing your computer’s DNS settings. But did you know you can do the same with your Android mobile devices?
Android, of course, is the open source operating system owned by Google. Since Android is a Google product, as you might expect, Google’s own DNS servers are programmed into the Wi-Fi DNS settings. That means that anytime your Android phone is connected to Wi-Fi and you access the Internet via the Web browser on your phone, it uses Google’s DNS servers to locate the site you want to visit.
Personally, I feel that I already share enough of my personal information with Google. They know my email addresses, my phone numbers, what I search for on the Web, who my contacts are, who I call, how long I talk, and even where I travel with my Android phone. They know more about my day to day activities than anyone!
My mobile phone is connected to Wi-Fi more than it’s not. Call me paranoid, but I don’t want Google collecting all of my mobile phone Web searches and Web site visits and adding that information to my Google profile. A little privacy, please! I just don’t want Google owning me in that respect. Plus, in my case, there are faster DNS servers to choose from.
When I benchmark available DNS servers, Google’s servers rank somewhere in the middle of the pack, so I now have both speed and privacy as motivating factors encouraging me to change the DNS settings in my Android mobile phone.
Changing the Default DNS
The following instructions for changing DNS server settings only apply to Wi-Fi connections. In most cases, you cannot change the DNS settings of your cellular service provider. Android does not provide user access to mobile data DNS settings. With root access, however, it may be a different story, and something for more advanced users to toy with.
There are apps in the Google Play store that claim to change DNS without root, but I don’t trust any of them. I reviewed a couple of DNS apps that look like they are on the up and up. For this article, though, I will only be concerned with Wi-Fi DNS.
If you don’t have any preferences for Google’s default DNS, you might consider using OpenDNS, the world’s leading DNS service. Their servers are reasonably fast and offer family friendly features you simply won’t get from Google or your ISP.
If, for whatever the reason, you wish to change the DNS settings in your Android device or mobile phone, this is how it’s done:
1. Navigate to the Wi-Fi settings in your Android device or mobile phone. You would typically get there from the Settings menu. However, on some Android phones, you can tap and hold the Wi-Fi icon showing in the notification area at the top of the screen to directly open Wi-Fi settings.

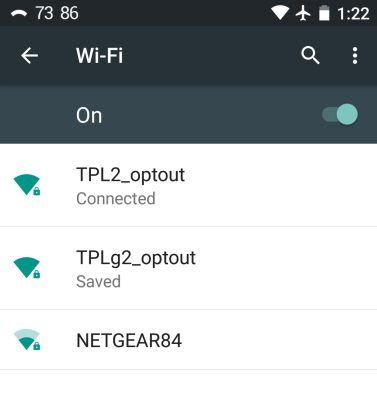
2. From the WiFi network list, tap and hold the desired Wi-Fi network. From the resulting menu, select “Modify network” or similar option that appears in the resulting menu.

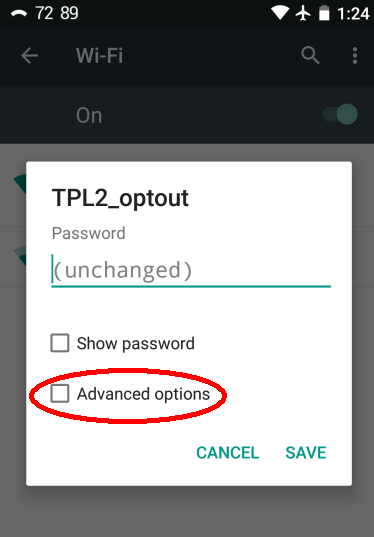
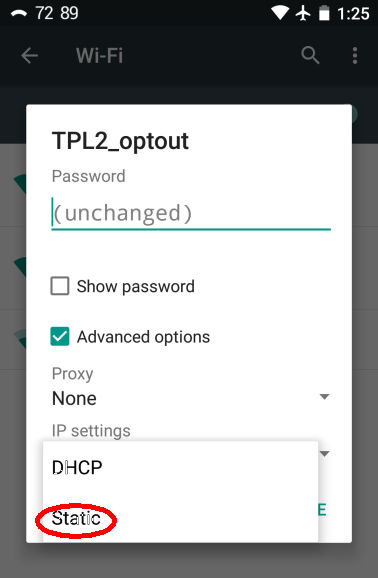
3. Next, tap to select the “Advanced options” check box. This will show the IP settings option. Tap this to get a menu that offers DHCP or Static.
4. Select the “Static” option from the IP settings drop-down list. Enter a static IP address for your phone. I recommend using an IP address on the high end of your router’s DHCP range.
Note: Dynamic Host Configuration Protocol (DHCP) is the process your router uses to dynamically assign Internet Protocol (IP) addresses to each connected device. Dynamic IP’s are subject to change. Setting a Static IP means your phone will always have that same IP address when it connects to the router. For that reason, you should set a static IP higher than the number of devices you expect to connect to your Wi-Fi router at any given time, but within the router’s set DHCP range. If your phone is not connected, another device may be dynamically assigned the same IP address as your phone, in which case your phone may not connect. An IP address can only be used by one device at a time.
5. Now, you can enter your desired DNS settings in the fields labeled DNS 1 and DNS 2.

On most Android phones, the default IP address is likely to be Google’s own name servers. If you don’t mind resolving all Web destinations through Google’s DNS, helping them build a detailed profile of your interests, good, bad or otherwise, then you can leave it that way. In some cases, your cellular provider may have set their own name servers as the default.
If you don’t already know what name servers are the fastest for you, you might want to refer to my earlier article, Faster DNS – Improve Online Experience . If you travel broadly and often, it may be best to use the popular OpenDNS or Google Public DNS servers. While OpenDNS is great for cached domain look-ups, they’re not as fast for non-cached look-ups, from what I’ve seen.
Some DNS Addresses to Get You Started
OpenDNS:
Preferred DNS server: 208.67.222.222
Alternate DNS server: 208.67.222.220
Alternate DNS server: 208.67.220.220
Alternate DNS server: 208.67.222.123
Alternate DNS server: 208.67.220.123
Google’s Public DNS:
Preferred DNS server: 8.8.8.8
Alternate DNS server: 8.8.4.4
6. Tap Save to complete the changes to your phone’s DNS settings and it will immediately start using you new DNS addresses.
Summary
If you chose wisely, you may see an improvement in how quickly your Web browser begins to load pages. Sometimes, the difference is too small to notice. If you chose to enter the OpenDNS name servers, be sure to visit the OpenDNS website to learn more about the many useful features their DNS service offers. Parents of young kids with cell phones will particularly appreciate the OpenDNS features.
And, of course, these settings are completely reversible. If, at any time, you feel that having customized your phone’s DNS was a mistake, you can go back to the Wi-Fi network Advanced settings and revert to the DHCP defaults.
—
Good comment Daniel.
I agree that Google are becoming too ‘nosy’ relating to how people use the Internet, especially when one sees such requests as, “We can tailor ads to suit your likes and dislikes”, oh yeah, in order for advertisers to know my intimate details. no way!.
I have have a VPN on my ‘phone and a VPN on my PC, almost a necessity in Australia where 98% of local TV content is a waste of electricity.
Regards,
Jonno
OK, but when I use Wi-Fi it’s my home network, using my router. And there first DNS is the IP of my router, the second one is 4.4.4.4. Should I change anything in that case? Maybe the second one only?
If the first IP is your router, I don’t think you even need a second IP.
Hi, you show changes being made to a ‘connected’ network. When I try this and change DNS 1 and DNS 2 I am unable to SAVE my changes. Any ideas. I‘m using an LG G4 and Android 6.0.
Did you tried to flush the cache in recovery mode?