Bullets and numbers are indented 0.25″ from your left margin in a list. The next text is then indented 0/50″ from the left margin. This is the default setting, but you can change the position of these indents in a list. Not only that, but these skills can come in very handy, especially when you have received a document in which a list has been modified many times. The appearance of the list can be altered greatly.
It can also be useful if you feel like you would like to change the indents or spacing. You don’t have to have a reason! There is no rule that I know of that you always have to use the Microsoft Word default settings. Knowing how to make these changes can be tremendously helpful.
Follow the steps below to learn how:
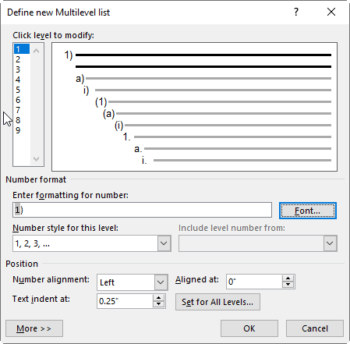
First, to define a new multilevel list, click the Multilevel List button, found on your Home tab in the Paragraph group. Once you have done that, near the bottom, select Define New Multilevel List. The Define new Multilevel list will appear.
As you can see, they can have up to nine levels. On the left of the screenshot above, you will see a column of numbers, 1 through 9. Each represents those levels, and if you click on one, the corresponding level will become active in the box to the right. You can begin by selecting the first level and defining that level using the options in the Number format section.
The bottom section of the Define New Multilevel List window has a section for Position. Here, you can set the alignment and the indentation for each level individually. You can also set it for all levels at once using the Set for All Levels button. Once you have made your choices and defined your new list, click OK.
Your new list will appear in List Library for use throughout your document.
Should you want to change the font formatting for your new list style, you can click the Font button in the Define New Multilevel list window to open the Font window. You will find that the Font window has options for changing your font, font style, size, color, underline style and color, and font effects. You can elect to change any of these options just as you would any text in Word. Once you have made your selections, click OK to apply your changes. Your format has now been changed.
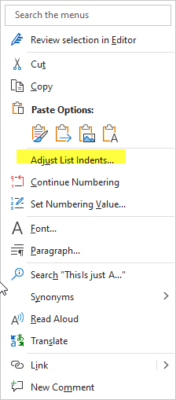
Ok, so now you can change the indents of a list. Select the list and right-click and select Adjust List Indents from the menu.
The Adjust List Indents window will appear and you will see that there are several options available to you. Using the arrow on your right, you can change the amount of the indentation of the bullet or number from the left margin. The next option is Text indent at. The arrows on your right can be used to change the amount that text is indented from the left margin.
The third option in the Adjust List Indents window is Follow bullet (or number) with. The default option is the Tab character, which will add a tab to the next indentation. To the right, you will see a drop-down arrow. If you click it, you will see a list of three choices:
- The Space option will remove the Tab and simply insert a single space between the bullet or number and your text
- The Nothing option will remove all space between your bullet or number and your text
- You can also change the spacing on an individual list item by choosing only that item in the Adjust Line Indents window and making any changes you would like
Once you have made your choices, click OK to apply them.
—


