We all know how much I love my Windows Home Server, but the computer WHS lives on was dying a slow and painful death. Several of the capacitors on the motherboard were bulging, and one had actually burst. As a result the computer was becoming unstable, which is not a useful trait for a home server! I decided it was time to replace the aging computer and start looking for a replacement, which means it is a good time to talk about what I bought and why, as well as give you an idea of how it goes together!
In other posts we have talked about Motherboards, Hard Drives, and RAM. If you haven’t read these articles now is a good time to catch up!
To build a computer you need eight basic components:
- A case to hold everything
- A motherboard to connect everything to
- A Central Processing Unit (CPU) to provide the “brain”
- Memory to provide short term storage
- A hard drive for long term storage
- A CD/DVD drive to load programs
- A power supply to power everything
- Fans to keep it cool
Case and Power Supply
The computer case you choose needs to be large enough to hold everything you plan to add now and in the future, while having a design that you find suitable and appealing. My goal was to find a case that was simple in design, able to hold at least 5 hard drives, have space for at least 2 additional fans, and have an included power supply
After searching Newegg.com and reading lots of specs I settled on a reasonably priced case by HEC for $50. This case has a simple black design, can fit ATX and MicroATX motherboards, has space for at least 5 hard drives, and a 585 watt power supply to power everything.
Motherboard
I already had 4 hard drives in my server totaling 1.73TB (1730 gigabytes) of storage. I could not justify replacing the hard drives, but I need to take into account future storage needs. Because my drives are the older IDE interface that presents a special problem. The SATA interface has become the de facto interface for hard drives and is becoming more prominent with CD/DVD drives as well. Because of this motherboard manufacturers are removing the IDE interface, or limiting IDE connections to the minimum of one. Each IDE connector on a motherboard can control 2 devices. I have 4 hard drives, so I have to find a motherboard with 2 IDE connectors and a few SATA connectors for future expansion. Back to NewEgg.com, where I found an Asrock 4CoreDual-SATA2 motherboard for a reasonable $60. The mother board supports Intel dual core processors, plenty of RAM for a server, 2 IDE channels, and 2 SATA connectors for future hard drive additions.
CPU
A server isn’t performing computationally intensive operations, but Windows Home Server accepts Add-ins. These add-ins do require a bit of CPU power. A power house CPU just isn’t required in this situation, but a bottom of the barrel CPU won’t cut it either. I chose a reasonably priced Intel Dual Core 2.0Ghz processor for $70. The processor is a retail version, which means it comes with a cooling fan.
Memory
Servers generally aren’t memory intensive either, but the add-ins for WHS do require a bit more than the minimum recommended by Microsoft of 512MB. 1GB would be a good start, but I chose to go with 2GB just to be on the safe side. Besides, you never know what the future will bring! I found 2GB of Corsair RAM for $32.
Hard Drives
This was the easiest choice! I have 4 that I plan to reuse in the new server. Whew, that was easy! (grin)
CD/DVD Drive
Another easy choice. I already have an IDE CD/DVD drive if I really needed one. The OS for the server is already installed on the current hard drives, and the BIOS on the motherboard recognizes by external USB DVD drive, so I’ll install my current drive in the case, but I won’t even hook it up.
Fans
Heat kills computers. Fans move hot air out of the case and cool air it. The case came with an 80mm fan mounted on the rear of the case. The CPU came with a fan to cool it. The only issue I worried about was the hard drives, which produce a lot of heat. This is especially true with you have four! I picked a 120mm fan to mount directly in front of the drives for $6. This fan lowered hard drive temperatures by 10 degrees Celsius!
Now let’s look at what it takes to put it all together!
Putting it all together
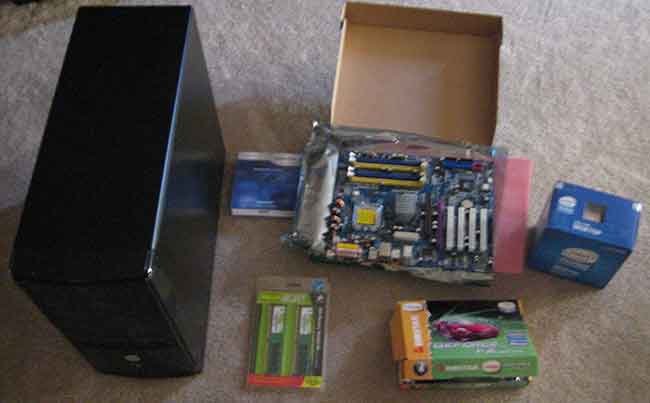
A few days, after I placed the order, a box from NewEgg arrived at my door (just like Christmas). The box was full of computer goodness!
Opening the case
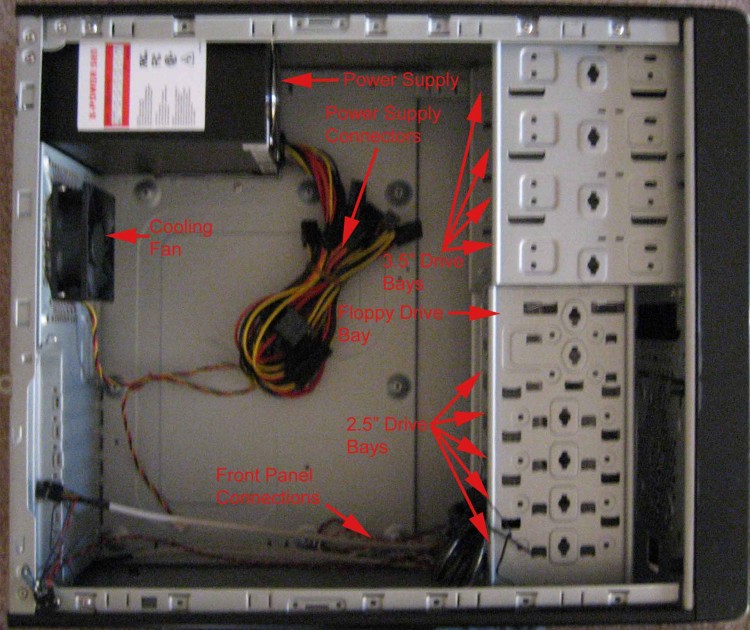
So let’s get started by opening up the case. This case uses 2 screws on the back to open the side, which is very common, though others may use clips or levers. No matter which method they use opening a case is very easy!
As you can see there is plenty of room for hard drives in this case, which is a major factor should more storage for the home server be needed in the future!
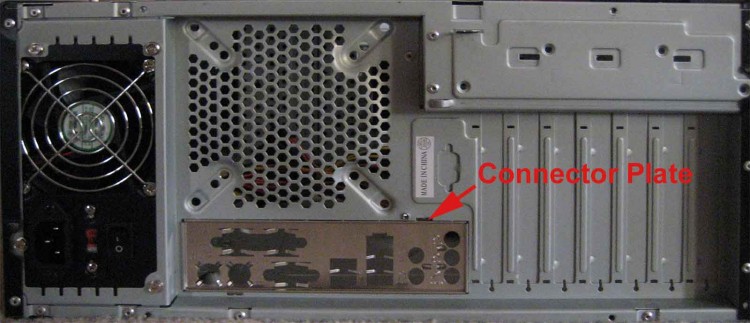
The first thing you should do is replace the connector plate. Aftermarket cases are made to accept motherboards from different manufacturers and there is a place on the back of the case that accepts a standard size connector plate. The maker of the motherboard will include a connector plate with the motherboard. The connector plate ensures the connectors on the motherboard have the correct holes in the case. I’ve installed the plate in the new case. It installs easily by simply snapping it into place.
Install the motherboard
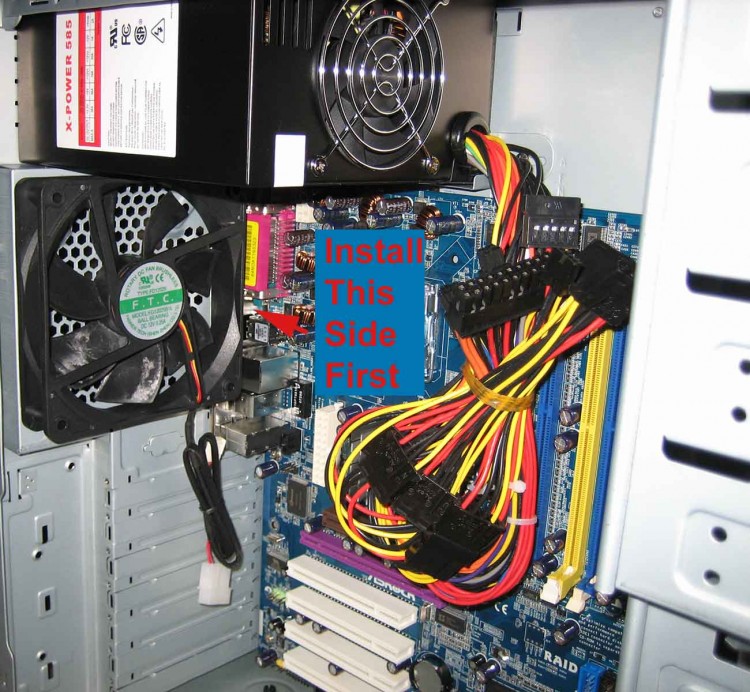
Now that the plate is in pull all the wires out of the way and lay the motherboard in the case. If you would like more information about motherboards, or need a refresher, read our What is a Motherboard post. Be sure to insert the connectors into the plate first! You will notice a brass post in the area where the motherboard goes inside the case. This post fits into a witness hole in the motherboard to ensure the board is located properly with the connector plate and screw locations..
Once you have the motherboard connectors inserted into the plate and the post into the witness hole make sure the motherboard is flat and nothing (wires, extra screws, etc) is between the motherboard and case. Use the provided screws to secure the motherboard to the case.
Install the CPU
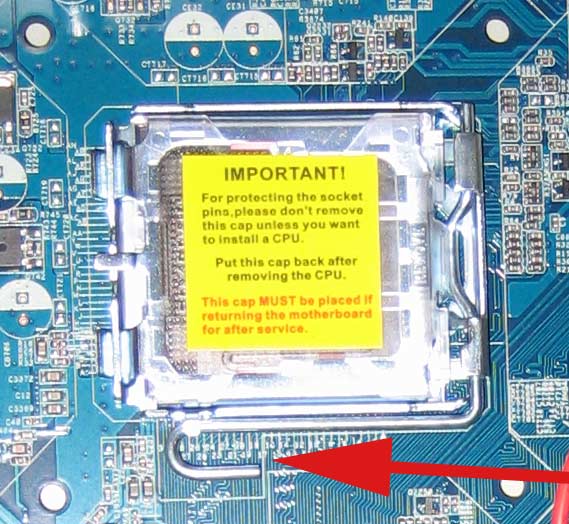
After I’ve secured the motherboard I like to secure the CPU and its’ cooling fan. In the past this was where you could trash a $300 (or more) chip. CPU’s were actually connected to the motherboard with hundreds of pins that fit into a socket. Break a pin – throw the chip away. Presently chips have contacts that are pressed against the socket by a lever system, which is much easier and safer to install
Pressing the lever down will all the lever to slide away from the catch. Once clear of the catch pulling the lever up will remove the top plate, which retains the CPU. Remove the plastic protector and place the CPU in the socket. It will only fit one way. Flip the top plate back to the original position and return the lever to the catch. This may require a little force, as the lever applies pressure to the top plate to keep the CPU in place and in contact with the socket.
Once the CPU is installed apply thermal grease to the top of the CPU. Thermal grease fills in the microscopic pits between the CPU and the CPU cooling fan. This ensures maximum heat transfer between the CPU and cooling fan. The amount of thermal grease you should use is very small, about the size of a grain of rice. Using more will actually make heat transfer less effective and might reduce the life of the CPU and/or decrease system stability.
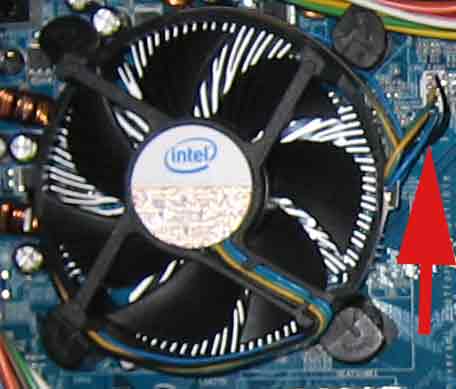
Notice the four holes in the board just outside the CPU socket? This is where the CPU cooler mounts to the board. The CPU cooler will have four posts, one for each hole. Most use a type of push to latch connection. Gently insert the post into the hole and push down on the top of the post to lock it. Do not apply too much force – you don’t want to break the motherboard. Plug the fan into the connection on the motherboard.
Mount the hard drives
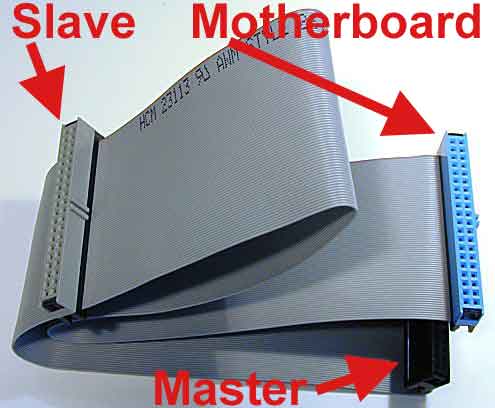
In the first part of this article I mentioned that I was using existing IDE hard drives. First I connected the drives to the IDE cables. Below is an IDE cable. Notice that each connector has a different color? The blue connector goes to the motherboard. The black, or end, connector goes to the primary, or master, device. The middle, or gray, connector connects to the secondary, or slave, device. The connectors are “keyed” so they can not be inserted incorrectly. Here is another case where color doesn’t always indicate what it should. The important thing to remember is two connectors on the IDE cable are closer to each other than the third. These are the connections for the devices. The one on the end is master. The one closer to the middle is the slave. The remaining connector goes to the motherboard. (Newer drives use the SATA interface, which is much simpler. SATA connections are one drive to one motherboard connection. No complicated “this goes there” scheme)
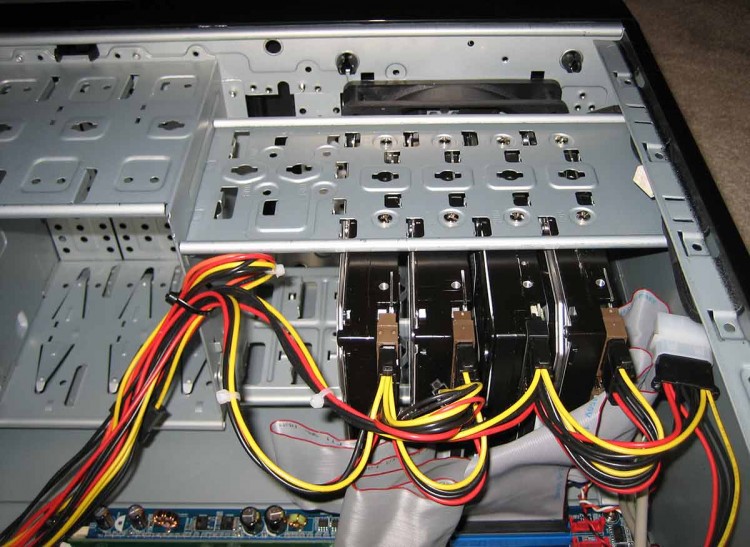
This case uses a “pressure fit” to hold the drives. I added 2 screws to hold them securely. Normally you want to leave some space between drives to allow heat dissipation, but in this instance I’ve added a fan to directly cool the drives.
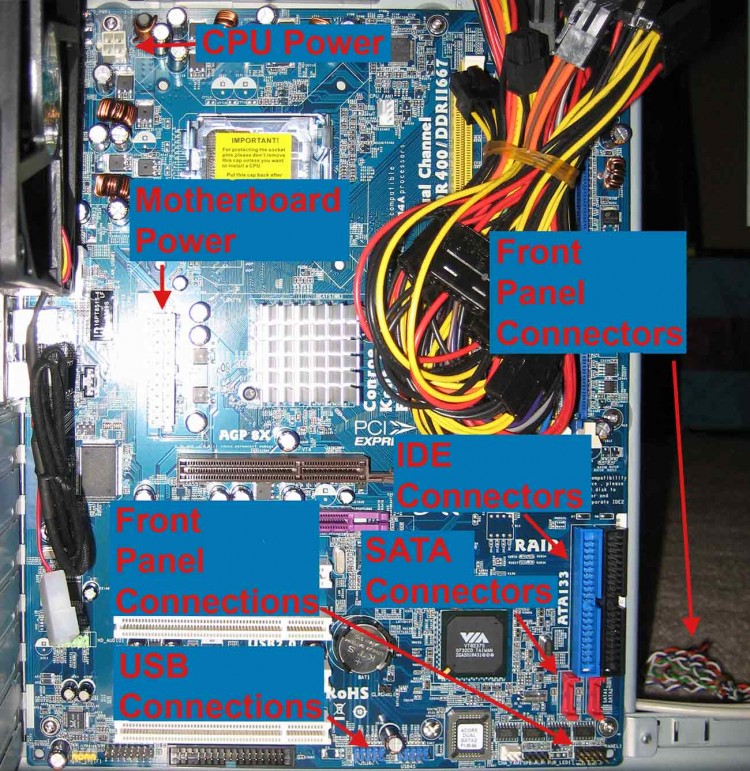
Connect the IDE cables from the drives to the motherboard, and power connections to the drives.
Having four drives creates quite a bit of heat. I will change the IDE cables to the newer round ones in the future. That should improve air flow around the drives by not blocking as much air as the large flat cable.
Cards and memory
If you would like more information about RAM, or need a refresher, read our What is RAM post for a brief explanation.
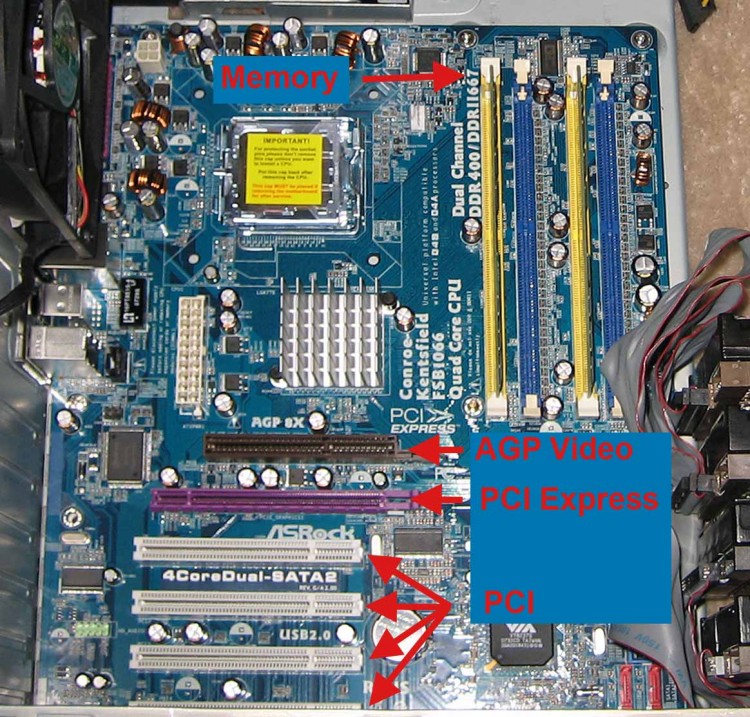
This motherboard supports both DDR RAM in the blue sockets, and DDR2 RAM in the yellow sockets. Remember that the RAM is “keyed” and will only fit in the correct socket. Install the memory modules by pulling the white locking tabs away from the slot. Align the memory module correctly with the slot and press down. Do not force the memory into the socket, but do insert it firmly.
This motherboard does not have video support built onto the board, so I chose an inexpensive AGP video card, which will go into the AGP slot. The mother board does have onboard 100Mb Ethernet, but I will install my gigabit ethernet card and disable the onboard ethernet.
The back of the case has removable “knockouts” that need to be removed before cards can be installed. A simple wiggle is usually enough to remove these. As with memory, align the card with the correct slot and press. Do not force a card into a slot, but do insert it firmly.
We’ve got the power!
One of the important steps is connecting all of the power leads. The computer won’t run without electricity. Fortunately the power connections are standard and “Keyed” so only the correct connector will fit the right connection. Pretty easy. You will have some connectors from the power supply that are not used. Don’t worry. These are for future expansion!
The next step is connecting the front panel connections to the motherboard. If you haven’t looked at your motherboard manual yet, now is the time! The functions are standard (power, reset, HD LED, USB, audio, etc), however the actual connection to the motherboard is up to the manufacturer.
The finishing touches
The final thing you want to do before closing the case is route all the wiring so it is clear of all fans, neat, and out of the way. The last thing you want is a fan that doesn’t work because a wire prevented it from turning and it burnt out, or a fan blade that wore through the insulation on a wire that shorted out your power supply!
Important reminders!
- Don’t handle the components more than you have to.
- Wear a grounding strap to prevent static discharge, which could damage sensitive electronics.
- Do not force anything!
- Fans should blow the same direction. You want air to travel through the case in one direction. Cold air in – warm air out!
- Plan ahead. Selecting the right components now can save you money and headaches down the road.
- Take your time.
- Read the manuals!
Hopefully this will be a good “pointer” for those who wish to build their own computer. For others, who may be scared off by the insides of a computer, hopefully this article will take away a little of that fear. Go ahead – open that computer and take a look. Nothing to be scared of.

What a very detailed tutorial about how to build a computer. In my opinion, I think it should be part of High School curriculum these days just like Auto Shop was in my day. There are so many simple problems that the average person could take care of themselves with just a little know how. By building a computer themselves, they will find that they really aren’t so intimidating. Then when they get a “real” difficult problem that requires a certified technician with experience, then they can call us. Gakidoo’s Computer Repair
Great tutorial Dave! with all the box-options available you have provided a tool that helps get the picture. Dale hits a nail on the head as well….. “Know what is in the box” should be mandatory reading. Keep up the great work Dave
Scott
Good tutorial.
Everyone should be able to perform periodic maintenance for his PC(dust cleaning at least).
In my opinion it is safer to install the motherboard in the case after installing the CPU and cooler, in order to avoid pressure on the circuit board.
Dear Dave,
My Computer is a few years old. I like to change from Windows XP to Windows 7. To be on the safe side, I like to download Window 7 on a new harddrive, maybe a SSD, I am not sure yet.
My question is, after installing Windows 7 and all my applications, the drive letter of my new drive will be say G or H. How can I change Windows 7 to drive C, as I boot the Computer, my C drive will be the old Windows XP?
Kind regards,
Paulus Kruijer