
Schedule System Restore Points At Start Up
 System Restore Points are basically little snapshots of your current system state. Windows takes these snapshots on a regular basis and also when a big change is made to your computer, such as installing MS Office, for example. These snapshots contain information about the current state of your Registry, installed drivers, and some significant system files.
If you are still running an earlier Windows version (7/8.x), this How To: Access, Use & Configure System Restore article should help you out.
Note: System Restore can be useful in cases of small scale foibles, but should never be depended upon to replace a proper backup of your computer.
One thing that many people may not know, however, is that you can force Windows to create a System Restore point either on demand, or also on a schedule. You can also tell Windows to create one at boot time and that is what this Quick Tips article is going to show you.
Task Scheduler
- Hit the Windows key and type task scheduler. In the menu, click Task Scheduler
- Once the Task Scheduler is running, in the left pane, select Task Scheduler Library
- In the right pane, click on Create Task…
That should bring you to a window that looks like this:
General Tab
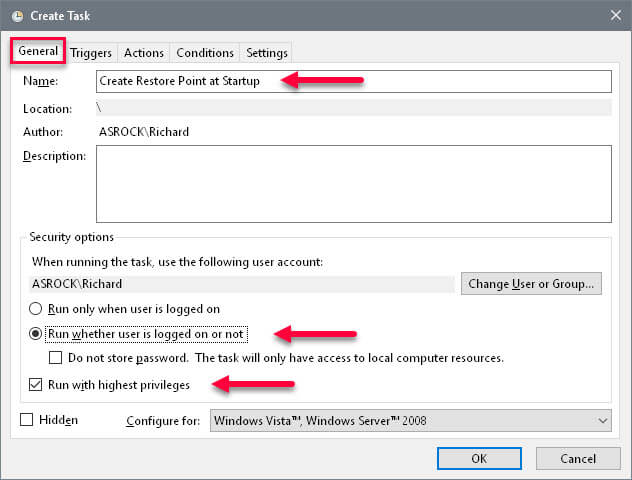
- Enter a descriptive name
- Tick the radio button labeled Run whether user is logged on or not
- Check the box labeled Run with highest privileges
Actions Tab
Select the Actions Tab and on that new screen, click the New button. You should now see a window that looks like this:
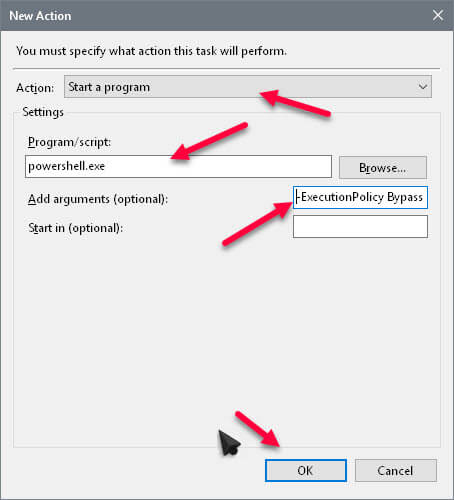
- In the drop-down menu choose Start a program
- In the edit box, type powershell.exe
- In the edit box lableled Add arguments (optional), enter this string of arguments: -ExecutionPolicy Bypass -Command “Checkpoint-Computer -Description \”Restore Point (Automatic)\” -RestorePointType \”MODIFY_SETTINGS\””
- Click OK
Note: It is extremely important that you get the arguments entered correctly. It might be a better choice to copy the above and paste it into the appropriate box.
Triggers Tab
Select the Triggers Tab and click the New button. That should bring you to a window that looks like this:
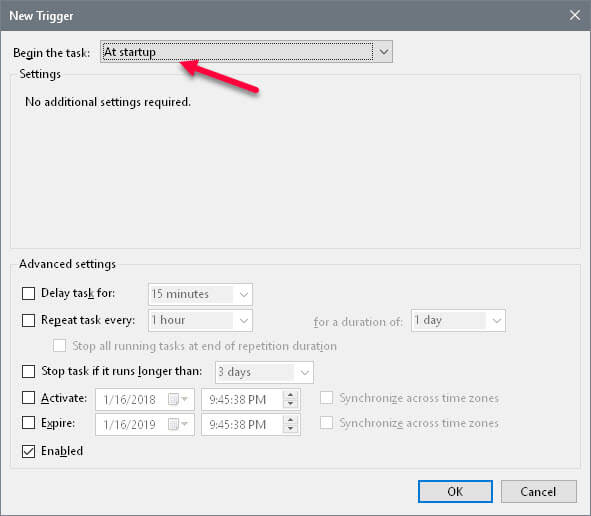
- In the drop-down menu, choose At startup
- Click OK
Conditions Tab
Select the Conditions Tab to bring you to this window:

- Uncheck the box labeled Stop if the computer switches to battery power
- Uncheck the box labeled Start the task only if the computer is on AC power
- Click OK
Password Required
In the Create Task window, click the OK button and you will be presented with a password request. Enter your information and click the OK button to complete the task. You can now close the Task Scheduler.
Results
Each day from now on, when you fire up your computer, Windows will create a new System Restore Point.
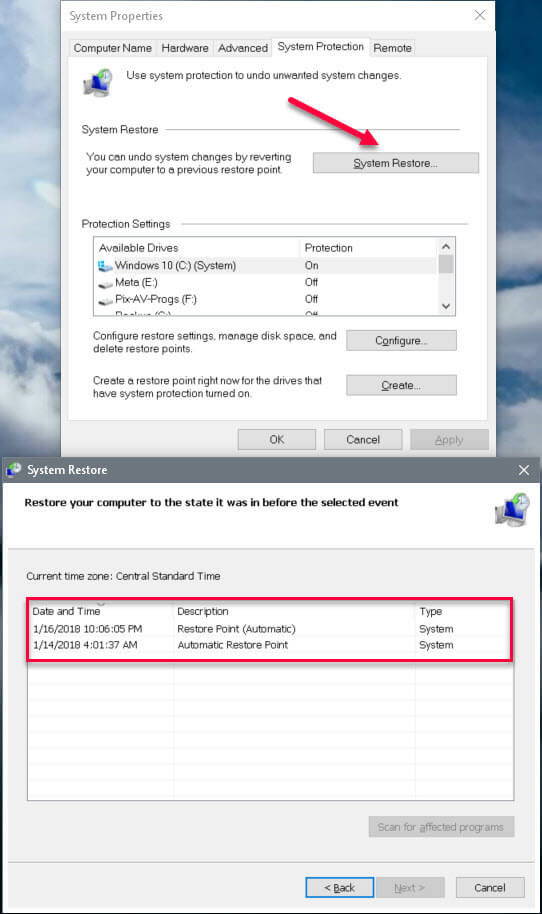
You can check your current System Restore points by following these steps:
- Tap the Windows key and type restore
- Choose Create a restore point
- In the window that opens, click the System Restore… button
- In the next window, click the Next button
That should bring you here:
Note: This method uses PowerShell to create the System Restore points. PowerShell will only create one System Restore point within a 24-hour period.
Addendum: Once you choose a System restore point, the button labeled Scan for affected programs will become available. Windows will run a little search and list any programs it finds that might be affected by performing the System Restore operation.
Here is an example: Let’s say you installed a program after the chosen restore point was created. In that case the restore point won’t contain any information about the newly installed program. This lack of information will likely cause your new program to “break”, or it might not show up at all and will have to be re-installed. This is only one of many possible scenarios.
Thank you to Mindblower for pointing out this lapse in proper thinking to me.
As always, if you have any helpful suggestions, comments or questions, please share them with us,
Richard
Note: Going forward, I will also be accepting off-topic questions within these Quick Tips articles. I hope to keep a record of them to learn what most interests our readers and to be able to create requested articles based on that response. Don’t be shy.
—
Thanks Richard. Hope you’ll do a follow-up on using the Restore and the pitfalls if any, Mindblower!
Hi Mindblower!
The only downside that comes immediately to mind is that a person would consider them to be a backup. They are not even close to a proper backup.
System Restore points have their place and should be kept in their place (very much like children),
Richard
Depending on what was loaded, how far back one wants to go, when the last backup took place – doing a Restore one might notice a list of programs that might get affected by doing a Restore. This is one point I thought you’d be able to focus upon, Mindblower!
Hi Mindblower!
I added this information to the end of the post. Thanks!
Richard
Hi Richard,
Like always your awesome, I work with alot of programs and make alot of restore points.
A question or two , What would you recommend for the amount of space for this?
Also I always wondered if you can delete any restore points and If so how?
I hope that isn’t a stupid question , but with me no question is stupid haha.
Thank you and for everything!
Rena
Hi Rena,
I usually set the Restore Point to 3%. This is strictly a personal choice, but 3% of a 256GB drive is about 8GB. That should be enough to hold several Restore Points.
Remember– System Restore is not a replacement for a proper backup system!
It isn’t necessary to delete Restore Points since Windows will manage that for you by deleting the oldest one first when the space needs to be used for a newer one. It’s basically a set-it-and-forget-it process.
The only stupid question is the one left unasked.
Thank you for your comment,
Richard