Microsoft Edge
Microsoft Edge is the default browser installed in Windows 10. Let’s just say that when it first materialized, it was not ready for prime time– not even close. It did have one stand-out ability, though. It rendered pages quickly and beautifully. The text was crystal clear and images were sharp as a tack. That part hasn’t changed.
I think the biggest complaint in the early days was about the lack of add-ons. I will give Microsoft credit for adding many new add-ons which are easily found in the Microsoft Store, and there are more being added all the time.
Reading View
Firefox and Chrome users are probably familiar with Reading View. Reading View is generally a way to strip a web site of all the cruft that normally accompanies them these days. A few examples would be advertisements (of course), side panels that may hold a huge variety of stuff, and basically anything that doesn’t actually have anything to do with the article you would like to focus on.
Note: Not all web pages support this feature, but you’ll know when they do because the icon that looks like an open book will not be greyed out. (It’s home is at the right end of the address bar.)
Edge also offers this feature and along with it comes a few simple tweaks to get things just the way you like it. This week’s Quick Tips article will show you how easy that is.
How To Use Reading View
Fire up Edge and go to a site that has an article you would like to read. If the page can be seen using Reading View, then the icon in the address bar will be available for you to click on, otherwise it will be greyed out and clicking on it will do nothing.
For our example today, I chose a page right here on DCT. It is this page for the Steganos Privacy Suite 20 contest, and you should think about entering the contest for a chance to win (it ends this Thursday the 11th) . I realize this is a shameless plug, but this program is a great one for anybody interested in bumping up their computer security another notch. I digress…
Once you have clicked the Reading View icon, the page will look very different. Plus, you will be able to further tweak its appearance in a number of ways.
You will be able to:
- Change the text size
- Change the text spacing
- Change the theme (background) from white, to sepia, and to dark
- Have the page read to you aloud (you can also change the narrator’s voice if the current one is annoying you)
- Grammar tools are available at the Microsoft Store and can be accessed from within the toolbar
- Print the page
- Click a button to bring the page up to full screen
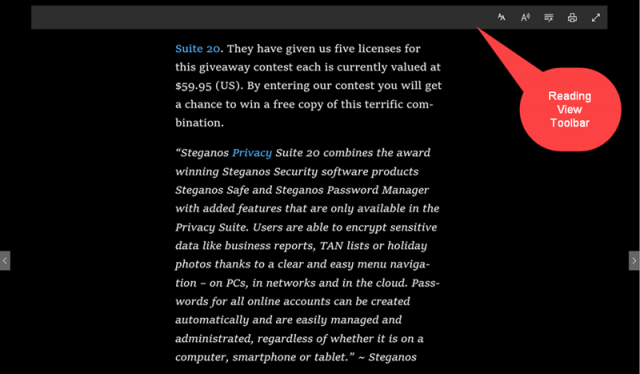
All these tools are available in a tool bar which you can access by clicking anywhere on the page. Click the page again to make it go away. Here’s how a segment of the page looks after a few clicks of the mouse:
Obviously, I changed the background to a dark theme, and I increased the text size two notches. You can scroll the page with your mouse wheel or by clicking on the superimposed next/previous arrows on either side of the page. Now you should be able to read your favorite articles distraction-free. I think Reading View is a very handy feature and personally use it quite often.
As always, if you have any helpful suggestions, comments or questions, please share them with us,
Richard
—


Richard,
Does Chrome have the ‘reading view’ built-in? Couldn’t find it.
I think FF used to have it on the address bar though I don’t recall seeing it there recently.
Thanks,
Dan
Hi Dan,
I never use Chrome, so I can’t answer that one.
Firefox and its spin-offs, Waterfox (which I use) and Palemoon, do have Reading View available.
Thanks for your comment,
Richard