Personalization – Themes vs Wallpaper
The concept of Themes has been around since Windows was a mere child. Wallpaper, too, is an ancient invention. The whole idea is to spruce up your computer environment with images that please you, rather than the constant, dull, default Windows Logo screen. Wouldn’t it be better to see the bright shining face of your loved one? Or perhaps a beautiful landscape you once visited and remember fondly? Small changes such as these can make or break the beginning of your day.
Wallpaper
Wallpaper is simple. It is nothing more than a background image on your desktop. You can choose any image you like to serve this purpose. To keep the image looking its best, you should try to find an image that matches your screen dimensions. So, if your screen is 1920 x 1080, you should use images of that size to keep things looking pretty. Here’s an example of a beautiful image that is way too small for the screen:

If you choose one that its too big, Windows will down-size it to fit. This may result in black bars at the top and bottom, or right and left, or both.
This week’s Quick Tips article will show you how to liven up your desktop using Themes.
Themes
Themes involve more than simple images on your desktop. The colors extend onto all your windows (in the Title Bars), the color and/or transparency of your Taskbar, Windows sounds, and can even affect how your mouse behaves and looks.
Personalization
Taskbar Behavior
Before we deep-dive into Themes, let’s first take a look at some basic changes you can make without messing around with Themes. It’s always a good thing to learn the basics, I think.
Try this:
- Right-click on an empty space on your Taskbar
- Choose Taskbar settings in the context menu that opens
The Settings App will open offering several choices right from the get-go:
- Lock the Taskbar in its current location. This can be at the top, bottom, left, or right edge of the screen. You can move it around by dragging it to the desired position. There is also a setting on the screen you’re looking at to do the same thing.
- Hide the Taskbar. This allows the Taskbar to slide off the edge of the screen (hide) until you want to use it. To see it again, move your mouse cursor to the appropriate edge of the screen, and the Taskbar will show itself once again.
By making a few small changes here, you have already taken a few steps towards customizing your Windows environment. There are many other options on this screen, and they are all pretty much self-explanatory. Have fun!
Background
Still in the Settings App, in the left pane, choose Background. Here, you can choose a specific picture, a solid color, or have Windows cycle through a number of pictures (Slideshow). (You can set the time intervals here, too.)
You also have the choice of Tiling the images on your screen, and of Fill, Fit, Stretch, Center, or Span. Keep in mind what I said before about using images of the right size for your monitor. If you have a small image and tell Windows to Stretch it, you may get some surprising and possibly undesirable results.
Colors
In the Settings App, choose Colors. This will give many choices for changing how Windows looks. You can choose a basic color for all your windows title bars and the Taskbar. You can have Windows choose an accent color for you each time the background image changes. You can change the transparency of the Taskbar and the windows you open. Finally, you can choose either a Light or Dark mode as your default. There are even high contrast settings available for those of you who may have difficulty seeing certain color combinations.
The only real way to see all the differences these changes make is to play around with them. You can’t hurt anything by trying. By using all these settings in combination, you can pretty much get everything looking just how you want it to look, and that includes Fonts, and the Start Menu. At this point you have basically created your own custom Theme.
Themes
Themes are bundles of all the settings you have just toyed with. They may include color combinations, background images, icon sets, mouse cursors, sounds, and other changes to your interface. Microsoft offers many Themes at its Windows Store and also on a dedicated Themes Site. (You can reach the Windows Store Themes section by clicking the Get more themes link in the Settings App, in the Themes section, under Personalization.) You can read all about it on this Huge Collection of FREE Themes & Wallpapers from Microsoft page. You can also get many thousands of ready-made themes from third-party sources. DeviantArt is one such place, and last I looked they had over 44,000 Windows Themes to choose from! Another, more complicated method, is to use RSS feeds to retrieve your images from the internet. To find out more about this, read RSS Themes in Windows.
Note: Third-party sources are not always vetted properly and sometimes, not at all. Making changes to your entire interface is a somewhat drastic affair and I advise you to make backups, or at the very least, a System Restore Point, before proceeding. You never know what these third-party Theme bundles include– you may get what you ask for, and then some.
I trust DeviantArt and that’s why it is mentioned in this article.
Rainmeter
No discussion about Windows Themes would be complete without mentioning Rainmeter. If you are serious about taking control of your windows desktop, then Rainmeter is the way to go. Rainmeter can be imposing for the uninitiated, but if you take it slowly, and learn a little bit at a time, you can end up with some truly phenomenal desktops:
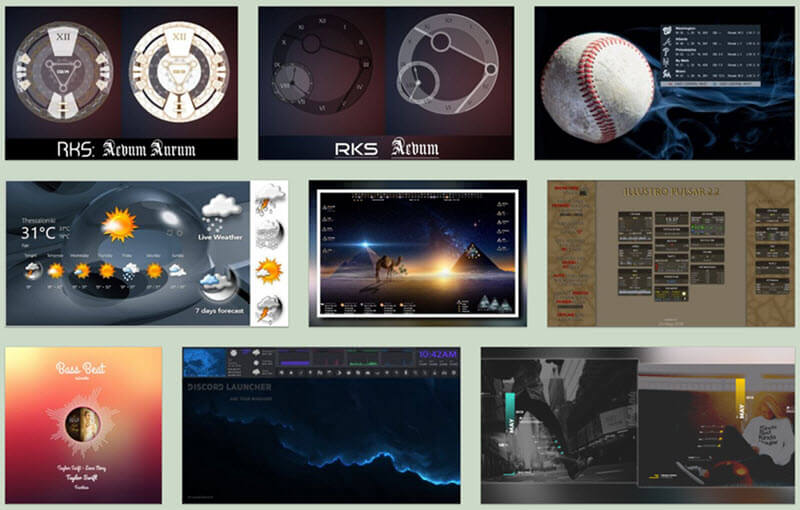
The above image shows six of literally thousands of Rainmeter skins developed by professionals and amateurs alike. Once again, this DeviantArt page will offer many choices. You can, of course, create your own spectacular desktops and submit them to be used by others. There are even contests to enter if your think you’re that good. ?
Note: In Rainmeter parlance, the term “skin” can refer to an entire desktop design, or to a single element within that design. For example, I missed the old Gadgets from back in the Windows 7 days, so I used several skins to add these. I like a big old clock, and since I’m a nut for what’s going on in the background, I also added an Internet meter, a CPU/RAM meter, and the old standby– a current Weather display. A three-month calendar was a nice addition, too (I had to use Rainlendar to customize the calendar I wanted).
If you would like to get Rainmeter, which is free by the way, you can download it at this official Rainmeter site. Be prepared for a learning curve, but the sky’s the limit!
As always, if you have any helpful suggestions, comments or questions, please share them with us,
Richard
—
Richard,
My option to use “Peek” is grayed out. Is there another setting I need in order for this to work?
Thanks,
Tom
Hi Tom,
You will have to enable Peek from within Control Panel:
Open Control Panel
Choose System
Choose Advanced system settings
Click the Advanced tab
Choose Settings
Choose Visual Effects tab
Check the box labeled Enable Peek
That should do it for you,
Richard
Thanks Richard.
Hi Richard,
Thanks for more of the Win 10 ‘goodies’ … 🙂
Hey JoninOz,
Glad you like ’em 😉