
What Is DPC Latency
“A Deferred Procedure Call (DPC) is a Microsoft Windows operating system mechanism which allows high-priority tasks (e.g. an interrupt handler) to defer required but lower-priority tasks for later execution. This permits device drivers and other low-level event consumers to perform the high-priority part of their processing quickly, and schedule non-critical additional processing for execution at a lower priority.” ~ Wikipedia
If you are noticing stuttering or lagging when running your computer, then this article might help you fix that problem. You will notice that the above definition mentions drivers. Most people dislike dealing with driver issues but, truth be told, if they are outdated and/or corrupted, they can be the source of many hard to define problems. Old drivers can also be a very real security risk.
How To Get LatencyMon
To quote Steve Gibson, “You can’t optimize it until you can measure it”. That’s what we will try to do today.
DPC LatencyMon from Resplendence is just such a measuring tool and you can get it by clicking this link: https://www.resplendence.com/download/LatencyMon.exe
Note: LatencyMon comes up 100% clean on Virus-Total.
How To Use LatencyMon
Main Window
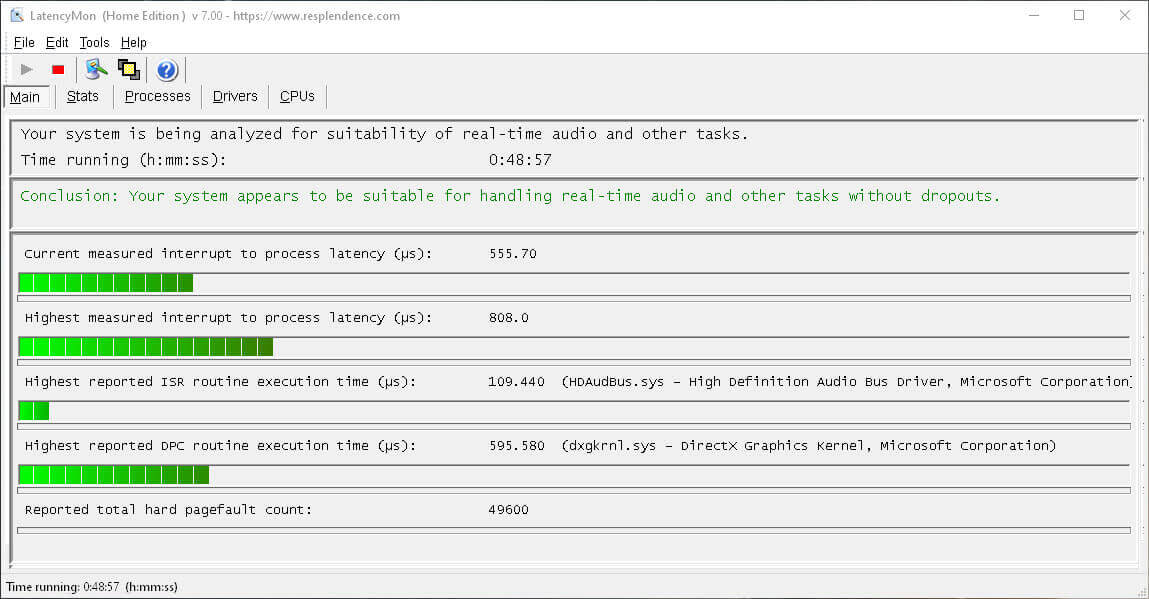
Being a master of the obvious, I must tell you that LatencyMon monitors DPC latency. Install and run the utility. Click the Start button and let it do its thing for a while. You should be seeing a window like this:
Note: You can click images in this article to enlarge them for easier reading.
All green bars are what you are shooting for. Any areas that start getting red might need some attention. Or not. It depends on how you use your computer.
Stats Window
To see the Stats window, click the Stop button, then click the Stats button. Please note that the statistics will only show the information last measured in the Main window. Restarting the Monitor will start over from scratch.
I see this as a weakness in the program. Clicking away from the Stats window, then back in again, will show you only what it knows at the current monitor’s time, which will be zero. In other words, if you have been monitoring your system for an hour, then clicking out of the Stats window will lose that information and you will have to start monitoring all over again. That’s a shame…
This loss can be avoided by clicking the Edit button, copying the report to the clipboard, then pasting it into a Notepad text file. Clumsy, but it works.
If you avoid doing this, unlike me who had to start over, the information it provides can be useful. It might look something like this:
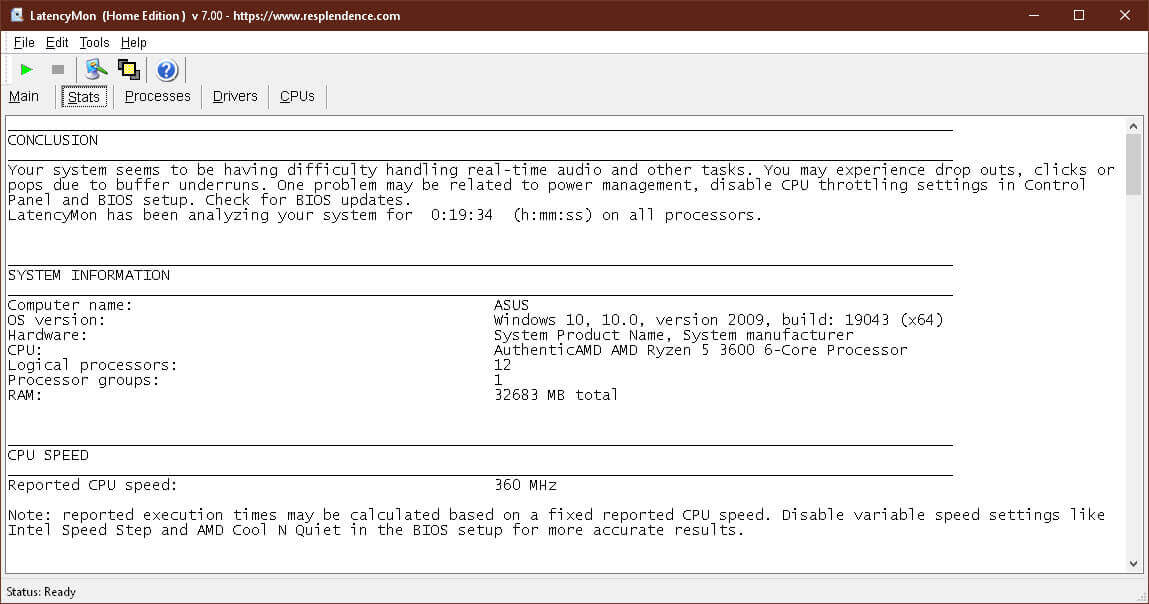
The Stats window is telling me that handling real-time audio might be a problem and that I should try to disable CPU throttling in both the Windows settings and in BIOS. I am not really concerned about this problem because I don’t use anything that is related to audio streaming.
How To Turn Off Throttling
Before making any changes to your system, please back it up. Better safe than sorry.
Read this Simple Guide To Creating & Restoring System Images – Part 1 to learn how.
BIOS
AMD implements a CPU throttling method they call Cool “N” Quiet. The same type of system is used by Intel but they call their’s SpeedStep. In either case, you will have to find the entry in your BIOS and disable it. Explaining how to do this goes beyond the scope of this article. The procedure varies from system to system. Check the user manual for your motherboard to learn how.
Windows
Open Control Panel and choose Power.
Note: If you don’t see that option listed, then make sure you are viewing either large or small icons and not Categories.
(To learn how to create a handy shortcut to the Control Panel, please read Windows 10 Quick Tips – Control Panel.)
That should bring you to a window like this one:

For the purposes of this article, you should be using just about any plan other than Balanced. Use a high-performance plan. If you have one available for your particular motherboard and CPU, then use that one as I have done in the above image.
Next, choose Change plan settings.
In the next window that opens, choose Change advanced power settings. That should bring you here:

- Scroll down to Processor power management
- Set Minimum processor state to 75% or higher. If you want to eliminate any throttling at all, set it to 100%
- Set Maximum processor state to 100%
- “OK” your way out of all the open windows
Note: The above image does not show the System cooling policy setting. This should be set to Active. This will make the fan adjust its speed according to the temperature rather than having the CPU throttle to control its temperature.
Note: Using a high-performance power plan will consume more energy that might be of concern if you are using a laptop.
Note: Disabling throttling, whether in Windows, or BIOS, or both, will cause your CPU to run hotter. This can be managed with fan control settings.
Other Options
If you still have DPC Latency problems, there are other things you can try:
- Update your Graphics Drivers. Get them from your GPU manufacturer and not from Microsoft via Windows update. Microsoft’s drivers are usually outdated
- Disable Dynamic Ticking. Dynamic Ticks are a feature that lets windows stop the system timer when nothing is happening in order to conserve power
- Disable all Ethernet and Wireless adapter energy savings settings
- Disable third-party Firewalls and let Windows manage that security feature
- Uninstall Bonjour from your computer. This is an Apple service that is unnecessary on a Windows system (unless you use those services)
- Disable IPv6
- If you are using an Nvidia GPU, then you might want to disable PowerMizer
- Disable CPU throttling (already covered in this article)
I simply do not have the space to explain how to do all these things in this article. I will try to address each one in future articles for you. As they are completed, they will be linked here.
LatencyMon can be a handy tool to narrow down the causes of lagging and stuttering on your computer. It will not fix anything in and of itself, but it will help to lead you down the right troubleshooting path.
As always, if you have any helpful suggestions, comments or questions, please share them with us,
Richard
—