We’ve covered the installation of Windows Home Server 2011, installing the Connector software on client computers, the Dashboard Home tab, and if you’ve followed along you are now ready to interact with the server from your client computers using the Dashboard. If you’re new to Windows Home Server 2011![]() now is a great time to jump on the bandwagon! Microsoft has dropped the price to around $60, which is practically unheard of.
now is a great time to jump on the bandwagon! Microsoft has dropped the price to around $60, which is practically unheard of.
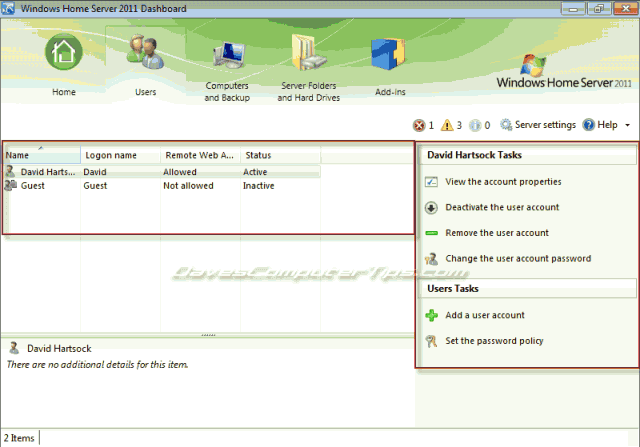
Windows Home Server 2011 Dashboard: Users tab
The Users tab allows you to control which files and folders a user has access to, as well as whether they are allowed to access the server remotely.

The screen is broken down into two main sections. The left section is a display of accounts created and a general overview of those accounts. The right section, named User Tasks, is where the magic happens and this first part of the Users tab we’ll look at.
Users tab – User Tasks
This section of the Users tab changes based on other selections on the screen. If nothing is selected in the left pane you will see this sections will look like this.

Your options are to Add a user account and Set the password policy. The first thing you want to do is set a password policy by clicking Set a password policy to open the settings dialog.

This policy sets the password requirements for all user accounts on the server. I highly suggest you choose the Strong setting. You are granting access to your files and as such you do not want passwords that are easily guessable or broken. Your options are:
- Weak – Any non-blank password is accepted.
- Medium – Passwords must contain at least 5 characters. A complex password is not required.
- Best – Passwords must contain at least 5 characters, and must include letters, numbers, and symbols.
- Strong – Passwords must contain at least 7 characters, and must include letters, numbers, and symbols.
Make a choice -preferably Strong- and click Change Policy to continue. You’ll receive confirmation that the policy has been changed.

Simply click OK to return to the Users tab.
Next we need to add a user. If this is your first time on the Users tab you will notice there is already a Guest account, which is disabled (and you want to leave it that way), and the account you created when you installed WHS 2011, which will have administrator privileges. You need to create user accounts for anyone else you wish to allow access to files or remote access. Click Add a user account to open the add a user account dialog.

The fields are self explanatory and I suggest you actually use the person’s real first and last name in the requested fields – it will help you remember later on. I’ve highlighted the user account name field as it becomes the login name for the user. The first and last names are only displayed in the Dashboard. Choose a password that conforms to your password policy and enter it twice. Once you’ve completed all fields click Next to proceed to the following screen.

On the left you’ll see each currently shared folder available on your server. On the right is a drop down menu that defaults to Read only. The options are:
- Read/Write – The user has full access to these files. They can view, watch, listen, create, copy, and delete files inside this folder.
- Read only – The user can do everything but create and delete files within this folder.
- No Access – The user will have no access to the files within this folder. They will be invisible to this user.
Most users will will only need Read only access, which is the default. Set the permissions you would like the user to have and click Next to proceed.
The next screen allows you to allow or deny remote access to the server for the user. If enabled the user will be able to log into the server over the internet and have access to the features you specify. Note that the file permissions from the previous screen still apply.

Remote access is enabled by default and all options are allowed. The options are as follows:
- Shared Folders – Enables the user to directly interact (based on the previous permissions) with the files contained in the Shared Folders on the server.
- Computers – Enables the user to have access to and control of computers connected to the server using Remote Desktop Protocol. (see why strong passwords are a must?)
- Media – Enables the user to view pictures is a slideshow, watch videos streamed from the server, and listen to music streamed from the server.
- Homepage links – Enables the user to see your links on the remote access homepage. You can add links to the remote access page, which is a great way to share bookmarks and important sites.
- Server Dashboard – Enables a user with administrative permissions to access the Dashboard from the remote access homepage and make changes to server settings (strong password?).
Carefully think through your choices and after you’ve made your selections click Create account to allow the server to create the account with the settings you chosen. You’ll see the following screen once the account has been successfully created.

Simply click Close to return to the Users tab.
The first thing you’ll notice is the new user account now appears in the left section of the Users tab. Highlighting a user account changes the offerings in the right hand section allowing you to make changes to the account.

Clicking View the account properties will open the following window allowing you to make changes to the account settings. The Shared folders and Remote Web Access tabs offer the same settings as when you created the account.

Clicking Deactivate the account will allow you to deactivate the account (who would imagine that?). This is useful if you want to suspend someones access to your server for any reason. When conditions or situations change you can reactivate them without having to recreate the account. You’ll receive a warning. If you want to deactivate them click Yes. The account will be deactivated and you will be returned to the Users tab.

Clicking Remove the account will completely remove the user, as well as their access, from your server – this is NOT reversible. You’ll receive a warning. Click Delete account and the account will be deleted. I suggest you use caution as deleting the wrong account will prevent access to the server for someone that should have access.

Finally, clicking Change the user account password will allow you to change the user’s password. This is useful for lost or forgotten passwords. Simply enter a new password twice -be sure to follow the password policy you set earlier- and click Change password to affect the change.

One question, how many users are allowed on WHS 2011? I WHS 2003 and with a big family and a lot of computers and could really use about 12 user accounts.
WHS is limited to 10 users, but Windows Storage Server Essentials has a limit of 25 users. The problem is WSS will be priced significantly higher. I’d look to prioritize your computers and add the 10 with the highest priority. You can always map network drives for the other two.
nice
hi,
Your answer is confusing to the question of how many users WHS 2011 can have.
You have answered that with the number of clients.
There can be more users added than clients, so really the answer shuld have 2 parts.
eg. as in my case, I have users access ny WHS remotely but those users do not have a client PC attached, therefore there are less PCs than users.