Windows Search has been much maligned. There are forums all over the internet where it has been vigorously discussed, often in vitriolic terms. Typical complaints are that it can’t find a file even when you know the file is present, and, most often, “it just doesn’t work!”. For instance, this Microsoft Forum thread has been going for years now, and still occasionally gets new comments, mostly bad. (But then, how many people go out of their way to comment that something is brilliant?)
I’ve done a lot of research on Windows Search, and one conclusion is that its poor reputation is entirely Microsoft’s fault, but not for the reason you might think. It’s because Microsoft’s documentation on it is poor to non-existent. Useful tips on advanced searching are hidden away on two out-of-date Microsoft web pages, which you could be forgiven for thinking Microsoft doesn’t want you to see.
The other conclusion is that Search does work, and very well indeed, albeit with a few quirks. In fact it’s an impressive feat of software engineering, entirely let down by the fact that few people know how to get the best out of it.
When you type something at the Start Screen in Windows 8, or in the menu Search box or File Explorer Search box in Windows 7, Windows should go away and find relevant results, and it usually does. The new implementation in Windows 8.1 allows you to specify what types of thing you’re looking for (Files, Settings, Everywhere, and so forth). Click on a result and off you go, although it can take a little time for the results to come up if you have a lot of documents, photos, music files, and so on.
All well and good, but sometimes you are looking for something that you know is there – somewhere – but that Windows will stubbornly not locate. To make things more difficult, maybe you know only part of the filename, or a word or two from the contents. You can spend a long time trying to work out why you are not getting the results you expect. What can you do to improve matters?
In the long run, it’s best to take time out to rebuild your search configuration from the ground up so that you know that your particular type of search will efficiently give you what you want. Here is how to prepare Windows Search to work to its full potential on your PC; in a later article I’ll cover what we know of its detailed search capabilities and how to use them.
Indexing

Windows Search speeds up and enables complex searches by indexing file locations, metadata, and content in a hidden database called Windows.edb, which can grow to be a couple of GB in size. Mine currently stands at 2.2 GB for 233,815 indexed files. The searching and indexing functions are carried out by the programs SearchFilterHost.exe, SearchIndexer.exe, and SearchProtocolHost.exe. These run under the supervision of the Windows Search service WSearch. The indexing is usually carried out in the background when you are not actively doing something on your PC, so as to interfere as little as possible with normal operation.
When you search for something, Windows consults the index to determine where it is, rather than ploughing through all the files on the disk looking for it. This should be quick and flexible, especially as you can combine several different search criteria (creation date, file type, file size, Album, Author, etc).
It clearly isn’t necessary to index most of the operating system or program files, although contrary to some assertions, you can if you want. Search seems to be able to find systems utilities like Services (services.msc) without trouble, so some of them must be in the search database by default.
Microsoft indicates that any folders placed in a library are automatically indexed. So the Documents folder and sub-folders should be automatically indexed. I’m not so sure that this actually works, so I specify all the folders I want indexed explicitly. Windows provides the capability to do this through the Indexing Options applet in the Control Panel.
Files which have not been indexed can still be found in principle, by a longer filename search process. In reality, sometimes non-indexed files will not be found at all, so we need to make sure that the index covers all the folders that we are likely to want to search.
Configuring the Search Tool – Where to Index
Let’s set up Search right from first principles, including building a new index, so that we know exactly what will be indexed and what not. We’ll put the new index somewhere where we can easily get at it and check its size.
Start by opening Control Panel | Indexing Options. There you can see the current state of the indexing process, a list of folders being indexed, and buttons to Modify the indexing and set Advanced Options.
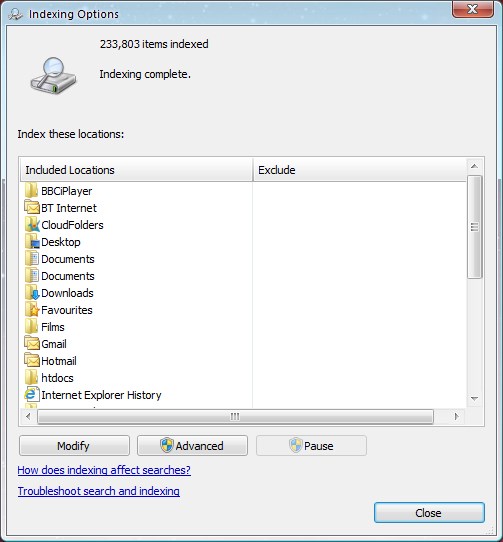 Which locations should we index? The Documents folder, obviously, and probably the other main system folders like Music, Pictures, and Videos. As they are in Libraries, these should be indexed automatically, but we’re going to make certain of that. You might have other folders on your hard disk that you specifically want to be able to search; you can specify them here. I set Downloads to be indexed, because I often have a lot of stuff in there; also I sometimes index a copy of a set of website files and folders, starting from the web root folder, D:\\Martin\\PercontorLocalWebRoot\\.
Select “Modify”, then “Show all locations”, so that you can see all the possible locations that can be indexed. Now select each drive in turn, and open up the top layers of folders to see what is currently set. DATA is the main data partition (D:) on my PC hard drive, so I definitely do want to index files here, but not all of them. I have chosen the Desktop, Documents, Music, Downloads, Pictures, and Videos folders and their sub-folders. It is not worth indexing any of the others. I also have another partition, E: (DATA2) on my hard drive; again, I have chosen to index some but not all of the folders.
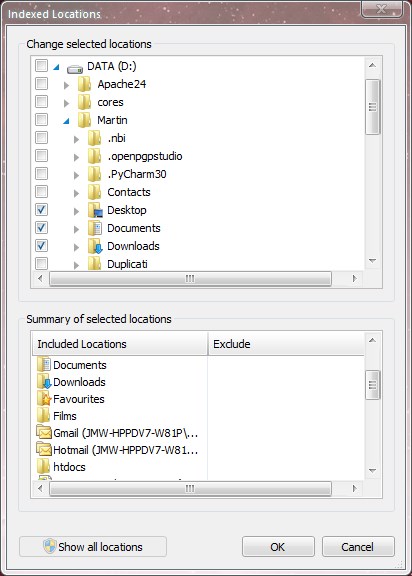 Most of my Microsoft Office Outlook mail folders are indexed; you can see that my Hotmail and Gmail accounts have been selected.
My C: drive doesn’t really need to be indexed, but, out of curiosity and for an experiment, I have chosen to index the operating system folder, C:\\Windows\\System32\\. Incidentally, if you want to index hidden files or folders, set File Explorer to View Hidden Files and Folders before you start up Indexing Options. This will enable you to index parts of C:\\Users\\Name\\AppData\\ and C:\\ProgramData\\.
I have enabled my folders under C:\\Users\\, although there is actually very little data there since the Documents and other system folders redirect to the data on the DATA partition at D:\\Name\\Documents\\, etc. Whatever you do, don’t index all of AppData; it is usually huge and contains application-specific files which are very rarely of any interest. You might decide to index one or two particular sub-folders.
If you have Outlook, you can select which e-mail accounts to index. The Mozilla Thunderbird “Advanced Options” can be set to allow Windows Search to search messages, and Windows Live Mail also has automatic indexing.
You can also index external drives if you want, but the more you index, the bigger the index gets of course, and the longer the index itself takes to search. So don’t index massive backup drives full of files unless you really must.
What to Index
We can choose how we want specific types of files to be indexed. In document files such as Word and PDF documents, we would like to be able to search the text; for photographs and music and video files, we would like to be able to search using the descriptive metadata such as date taken or recorded, author, length of track, size of image, and the like. For the most part, Windows sets all this up automatically. Let’s go and have a look.
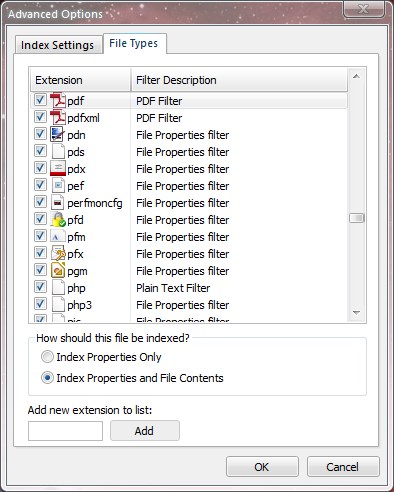 Select Advanced on the Indexing Options window. Select the File Types tab. You will see a list of all the file extensions available on the system, with a description of the filter used in indexing. The File Properties filter ensures that the file metadata for the particular extension, such as date of creation, recording artist, album, last modification date, size of file and so on is recorded in the index. If you highlight a particular extension, you can see which of the file data will be indexed, from the position of the radio button. It’s usually “Index Properties Only”, unless the file contains text, in which case “Index Properties and File Contents” will be selected. You can add new extensions to be indexed; for instance, I have set up to index web-server .php files, and since they contain recognisable text, I elected to Index Properties and File Contents. In that case the indexer uses the Plain Text Filter, rather than the File Properties Filter.
Adobe PDF files (.pdf, .pdfxml) are a special case, since you would like to be able to index their contents, but the contents are not in a form recognisable by the Plain Text Filter. The indexer has to use a special PDF iFilter. This is installed automatically when you install Adobe Reader (but not Foxit). As an extra twist, if you are using a 64-bit OS, you must install Adobe’s 64-bit PDF iFilter to be sure that documents are being indexed correctly. You can obtain it from here: Adobe PDF iFilter 64 . Just double-click the installation file.
Where to put the Index
 Having set up the indexing configuration, we can finally select a new location for our search index. I do this because the default location is hidden away somewhere obscure, and I want to be able easily to inspect the index to see that it has actually been built and how big it is. Create a new folder in C:\\ called, for instance, SearchIndex. Now from the Index Settings tab, select this as the new index location.
Leave the two top File Settings boxes unchecked unless you know why you might want them set. Now select Rebuild. WSearch will stop, the current index will be deleted, and then WSearch will restart and begin to build the new index. You can OK your way out of the Options windows. The index will take some time to rebuild, depending on how many files you have, and of what types. It is possible to speed up the indexer, but it is probably simpler just to start this process to run overnight.
Testing Search
Check whether indexing is more or less complete by opening Control Panel | Indexing Options and looking at the status information at the top. Indexing may be ongoing, or it may have finished altogether. If you ran the indexing overnight and a large number of files have already been completed (I have around 200,000), you can probably go ahead and do the following test. Otherwise, it may not work straight away.
Open NotePad or another text editor, and create a new document. Enter a word, let’s say “axolotl”. (It’s a Mexican salamander). Save the text file as, say, “FirstTest.txt”, somewhere well within your Documents folder structure, not just at the Documents folder level, and close it. Now open Word, and again enter “axolotl”. Save the document, again somewhere remote in your folder structure, close it, and name it “SecondTest.docx”.
Now start File Explorer, and navigate to the Documents folder. In the search box at the top right, type “axolotl”. Search should immediately find both files. The indexer is normally very fast, provided general indexing is already complete – your files should be indexed within seconds of closing them.
Now point File Explorer at the Documents folder again, and this time type:
name:~=FirstT
into the search box. This expression means “find all files whose name includes the sequence FirstT”. Search should immediately come up with FirstTest.txt. Try it again with “SecondT”. This should immediately bring up SecondTest.docx. Using name:~= should be quicker than just typing letters from the filename, because Search knows it only needs to look at filenames, not content. If you just typed “FirstT”, Search would also have to check through all its indexed text.
You can also do all this from the Start Screen search box, but there is an extra feature obtainable by using File Explorer. Select the Preview pane icon at the top left of the File Explorer window, next to “Navigation pane”. The Preview pane will open at the right, and if you select your file, a preview of its text contents will be displayed.
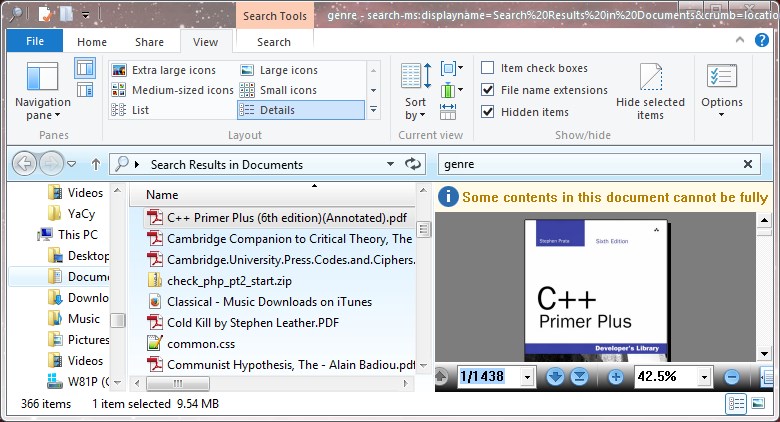
Finally, let’s check the PDF performance. Tucked away a couple of folder levels below Documents, I know I have at least one PDF containing the word “genre”. So I just type the word “genre” into the search box. After a few seconds to search the PDFs’ contents, the appropriate files show up. When I select one of them, after a few moments a preview of the PDF is displayed in the Preview pane, complete with navigation buttons. This is made possible by the integration of the PDF iFilter and Adobe Reader with the File Explorer program. Unfortunately this sophistication does not extend to displaying the PDF page on which “genre” is to be found, but you can double-click to open the document in Adobe Reader and search from there (ctrl-F).
The Panic Button
It has to be admitted, Search has its senior moments. If you type a search term into File Explorer, for instance to search Documents, sometimes there will be no response, or you will get the reply “No items match your search”, when you know very well they do. You may try different search terms or approaches, but Search will just stay doggedly stuck.
The best shot at a solution to this problem is to restart the Windows Search service, WSearch. You can do this via the Services Management Console, obtained by running services.msc or through Windows Administrative Tools. This may not work either, because WSearch is rubber software – you think you’ve stopped it, and it just bounces back up again – so even a stop or restart done this way may not close WSearch completely before starting it again.
Enter my killer solution: set WSearch “disabled” first, then stop it. This way it really will stop. Then set it back to “Automatic (Delayed Start)”, which is how it starts at boot time, and only then actually start it again.
You can do this via the Services console, but it takes time, so here is a way to set up a handy emergency desktop shortcut to do the job.
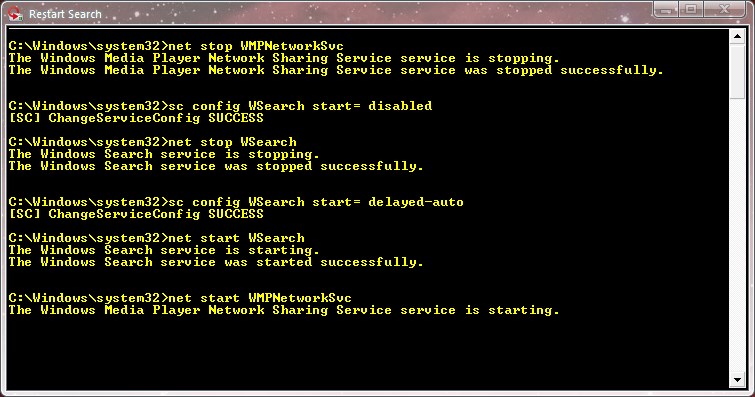
We’re going to write a simple MS-DOS batch file, or script, which will do the kill-restart process for us. Open a text editor and enter the following MS-DOS commands exactly as shown (no space before the = sign, but there is one after it.)
net stop WMPNetworkSvc
sc config WSearch start= disabled
net stop WSearch
sc config WSearch start= delayed-auto
net start WSearch
net start WMPNetworkSvc
Save the text as a batch file (.bat). I called mine SearchServiceRestart.bat. Make sure you type the .bat extension, and use Save As | All Files (*.*) to avoid tacking a .txt extension on the end. Move or copy the file to the C:\\Users\\Name\\ folder. Now right-click on the desktop and select New Shortcut. In the Shortcut wizard, browse to the location of your batch file, e.g. C:\\Users\\Name\\SearchServiceRestart.bat, and select it as the shortcut target. Finally give the shortcut a name, such as Restart Search. Finish the wizard to create the shortcut, then right-click on it and select Properties. Under Advanced…, tick the box to Run as administrator. Finally, select Change Icon…, and browse to C:\\Windows\\System32\\imageres.dll, and select it. Imageres.dll contains a range of decent icons from which you can select one that you think is appropriate.
Now double-click your new shortcut, and OK the UAC security prompt. A command-prompt window will pop up, and the commands will start to execute. The WMPNetworkSvc service will be stopped first, because it depends on WSearch; then WSearch will be first disabled and then stopped. As I said, WSearch is extremely resilient and will not stop completely unless disabled first. Once it has stopped, the next command is to set its boot start mode back to Automatic (Delayed), and then actually to start it and the dependent WMPNetworkSvc. When the commands have finished executing, the command window will disappear. Put the short-cut somewhere memorable; you should not need to invoke it very often.
Now try your search again. This time it should work, or at least show more response. If not, there are four more things to try:
- Check in Indexing Options that the indexing process has actually finished, or at least is showing a large number of files indexed; if not, wait until it has completed;
- Reboot;
- Rebuild the index, by going to Control Panel | Indexing Options | Advanced, and selecting Rebuild ; this will take some time, and is best done overnight;
- Reinstall Windows. I am not kidding; I have known Windows Search to have got into a state where reinstallation was the only way of putting it back into working order.
Occasionally you will be unable to find a file because Search has decided to re-index completely, in which case your searches may not work until the process is finished. You can open Indexing Options to check progress, but a nicer way is to use the Indexer Status Gadget. If you are running Windows 7, gadgets are probably familiar to you. All you need to do is download the gadget from Gadgets Revived, and double-click on it to install it. It’s the gadget to the right of the Volume gadget on the section of my desktop illustrated below. (The bottom window is Networx’ network traffic graph.)
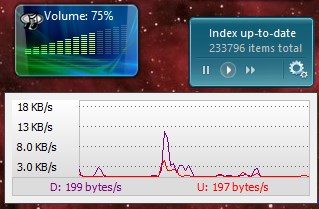 Virus-scan it by all means. It was written by Brandon Paddock, who worked for Microsoft at the time. It shows you the total number of files being indexed and how many remain to be indexed. It also enables you to pause the indexer if on occasion it is using too much CPU, or to set the indexer to “fast”, which disables the backoff feature which normally pauses the indexer while you are actively using the PC. You can of course set the backoff to “on” again by pressing the button showing a single arrow. The UAC confirmation window will come up when you do this, as the action needs elevated privileges, unless you have UAC turned off – which you definitely shouldn’t have. Just keep it on the lowest security level to minimise disruption while staying reasonably safe.
If you run Windows 8, and would like to run this gadget, just install 8GadgetPack. Ignore Microsoft’s silly assertion that gadgets are insecure; that’s just their poor justification for trying to force you to use their appalling Store Apps instead. Gadgets are no more insecure than any other program, and equally capable of being virus-scanned. Just don’t load any from a source that you’re not sure about, the same precaution you would take with any application. The 8GadgetPack team is reliable.
The Forbidden Folder
If you want to have a look at the index file itself, and see how big it is, double-click on C:\\SearchIndex\\, or whichever folder you built the index in. (You will need to be working in an account having administrator privileges, which will probably be the case if you are the owner and only user of your computer). Double-click again on the Search folder, then on Data, then on Applications, then on Windows. You will get a warning that “You don’t currently have permission to access this folder”; just click Continue. Among the files in the Windows folder you will see Windows.edb. This is the index database file. It will probably be around 1 – 2 GB in size if you have a lot of data.
Next time: Sophisticated Searching, and what to do when all else fails…

Another excellent article Martin.
I use Windows search a lot, with the wildcards mentioned and something that’s always puzzled me is why the search isn’t predictive like a Google search.
IE, it prompts as soon as it begins to recognise a word or phrase.
Example: at search I go to type in MSCONFIG……at MS….it comes up with everything with MS… in it, but strangely, not MSCONFIG.
Now, I could put a short-cut for MSCONFIG on the desktop, but that’s not the point…….
The problem is, what would it predict? Would it prompt you to give it the rest of a filename, or to complete a text sentence in the content, or a file property? There isn’t sufficient information usually at the outset to do any form of realistic prediction, and to try would use up a lot of resource in a utility which already has its work cut out for it just doing the search itself. When you’re looking for “msconfig”, Search doesn’t know whether you’re looking for those letters in text, or a file property containing those letters, or a program, so it typically suggests results, based on all these sources, from Documents, and Files and Folders, (since Libraries are indexed by default), and from Programs only if it finds a precise match in the program database.
For filenames, you get some degree of “predictive” response by doing a tailored filename search (see Part 2), for example
name:~=timelord
Here you are saying “look only among filenames for those which contain these letters; don’t search any content or properties”. So if you type the letters slowly: t… i… m… etc, Search should have time to come up with a list of filenames in the search pane which will change as you type in each new letter. This response will be quicker if you use the search term “name:~<timelord" instead, since "name:~<" looks specifically for filenames starting with the characters given, rather than just containing them.
name:~<"Doctor Who" does the job for names containing spaces.
As you wrote, sometimes a file or a name cannot be found. I did find, though, that the least amount of misspelling of the name will result in files or names not being found. The spelling must be, in my experience, perfect related to the original spelling. It isn’t like email addresses, where several names will pop up to choose from. I’m not sure whether a capital letter written in lower case, or vice versa, would result in failure. Will try that later to see if successful or not.
Bill, searches are not sensitive to the case of letters, so tag:”monkey studios” will find the item tagged “Monkey Studios”. Searches would become many times more difficult if you had to try to remember whether you had spelled a term with a capital or not.
For the reasons suggested in my reply to Marc above, you need to know the exact form, or spelling, of the term you are looking for, or at least be willing to try out a couple of variations, which isn’t really very onerous. Searching algorithms become dramatically more complex (and therefore slower) if you want to do a “fuzzy” search, where you don’t quite know the exact form of the term you are looking for. The problem is, as I implied above, what Search should classify as “near misses” to be presented to you as possible alternatives. For instance, should Search be expected to know that when you search on “monkey” it should also bring up results associated with “ape”, just in case you mis-remembered? This sort of thing becomes immensely complex very fast, and is one reason why Google spends huge amounts of money on research and needs massive server farms. We just have PCs, and therefore need to keep it relatively simple.
Nearly forgot – see part 2 of this article, just published, for detailed explanations of the searches you can do. http://www.davescomputertips.com/the-art-and-craft-of-windows-search-2-sophisticated-searching/
The windows 7 search is the way it is because not one person at microsoft other than the imbecile that wrote it ever used it. Because if they had the cretin would have been fired. It appears to have been implemented by a first year un-paid intern with a bad attitude.
It is completely dysfunctional in every aspect.
Couldn’t have said it better myself. lol