
Windows Hyper-V Manager
Unlike Oracle’s VM which is a type 2, Hypervisor Hyper-V is a type 1 Hypervisor, which means it runs directly on the host machine’s hardware. It only runs on the Pro, Enterprise, or Educational versions of Windows. This means you can install Hyper-V on Windows and achieve the fastest speeds for operating virtual systems. There are differences between Windows 10 and 11 installations. Just follow the one you need.
Virtual System Installations
The first steps are the same as installing VirtualBox, explained in Part 2 of this series. After you have checked and are sure virtualization is activated at the BIOS level, follow the steps below to install Hyper-V on your version of Windows.
Windows 10 and 8.1 (Professional, Enterprise Education)
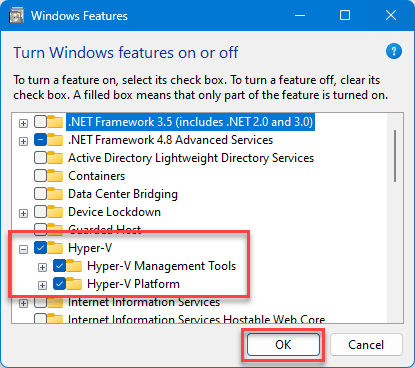
- Type Turn Windows features on or off in the search area of the taskbar and open the app.
- In the window that appears, scroll down and check on Hyper-V then click OK and wait for the process to complete.

- Restart Your Computer.
Windows 11 (Professional, Enterprise Education)
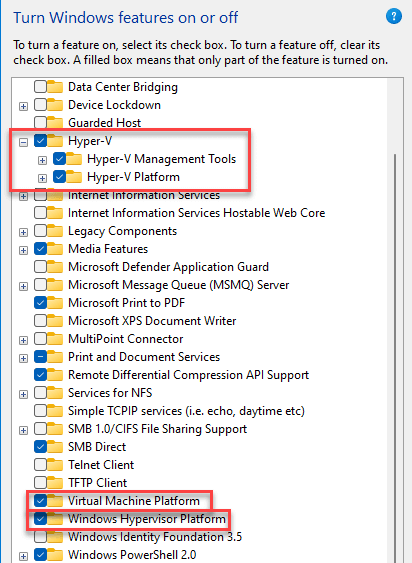
If you want to enable Hyper-V on Windows 11, follow the same steps as for Windows 10 but Windows 11 has three components. To take full advantage of virtualization, make sure each of these is enabled in Windows Features:
- Hyper-V This adds the management tools and platform to run VM on Windows 11
- Windows Hypervisor Platform This enables the user-mode API components that allow third-party virtualization applications like VirtualBox and Docker to interact with Hyper-V
- Virtual Machine Platform This component must be turned on to use the Windows Subsystem for Linux (WSL)

Windows 10 (Home)
If your system does support Virtualization there is a way to install Hyper-V on Windows Home. You must have a batch file that will install it prior to enabling it on Windows 10 Home.
To create the batch file:
- Open Notepad
- Copy then paste the code below
- Save the file as Hyper-V-Enabler.bat on your PC
- Navigate to the new batch file, right-click on it, and select “Run as Administrator”
pushd “%~dp0”
dir /b %SystemRoot%\servicing\Packages\*Hyper-V*.mum >hyper-v.txt
for /f %%i in (‘findstr /i . hyper-v.txt 2^>nul’) do dism /online /norestart /add-package:”%SystemRoot%\servicing\Packages\%%i”
del hyper-v.txt
Dism /online /enable-feature /featurename:Microsoft-Hyper-V -All /LimitAccess /ALL
pause
Click “Yes” if the UAC prompt appears. Wait for the installation to complete. When the commands are finished executing the final command prompt will ask if you wish to restart Windows. Click “Y” and you will have Hyper-V enabled on your Windows Home OS. Follow the steps for Windows 10 above. Once you have rebooted, you will need to enter “Turn On Windows Features On or Off” in the search bar and make sure that Hyper-V is enabled.
Using Hyper-V Manager
Now that you have installed Hyper-V Manager on your PC you can create and manage virtual machines, virtual hard disks, and virtual networks. To launch it just type Hyper-V Manager in the search bar of the Task Manager or from the Start menu. Part 4 of this series will walk you through the installation of a virtual machine in Hyper-V Manager.
Summary
Installing Hyper-V is very straightforward and easily activated. Now let’s get started by installing a new OS.
This is the 3rd of a 5-part series about Virtual Drives:
- Understanding a Virtual Drive
- Installing Oracle’s VirtualBox
- Installing Hyper-V Manager ⬅ You are here
- Installing a Linux Distro
- Using Quick Create In Hyper-V Manager
—