Styles make your life so much easier because you create a document once and then you always have it at your fingertips, formatted exactly to your standards for any particular use. Styles are like creating an exemplar for how you want your document to be formatted, your font color, size, spacing, margins, etc. Once you have created it you never have to go through that work again!
Once you learn how to create styles in Word, the number you use can expand very quickly! It always makes sense to keep your house tidy right? There will come a time when you may want to rename a style or delete one or copy one style to another. You get the picture. Well MS Word has made this easy for you with the Organizer.
Follow the steps below to learn how to use the Organizer to manage your styles:
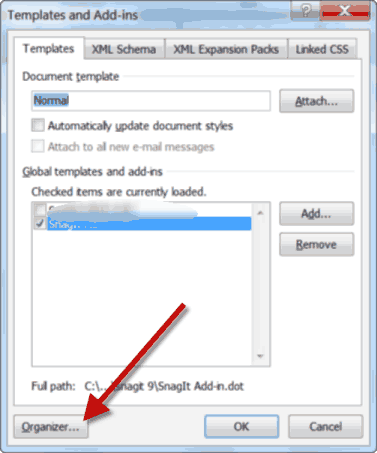
- On the Developer tab of your Ribbon, in the Templates group, click on Document Template.
- If the Developer tab is not visible, you can access the Organizer from the Manage Styles dialog box.
- Click the Organizer at the bottom left.
- Click the Styles tab if it is not already selected.
- Look to the left and right of the Organizer and you will see each side can display styles in either a document or a template.
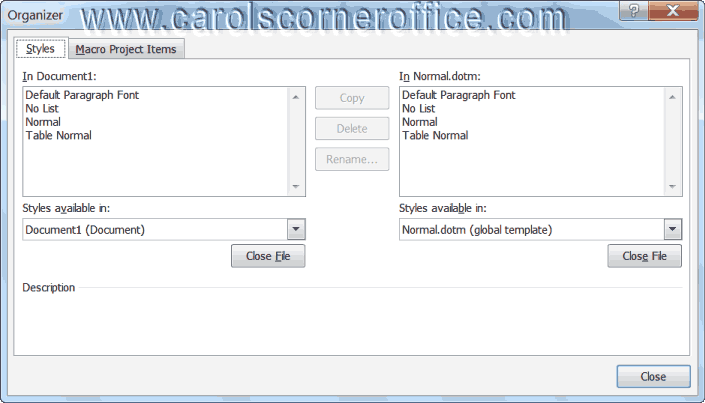
- Use the lists on both sides to indicate the template or document whose styles you would like to manage.
- If you are having trouble locating your desired template or document using the lists, click on the Close button on one side to open up an area. Then click the Open button to locate and open the template or document of your choosing.
- Select the style you would like to copy, rename or delete.
- Click on the Copy button to copy the style to another document or template. If the target file has a style with the same name, Word will prompt you to give it a new name.
- Click on the Remove button to delete the selected style and the Organizer will ask you to confirm your action.
- Repeat the steps above for each style you would like to organize.
- When you are finished, click on Close.
Be aware that there are some caveats when using the Organizer. You cannot use the Organizer to delete the built-in styles in Word. Also, The style lists for a particular document or template represent the styles in use in that file, which could include any of Word’s built-in styles, such as headings. You can select these styles and copy, delete or rename them but if you do, your new name is just added to the end of the built-in style name. The bottom line is the Organizer is good to use with your custom and templates and not the built-in styles that ship with Word.
Can I have more than one “style book” on my Word. For example, I have two businesses and have different styles (branding) for each. I have a document for each that is the template. When I go to business 1, document 20, I want to base that document on the Business 1 template styles. Similarly, I want to base business 2 documents on that template. But I keep coming up with moving everyone to the normal,dots file and moving it back — for each header, paragraph, bullet, etc.
When I go to “Styles available in:” I would like to say Business 2 template and see only those styles.