As you know, footnotes are used in documents to provide references or annotations. It is very easy to insert automatic footnotes in documents using Word, but suppose you would like to use a custom footnote mark?
Turns out you can do this and just as easily as you insert the automatic footnotes!
Follow the steps below to learn how:
- Place your cursor where you would like your custom footnote located in your document.
- Display the References tab on your Ribbon.
- In the Footnotes group, click the icon at the bottom right-hand side to display the dialog box.
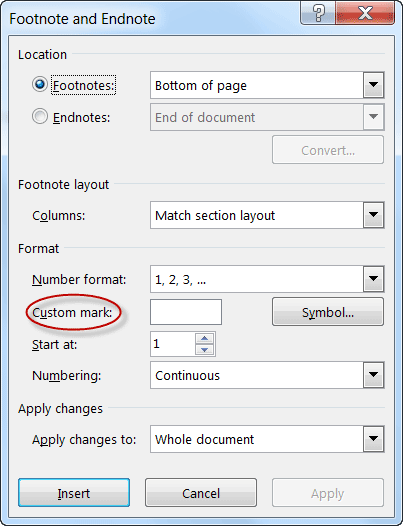
- In the Custom Mark box, enter the character(s) you would like to use for your custom footnote mark. If you would prefer a special symbol as your custom mark, click on Symbol and make your selection.
- Click on Insert and your custom footnote mark will appear in your document and your cursor moves to the bottom of the page where your footnote will appear.
- Key in the text of your footnote, formatting it as you normally would.
- Click someplace in the body of your document to close the footnote box.
—
Ah, nice and thanks, but what I would have liked to do is to integrate special characters before and/or after the automatic foot/endnote number, not replace it, e.g. generating “[1]” instead of “1”. Any ideas?
What you want to do is change the Footnote Reference Style. Unfortunately, there is no built in method to add brackets before and after the Footnote Reference number.
There is, however, a way around it to accomplish what you want. Follow the steps below to learn how:
Go ahead and set up your Word document and just insert your footnotes the way you always do.
Once you are finished with your document and all your footnotes:
Click CTRL + H which will open the Find & Replace dialog.
In the Find field, click Shift + 6 + f. Note – it must be lowercase f.
In the Replace field, click your opening bracket key and then click Shift + 7 and add your closing bracket character.
Now click on Replace All.
You will find that all of your Footnote reference numbers will now have brackets before and after the reference number.
I hope this has been helpful to you.
If you would like to substitute [1] for the superscripted 1. that appears in your Footnote you can simply modify the footnote style and save it. Then your footnote will reflect the bracketed 1 instead of the superscripted 1.
I hope this has answered your question. All the best!
Hi! I also need to do this – but was unable to do so based on your note above. Did you mean to go under Format > Styles and change the style called “Footnote”? I tried this, but there is not a style listed for the actual numerical notation, only a style listed for how the text is formatted in the end/footnotes. If there’s any way you can help me understand how to put brackets around the numeric endnote that would be great!