

Polishing Your Manuscript
Probably the most time-consuming and repetitive aspect of writing a book is the editing. It’s almost endless and the image above needs to have the caption multiplied by at least ten, if not more.
However, it’s not a fruitless exercise by a long shot and I regard editing akin to placing the book in a huge wine press, where extraneous words and unnecessary paragraphs can be squeezed out. That’s the theory anyway, yet the fact remains that no matter how many times I edit the book, I always find mistakes or some aspect I’m not happy with. I’m also in the habit of looking back at previous drafts to remind myself about how effective the editing has been, which can be a cringe-worthy business when you read what you originally wrote, producing an inward blush and the exclamation, “Did I really write that?” But that’s all a question of style and it’s not the subject of what we’re looking at today.
How To Format Your Manuscript
Whilst there are numerous programs that help in the writing of a book, such as Scrivener and Novlr, I use Microsoft Word (2013) because it’s simple, uncluttered and easy to use. Now that I have a finished draft, I can use Word to correct layout aspects such as indents, line spacing, and font size. Formatting the manuscript for the preferred book trim size, however, is a different matter. Fortunately, KDP has a free Kindle Create Word add-in which takes all the grind out of margin sizes, gutters, and headers.

The add-in creates an additional tab in Word’s ribbon so that you can choose the following options:
- Layout theme
- Trim size (actual book size)
- Title page, book start, chapter title, and other elements
- Add headers (author, book title) and page numbers
I’ve chosen a trim size of 9″ x 6″ and a font size of 11 pt, and by using this very useful tool from KDP, you’ll be able to calculate the book spine size and other important elements for your cover design.
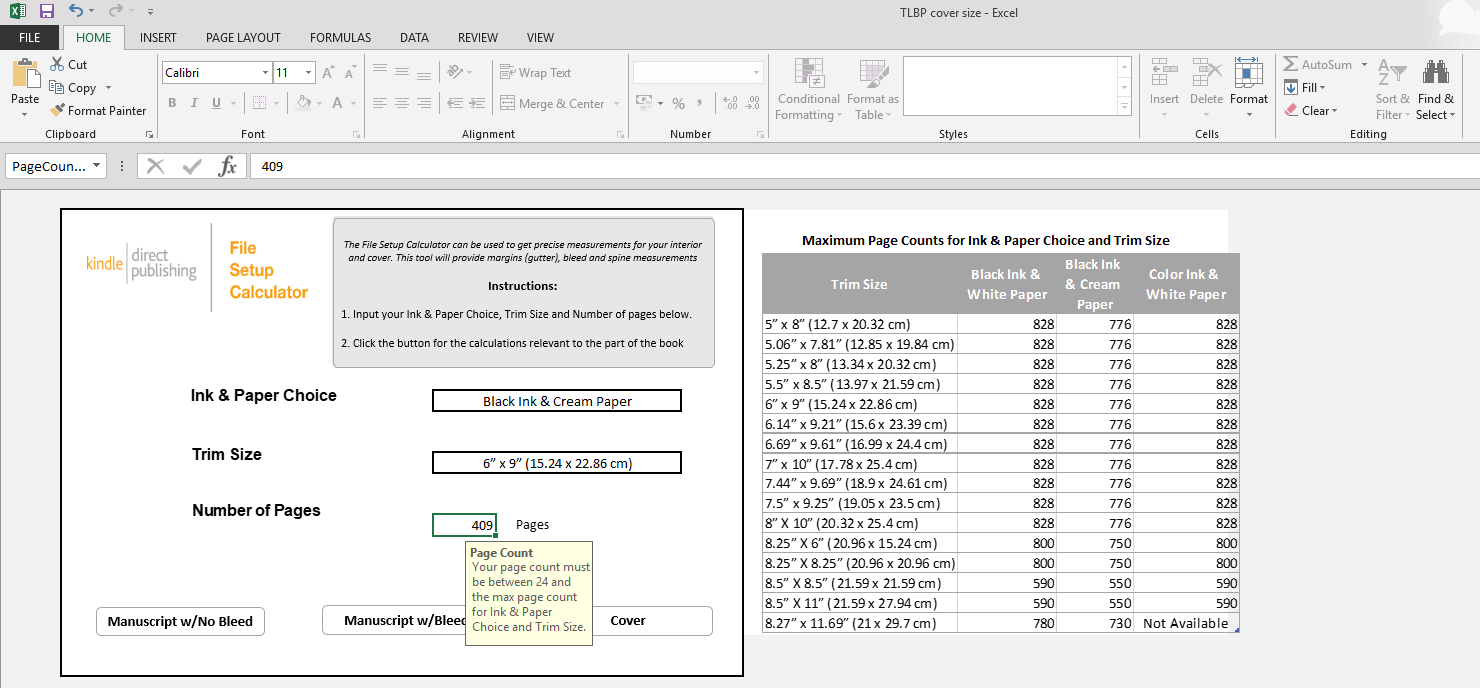
The KDP Word add-in uses its own templates based on your chosen trim size to calculate the exact margins and gutters for each page.

I have Word set up as a single page for writing and at first, I was a little disconcerted to find that the margins varied every other page, until I realised that the inside of the page (the gutter nearest the spine) has a slimmer margin than the outside of the page. I had to check a few paperbacks just to make sure I hadn’t screwed up.
Sign Up With Kindle Direct Publishing
If you have an Amazon account you can go to this sign-up page at KDP and use the same username and password as you would normally for Amazon, where you will then be shown the main page for publishing your book. I was pleasantly surprised at how simple and undaunting the entire process is. It really isn’t very scary at all.

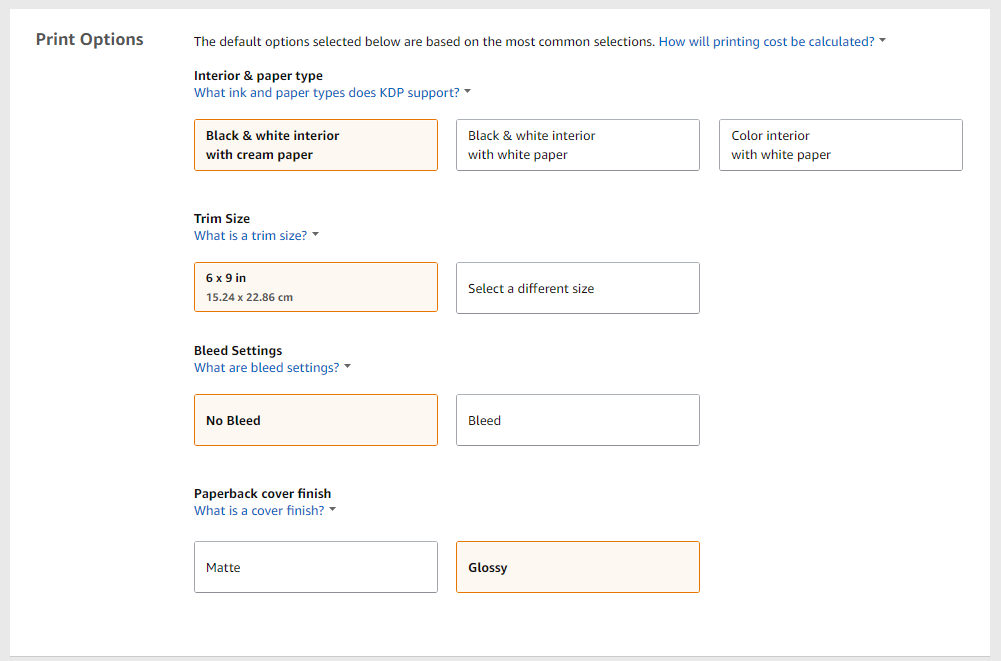
Once you’ve completed the book title, chosen eBook or paperback, the following pages guide you through all the other options such as trim size, ISBN, print options, book cover, rights, pricing and finally the big red button– uploading your manuscript.
I haven’t uploaded the manuscript yet, as I still have some corrections to make. I also need to be 100% sure that I’m happy with the finished book and barring any hiccups, that should happen early in the new year. Since I haven’t yet uploaded the manuscript, I can’t show the rights and pricing page, but I expect I’ll be able to do this in Part Three of this guide. I’ll also be publishing as an eBook and linking both formats as described in KDP’s guide, Linking Your eBook and Paperback, a subject I’ll be covering in Part Three.
The Book Cover
In order to keep the costs down, I had originally intended to either design my own book cover, persuade a friend to do it, or use KDP’s own book Cover Creator. First I realised that I’m not a graphic designer, friends can be unreliable, Cover Creator still needs design skills and I certainly didn’t want to use stock images, with my book cover possibly ending up as bland and uninteresting. There’s also the matter of copyright to take into account and the last thing I needed was to get bogged down in such matters. In the end, I contacted the person who designed the cover for my first book, we arranged a fee, discussed how I imagined the cover might look and she’s now busy coming up with a design. In order to do so, she needed to know what the book was about, so I sent her a full spoiler synopsis and following a Skype session, she now has a very good idea in her head of how the cover may look. I also made it clear that, notwithstanding my own interpretation, she should forge ahead with her own vision and surprise me. She certainly delighted me with the cover of my first book.
 When I go shopping for books, unless I’m looking for a particular title, book covers do catch the eye and they are key elements in how books are marketed. I only have to think of book covers (and film posters, for that matter) such as those for Jaws, The Godfather, and Nineteen Eighty Four, and I instantly recall them. As a diversion, here’s a list of The 50 Coolest Book Covers.
Publishing Your Book
Back in 2007 the process for self-publishing was very similar to what I’m doing today, except the tools that we now have to hand are much more advanced, the Internet is much faster and self-publishing has skyrocketed in popularity, particularly with Young Adult fiction. What I’m drawing from the democratisation of book publishing is the ability for new authors to publish their work quickly, without the need to be subjected to the whims and usually cold-hearted attitude of many literary agents. That isn’t to say every self-published book is to everyone’s taste, but at the very least we now have a new, inclusive, and exciting portal through which our work can be seen.
As I mentioned earlier, part three of this how-to will be needed to complete the process, so my checklist for publishing the book will be as follows:
- Upload the final book cover
- Finalise a synopsis for the back of the book cover
- Devise a marketing strategy prior to publication
- Use the new book cover as a marketing tool on the new website and social media well in advance of publishing date
- Final read-through for errors and layout (domain name already bought)
I really should get on with my checklist now, so in the meantime, I will reveal all in the next part of this series.
Contents
- How To Self-Publish Your Book – Part One
- How To Self-Publish Your Book – Part Two <<- You are here
- How To Self-Publish Your Book – Part Three
- How To Self-Publish Your Book – Part Four
- How To Self-Publish Your Book – Part Five
—