 I cannot tell you how many times I have received a phone call from an irate client, cursing Word and the person who created it because they “have tried everything under the sun” to correct some formatting and it just doesn’t work!
Below are some of the complaints I get over and over:
The line that will NOT go away! You can be typing along doing well and all of a sudden a black line appears in your document and you cannot seem to remove it. You place your cursor at the beginning of the line and try to delete it – not gonna happen! The line remains.
Well you are not crazy and it is not the the program, or the designer who created it, that is at fault. That black line that sits there in your document so stubbornly is actually called a paragraph border and it was created for you by Word’s AutoFormat feature. You may have keyed in three dashes in a row and tapped your enter key and Word thought you wanted a line all the way across your page.
Follow the steps below to remove it:
Place your cursor in the text immediately preceding the line.
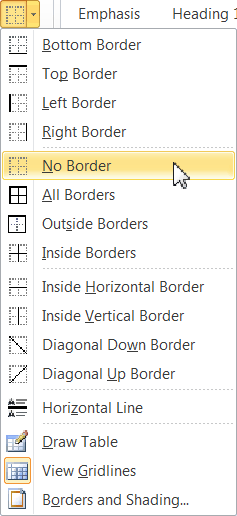
- On the Home tab of your Ribbon, in the Paragraph group, click the Border drop-down and select No Border.
It’s always a very easy fix when you know how, isn’t it?
How about the blank space at the end of a document? That is another one I get calls about.
The document is fine except for one page that has a huge amount of space at the bottom and you cannot make it go away!
I teach all my students that they have to enable the Show/Hide feature in Word. I would be lost with out it and you might be too!
So if your Show/Hide feature is enabled and you cannot find a hard page break, what else could it be causing that big old space at the bottom of the page?
Well Microsoft could have done a better job with their Block Protect feature in my humble opinion. Block Protect keeps sections of text together on the same page of your document.
- The quickest and most simple thing to do is click CTRL + A to select all text in your document.
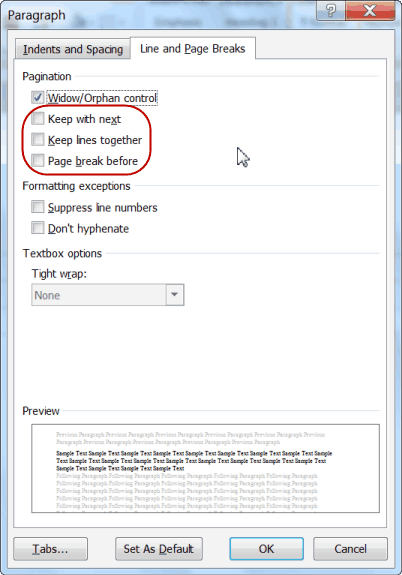
- Then on the Home tab of your Ribbon, in the Paragraph group, click the little arrow in the right-hand corner to open the dialog box.
- Be certain the three check boxes are unchecked.
Now you will be able to scroll through a document and be certain that all your page breaks are correct and there is no huge space at the bottom of any page!
The last problem that I frequently get calls about is the case of the highlighted text that the user cannot get rid of.
Usually when I get calls about this issue it is from law offices because they frequently use research documents from companies such as WestLaw which will highlight certain words in the document for them.
Unfortunately, those highlighted words are not highlighted in the manner that Word highlights them.
You cannot make the highlighting disappear by changing the font formatting because that is not your problem.
The problem is a paragraph problem!
This speediest and easiest fix for this particular problem is:
- Select the text with your mouse.
- Click CTRL + Q to remove all paragraph formatting.
- If you need to preserve formatting other than highlighting such as indents, select the text and click the drop-down next to the Shading icon (paint can icon) in the Paragraph group of your Home tab.
- Select No Color.


These are great tips, Carol, but why are you still talking about Word 2010′ when 2013 has been out for almost two years?
Patrick, the reason is probably because there are still more Word 2010 users than 2013. Not everybody switches versions just because it’s a new version. If the old version ain’t broke, why try to fix it. I expect to hang on to Word 2010 for a few more yet.
Apropos Patrick’s comment and your reply, I couldn’t agree more with the latter. I’m still using Word 2000 which meets most of my WP needs.