Last couple of weeks I have been talking on the subject of Google. From, ‘How to Change Google Chrome Theme,’ to, ‘How to See Past Google Doodles.’ If you missed either of those you can find them here:
This week I wanted to stay on subject but cover something a little more serious. When you have a Gmail email account you connect this email to many different sites or apps. Have you ever wondered how you can see what your email account is attached to? I did and wanted to see if there was a place that would show me what my account was connected to. Knowing this can help you clean up those trails that you have left online. After some research (and some coffee) I found out you can see what your account is connected to and remove them if needed. Before we jump into this lesson make sure to take a peek at these other articles I have written:
- How To Opt Out Of Ad Privacy Choices Amazon
- How To Change Keyboard Theme On Android
- How To Turn On/Off Auto-Correction On Motorola
- How To Turn Off Predictive Text Samsung
- How To Change Instagram’s Device Permissions
Guess we better get this class moving. Pull out those computers/devices and get started.
How To Find Accounts Linked To My Gmail
This will be shown on my Windows Laptop and Motorola Edge Android phone.
How To Find Accounts Linked To My Gmail (Computer)
Step 1: Find your Google Chrome browser and open it up.
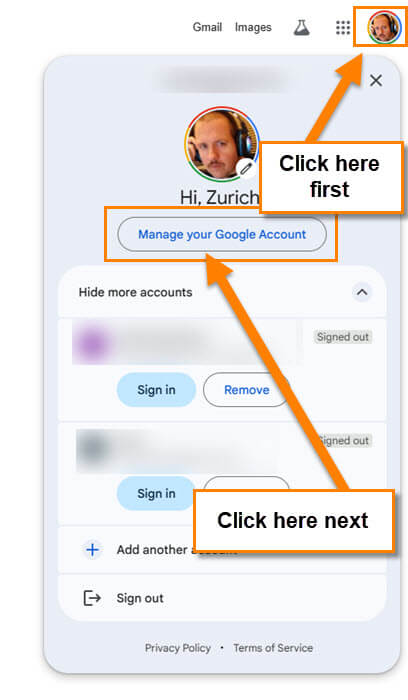
Step 2: Once on the browser look to the top right for your profile image. If you are not signed in to your Google account, do so now. Click on your image and a menu will appear. At the top under your Hi, (Name here) click the Manage your Google Account button.
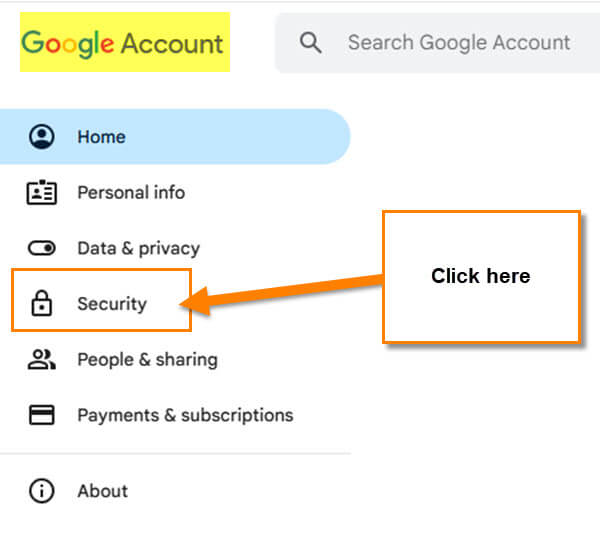
Step 3: On the next screen look to the left menu and click on the option called Security.
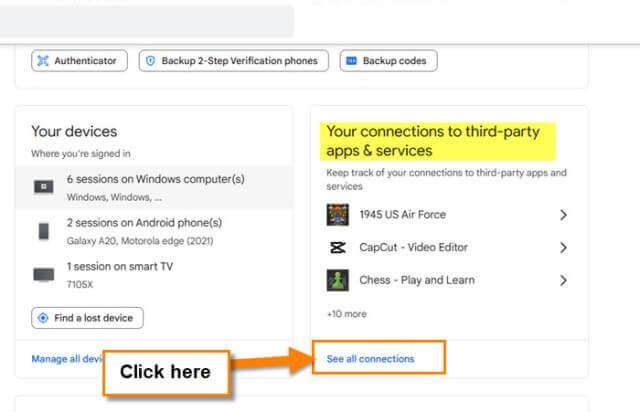
Step 4: The security screen will have many options but we want to find the section called, “Your connections to third-party apps & services.” You should see the See all connections link under that. Click it.
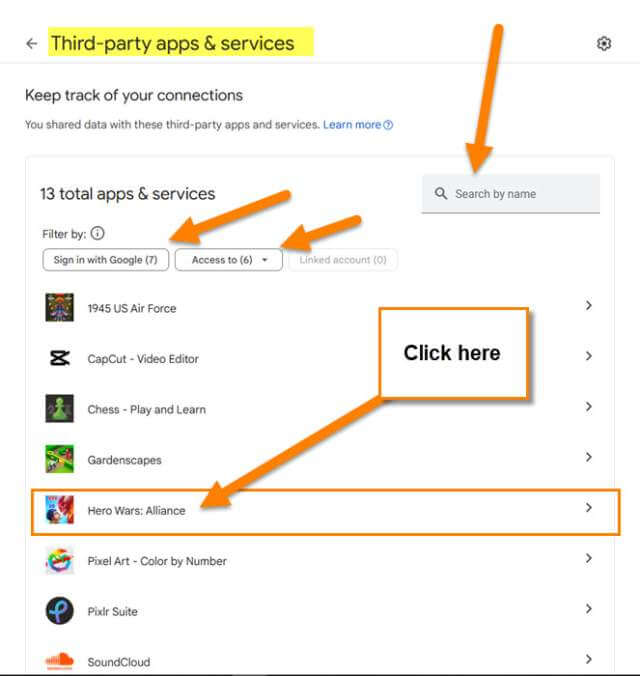
Step 5: Here you will see all the apps and services you have your Gmail connected to.
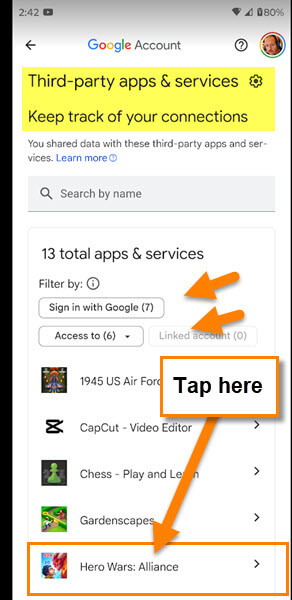
Keep track of your connections: You shared data with these third-party apps and services.
Here you can search a few different ways:
- Search by name (Search box)
- Filter – Sign in with Google (these you use Google to sign in with)
- Filter – Access to
- Or choose one from your list
I do not have many so looking at the list is easy for me. Since we now know where they are let me show you how to remove the access. Find the one you want to remove the access from and click on it.
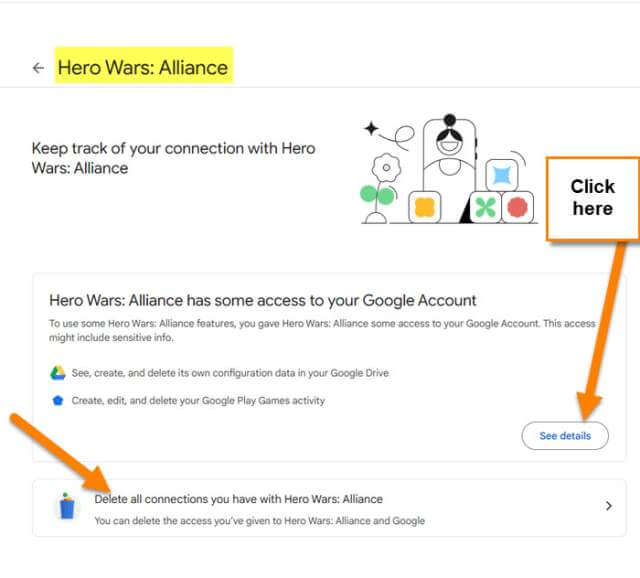
Step 6: Now you will be on the App or service screen you clicked on. You have two options here:
- See details button
- Delete all connections
For this article, we will click on the See details button.
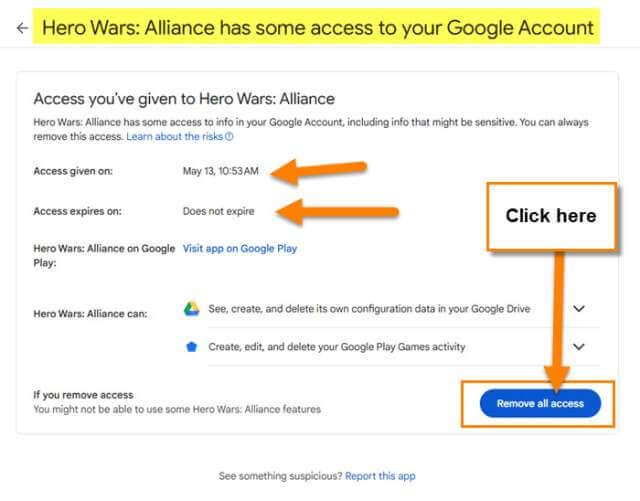
Step 7: After that it will open the details of all the access your app or service has with your Google account. The button we will want is Remove all Access. That is located at the bottom right. Click it.
Bonus tip: You might see a button saying “Stop using Sign in with Google” and if you do, click it. Then click the Confirm link on the pop-up window.
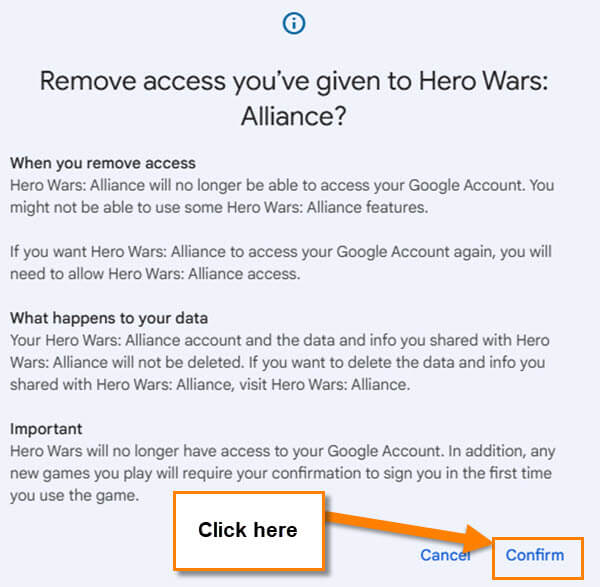
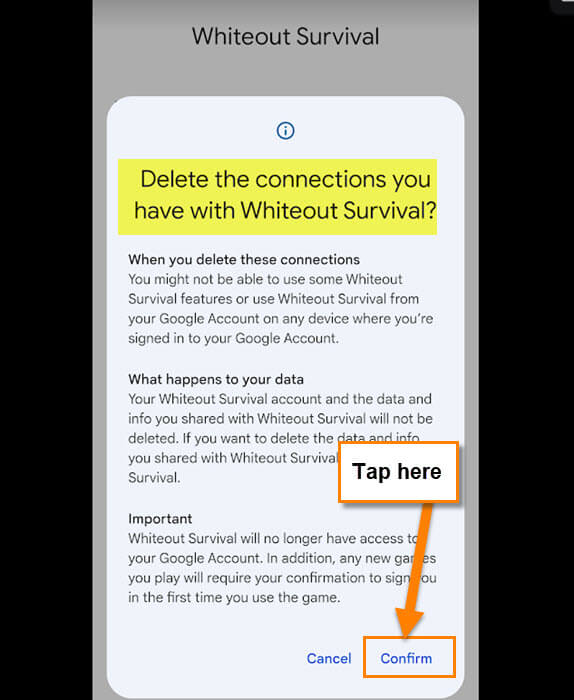
Step 8: You will now be given a warning screen with a confirm link. Basically, it is telling what you are about to do. If you are good to go, click on the Confirm link at the bottom. DONE
You now know how to find this and remove the access it has. Time to jump on over to our mobile device and show you how.
How To Find Accounts Linked To My Gmail (Mobile Device)
This is being shown on my Motorola Edge Android phone.
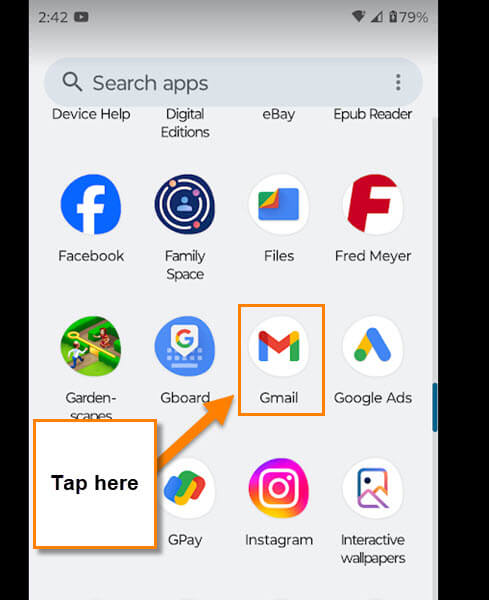
Step 1: On your device find the Gmail app. Tap it to open.
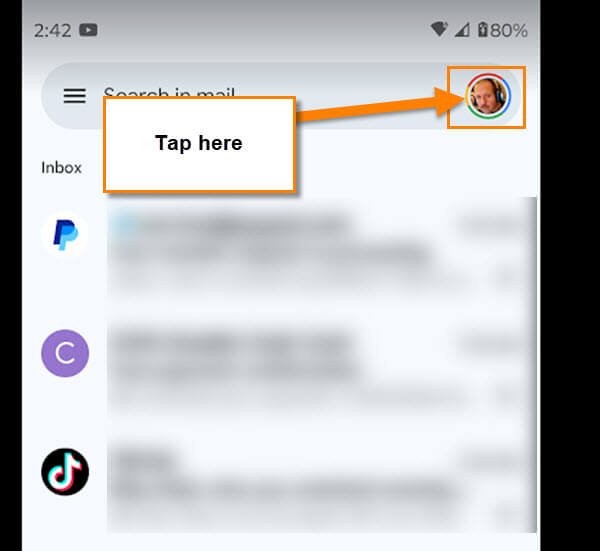
Step 2: Once on the app make sure you are logged in to your account. Look to the top right and tap your profile image.
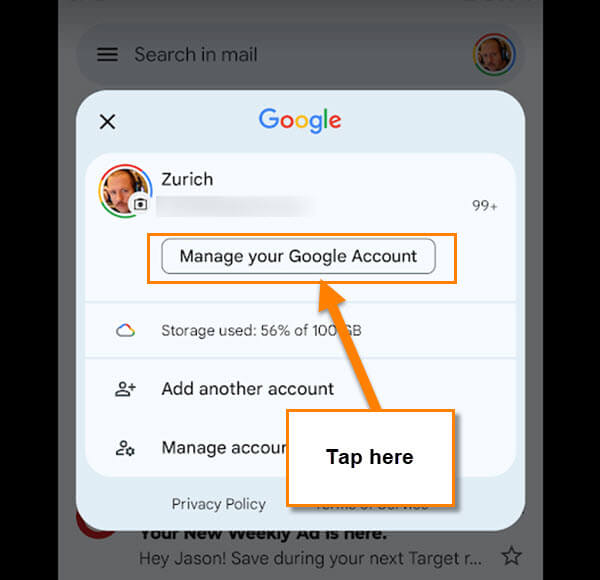
Step 3: As we did before, click on the Manage your Google Account link.
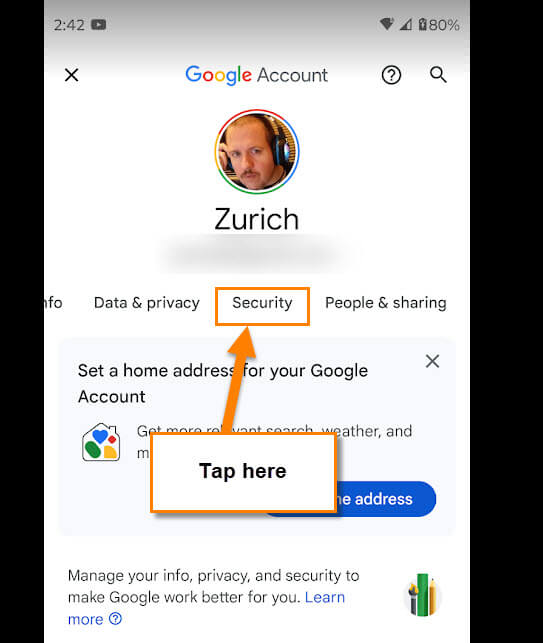
Step 4: Here you will see some tabs under your name and email address. swipe over until you see the Security tab. Tap it.
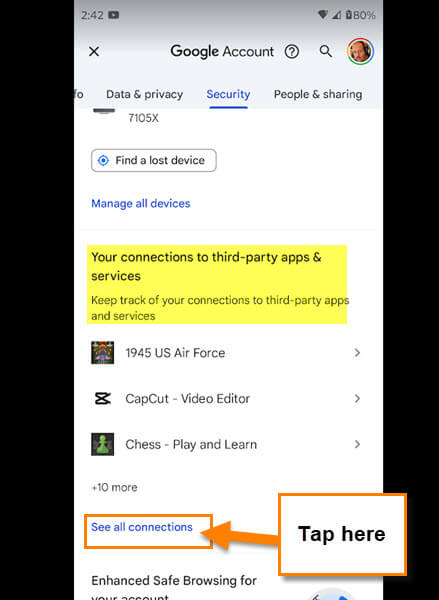
Step 5: On the security screen scroll down until you find the section called “Your connections to third-party apps & services.” Now Tap the See all connections link.
Step 6: Now we are on the screen that shows you all the connections you have. You can search or use the filters to find which one you want to deal with. Tap on the one you want to remove access for.
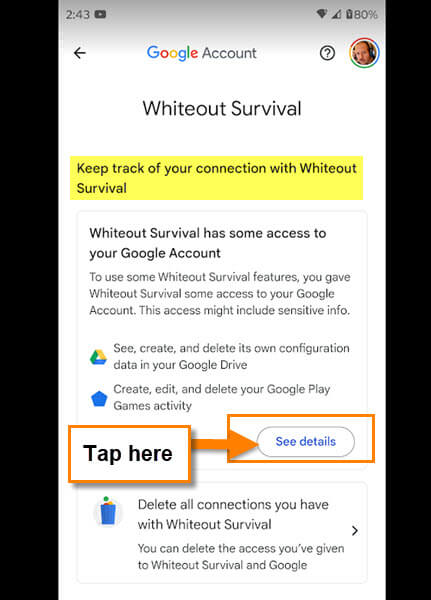
Step 7: As we did on the computer, tap on the See details button.
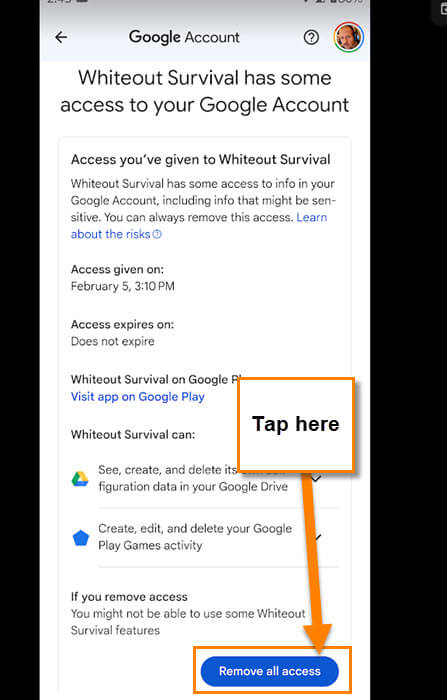
Step 8: On this screen, tap the Remove all access button at the bottom right.
Step 9: That confirmation window will pop up and all you have to do now is tap the Confirm link. Done!
You now know how to do this on the Chrome browser and your mobile device. Time to share your new knowledge with the world.
—

Jason,
Very useful article, Thank you.
Yes very useful. I spent almost an hour scrolling all over the place and updated many things.
Luckily Gmail is very user friendly because I could only have 1session open at a time so I wasn’t able to have your instructions to hand while I scrolled.
So I had to wing it! It was easy and productive.
Thanks
Very good instructions. This question often comes up.
Is there also a way to find email accounts that use my Gmail account as the backup or recovery option?