
A memoir is defined as a historical account or biography written from personal knowledge or special sources.
In this article, we will look at putting together a family history to pass on to others. We will look at ways to organize a document as well as pictures. And discuss ways to distribute the results using the cloud, flash drives, DVDs, and even as a published book.
I am not going to give you a magic formula to create yours– only you can recount your life story. This article will present some ideas on how to get those memories into a form you can reproduce easily to pass on to your heirs so they have a first-hand account of your life.
It does not matter what type of computer you have but you will need one to create your story. Once you have completed it, you can distribute it by various means such as a published book, on a CD or flash drive, or as a PDF to be emailed or made available in the cloud.
This demonstration will use Google Docs that can be used on most computers as long as you have internet access. You will need a Google account but not a Gmail account. With the free Google account, you receive 15 GB of online storage. Other word processors will work as well.
I suggest breaking your life story down into meaningful sections such as childhood, family growing up, school K-12, college, service, working experience, etc. Include the things you want others to remember about you.
Start A New Document
Open docs.google.com
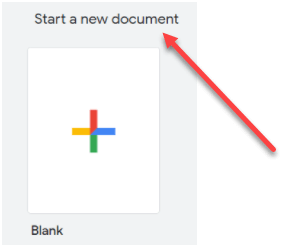
Click Start a new document.
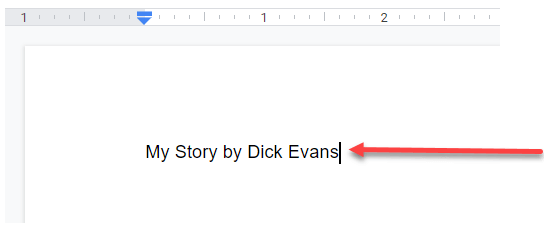
Type a title for your memoirs document.

Click “Untitled document” to use the title as your document name, then click back on the document to continue.
This is not a lesson in using Docs. I am assuming you know how to use the word processing application you are familiar with.
Speech To Text
Those of us that came from an office environment may be proficient in using the keyboard. Sitting at the computer and typing is easy for you. For many, it is not. In Docs as well as many other applications there is a speech to text feature.
If you have a smartphone, you might be familiar with clicking on the microphone symbol and speaking. The phone converts your words to text in whatever phone app you are using. It is not 100% and depends on our speech patterns so it is important to read what it wrote and correct any errors.
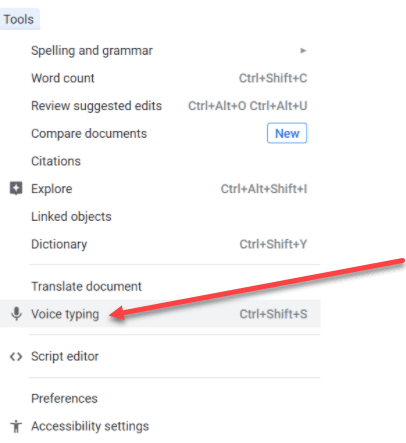
In Google Docs, click Tools > Voice typing. You can instead use the keyboard shortcut Ctrl+Shift+S.
Note: when pressing multiple keys, hold down all but the last key and then tap the last one. Do not try to hold them all down at the same time.

The red microphone image indicates that Docs is ready for you to begin speaking. Click it and speech to text stops.
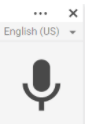
To return to speaking, click the black image. X closes the feature.
With speech to text or voice typing, you can sit back and relax as you tell your story. With Google Docs you can also use your smartphone to create or update your document anywhere you are.
The Three Nevers
I wrote about these in a previous article but this sums it up:
(1) When centering titles or pictures in your document do not use the space bar to move the items over.

Use the center tool.
(2) When typing your document keep typing at the end of a line. Those of us that came from a typewriter environment needed to be aware of the end of a line and we performed a carriage return to get to the next line. A feature in a word processor called word wrapping will automatically bring you to the next line when the word will not fit on that line.
(3) Do not use the Enter key to get you to a new page.
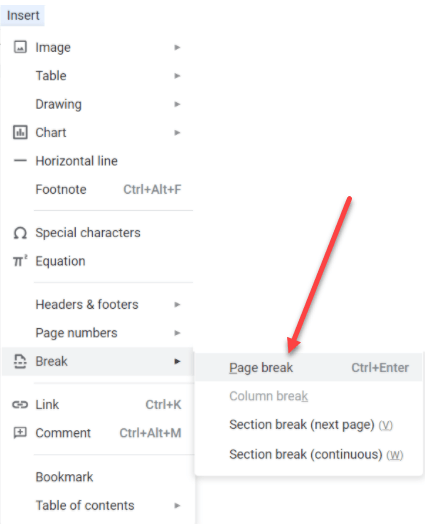
Insert > Break > Page break instead. You can also use the keyboard shortcut Ctrl+Enter.
Insert Pictures
Pictures are an important part of your story. Dig into old photo albums and pull out a few from various time periods in your life. Put them into digital form and use them throughout your memoirs document. If you plan to publish, remember that color images will cost more. If you are going to publish online or will be using digital media, there is no extra charge for color.

Place your cursor on a blank line and Insert > Image > Upload…
As you can see in the drop-down, images can be included from various sources. When inserted, click the image and drag one of the corners to size the image to the page. Do not drag from the right or left or top or bottom to resize or the image will no longer be proportional. You can also set it to have the text wrap around the image.
What if many of my pictures are in physical forms like in old photo albums or even slides? Use your cell phone and take a picture of the old picture. For those old slide carousels, project the slide on the screen or on a blank wall and use your cell phone to take a picture of the picture. They turn out just fine and I have written about doing that in the following articles: How To Add Captions To Pictures and How To Scan Old Photo Albums
Table Of Contents
Google Docs will generate a Table of Contents (TOC) for you. You do not have to create one on your own and constantly update the page numbers. Let the application do it for you. The only requirement is to format the title line of each section or chapter as a Heading style.
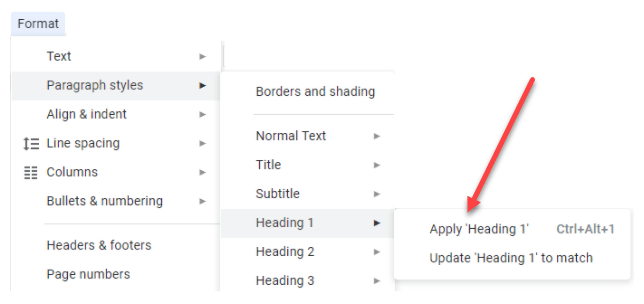
Select Format > Paragraph styles > Heading 1 > Apply… or any of the other Heading styles.
You can instead use the keyboard shortcut Ctrl+Alt+1.
At the top of your document create a new page and title it Table of Contents. Come down a couple of lines to insert the details.
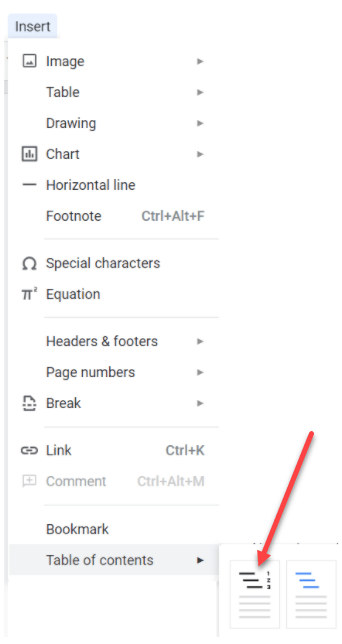
Select Insert > Table of contents > the left choice to include page numbers.
The completed TOC is generated with page numbers to the right. You can change the font after the application creates the details on the page.
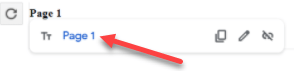
Clicking on an entry in the TOC pops out a link to use to jump right to that page in the document. As you add more pages and sections to the document, the circular arrow to the left will refresh the table adding the new sections and adjusting the page numbers.
Publishing The Final Work
This is a matter of personal choice. The simplest is to print the document as a PDF and email it to all you want to have it. You could also purchase a number of USB flash drives and save your work on each one so you can send them to those who would like a copy. Years ago we might have written the document on a CD/DVD but most computers today do not even have a CD/DVD drive. You can also share your document in view-only mode and just email, text, or message the link to all who would like to see it.
The more “professional” way would be to actually publish your memoirs as an actual book. I use Amazon’s Kindle Direct Publishing service for my publishing. There is no cost to publish your work and make it available to the world as a paperback book or even as an eBook on Kindle. All you need is the PDF version of your memoirs. There is an article right here on Dave’s Computer Tips about publishing a book that might help you with this approach. It is a five-part series on How To Self-Publish Your Book by Marc Thomas.
The Wrap Up
I know I did not get into step-by-step details as I have in other articles. This was an overall look at how to go about it and I hope it whetted your appetite enough for you to jump into the task of writing your memoirs for your future generations to see just how life was back then.
Dick
—
I’m in my fourth, and last, year of writing my autobiography. Just for the family, of course, chock full of lessons on what NOT to do, as learned by an expert.
Am using MS Word, and inserting at least one photo (from photo albums and Google Images), cartoon, graph, etc, on every page. A picture’s worth a thousand words, right?
Speaking of thousand, I’m past a thousand pages. (Thirty-six years in the Army will do that.) Publishing on paper in two or three volumes would work, but not if I want to keep all the color photos.
So my plan at present is to publish on two or three bluray discs. That will also let me include my music collection (in .mp3 format), along with some favorite videos, in some cases entire documentaries like “GI Jews.”
My memoir is also something of a time capsule, and Wikipedia links are spread throughout. I hope to have time to copy each linked wiki page, just in case the site goes down in a hundred years. (As if we won’t have blown ourselves up by then.)
The blurays will be M-discs, said to be archival. I’ll include an external USB bluray player with each copy of the memoir, one for each of our children. Grandchildren get their copy on turning 18.
Of course I worry about the hardware or software becoming obsolete like floppy disks and their drives, and have to hope my descendants will convert the blurays to each iteration of new technology for their own children and grandchildren.
Editing is the hardest part. Every time I return to a page I thought was final, I find a dozen ways to say something better. Ha, just like with this comment.
Wow… My only suggestion for you is to also place a copy in the cloud and share it with your children. Microsoft OneDrive, Google Drive, or DropBox. Just be sure to keep the account open so they can access it after you pass on. Well done!
Saving it in the cloud is a good idea, and no doubt one of our children could be trusted to keep paying the annual fee.
But afterwards? Not sure about the grandchildren.
I wonder if MS or Google have century plans.
(I’ve taken a break from editing and found your email. I’ll be glad when I can call editing done.)
I do not know about keeping accounts open afterward. We will have to chack on that…