In an earlier post, we talked about using Quick Parts in Word. This is a great way to save you lots of valuable time and keystrokes when you are working with short documents, (i.e., memos, letters, resumes, etc.), that tend to be used over and over again. This time around, we will talk about how to create custom Quick Parts that will appear in different galleries, like a custom header!
Follow the steps below to learn how:
The easiest way to create a custom header that will appear in your header gallery with the other sample headers is to first design your header as you normally would:
- Open the header and add any text or different elements of your choosing (i.e., spacing, page numbers, etc.), and be certain to set things such as Different First Page or Different Odd & Even Pages first thing.
- Now that you have your header created to your liking, select everything in your header by pressing CTRL + A while in your header area. You will know if everything has been selected if there is a gray shaded box around all the objects in your header.
- With all your objects selected, you can now create a custom Quick Part from your selected objects!
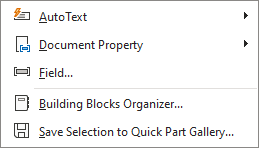
- With your objects selected go to Insert and click on Quick Parts, which will open options for you.
- Click on Save Selection to Quick Party Gallery.
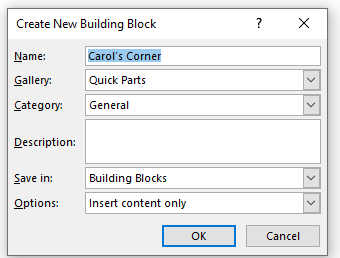
- Now, in the Create New Building Block window, key in the name of your Quick Part, the gallery where you would like to save it, a brief description, the template you would like the Quick Part saved to, etc.
- Once you have set all your options, click OK.
- You will now navigate to the Insert tab where you will click on Header, make sure your custom header appears in the Header gallery.
As you can readily see, by creating a custom Quick Part that will appear in a Word gallery, you will save loads of time and keystrokes. Go ahead and create at least one so you can see how easily this can be done!
—


What was the link for the ‘earlier post” you referred to?
Thanks,
Dan
Hi Dan,
I didn’t include a link (my bad). I did two articles on this subject on Carol’s Corner Office and I also did one on Dave’s Computer Tips. If you key in the words “Quick Parts” and search for it, it should be easy for you to find. I will try to remember to include links in the future.
Mindblower:
Good idea about flushing the cache, but it didn’t help my problem.
However, BRAVE does show the magnifying glass, so apparently FF has a glitch (for me).
Thanks for your interest.
Dan
Hi Dan,
This thread has been removed. It didn’t belong here in the first place because it had nothing to do with Carol’s article.
If you would like to continue this discussion, please move it to the Forum.
Thank you,
Richard
Richard,
For what it’s worth, it all started because Carol suggested I search (not sure why she was unable to provide the link to her article), so it was originally addressed to her.
No problem, do what you feel best.
Dan
Hi Dan,
I didn’t make the connection before. I ran a search for “quick parts” but it only turned up an article about Outlook, and not Word.
The Forum is working pretty good right now; you should take a look. You might find it useful and maybe interesting, too. There is a lot of information tucked away in there.
Sorry I can’t be of more help,
Richard
I often visit the DCT Forum and you’re right, it’s a good source.
Dan