
I posted this submission a short while ago but apparently, I did not make myself clear about how to do this. So now I will attempt to make this a bit easier for the folks who had difficulty with it.
Please bear in mind that it is impossible for me to give specific instructions to everyone since I have no idea what version of Microsoft Word everyone is using. Just because you have “Office 365” does not necessarily mean that you have a subscription to Microsoft Office 365 and there are some things you can do with a subscription that you cannot do without a subscription. Having said that, I assume (and I should not) that everyone has a basic amount of information when using Word. Again, it is difficult for me to know whether you have recently started using Word or if you have had it for years, so please bear with me as I try to make this a little clearer for the folks who did not find my original post very helpful.
Yes, I am sure that most folks who have a subscription to Office 365 know what a Bullet is and moreover know how to click a button to use one. But there are some things that you may not know about bullets that you can learn here.
We all know that a bullet is a small black circle. What you may not know though, is there are several other choices available to you in this regard.
Follow the steps below to learn:
- To apply a bullet from the Bullet Library, select the list or list item you would like to change and click the small down arrow to the right of the Bullets button. I thought this was fairly clear but now I will add a screenshot to be certain it shows you what to do. Please see below.
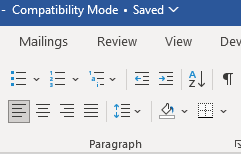
If you look closely at the screenshot, you will notice that this is the Paragraph group of your Ribbon, on the Home tab. That would be to the far left where you see the three dots that represent bullets. Once you click the small arrow next to the bullets, it will display the Bullet Library.

- As you can see above, you now have other bullet options that can be applied. To see a real-time preview of the bullets, hover your mouse over a bullet style and your selected bullets will change to show that to you. To change the bullet, simply click on the bullet of your choice.
- Above is a sampling of different bullets that you can apply.
The Bullet Library option in Word only shows you a few different bullet types. There are, however, hundreds of other symbols that you can use. You just need to know how to find them. So to define a new bullet, you will need to click the down arrow to the right of the Bullets button. Once you have done that, you should see the Define New Bullet option. Click on that and the Define New Bullet option will appear.

To define a new bullet, click the symbol button at the top (see above). This will open the Symbol window for you.

The Symbol window will show you all the characters of the Wingdings font. You will now be able to scroll through and select any of these characters to use as a bullet.
Find and select the one you would like to use and click OK and OK once more. That new bullet will now appear in the bullet library for you to use at any place in your document.
At the top of the Symbol window is a drop-down font list. By default, the Wingdings font is displayed. You can click the drop-down to see a list of all installed fonts on that computer. Most fonts have symbols and other characters associated with them. If you select a particular font, you will see all the characters and can search through them to find even more options that you can use as bullets.
I hope this has cleared up any questions you may have had regarding bullets. If not, please let me know.
—