![]() Many times when you are working on documents with other colleagues there is cause to protect certain text in that document; they are marked do not check in the Language dialog box. Also there could be styles that are set so that they will not be checked.
Many times when you are working on documents with other colleagues there is cause to protect certain text in that document; they are marked do not check in the Language dialog box. Also there could be styles that are set so that they will not be checked.
But suppose you wanted to do a complete spelling and grammar check? But how do you make that happen when you have these words and styles set to do not check?
Fear not, there is a way! Follow the steps below to learn how:
- Click CTRL + A to select your entire document.
- Click on the Review tab of your Ribbon.
- In Word 2013 and 2010, in the Language group, click the Language tool and select Set Proofing Language.
- Word will display the Language dialog box.
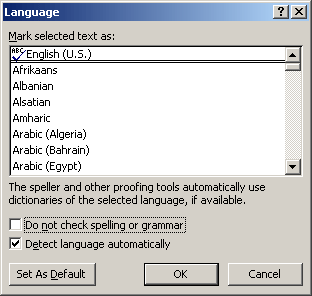
- Uncheck the Do Not Check Spelling Or Grammar check box.
- In the list of available languages, select the language of your text.
- Click OK.
- Your document is now ready for a complete spelling and grammar check. Simply click F7 or, if you prefer to do it the long way, on the Review tab, in the Proofing group, click the Spelling & Grammar tool.
There IS a caveat though. Once you have gone through this process you have overridden the particular styles that are default for your document.
To regain the default styles, you will need to select your entire document once again and click CTRL + Q to return everything to the way you originally had it.
This will not undo any spelling corrections you may have made, but it will return the do not check setting to whatever you had defined for each style in your document.