I have the job of managing the DCT YouTube channel. This is something that I have done for my personal account and other businesses too. With any job, it is always nice to find tips/information online to help make these channels better. You might agree that finding these gems is a must when managing channels. That being said, I have found some settings that could help you out on YouTube. Before we find out what lesson I will be teaching you today, make sure you check out some of the other articles I have written:
- How To Create A YouTube GIF
- How To Edit YouTube Channel Settings
- Set End Date On YouTube Video Promotions
- How To Add Featured Video To YouTube Channel
- How To Create YouTube Channel Playlist
Now that you are even more knowledgeable, it is time to tell you what we will learn today. When uploading to YouTube, I found a Setting that could help speed up the process. This Setting is called Upload Defaults and we are going to learn about them. If you are ready, then pull out those pads of paper and your favorite writing tool (yes, I went old school on you), and let’s get this started.
Adjust YouTube Channels Upload Default
This will be shown using the YouTube website and not the app.
Step 1: Go over to YouTube and sign in to your Channel.
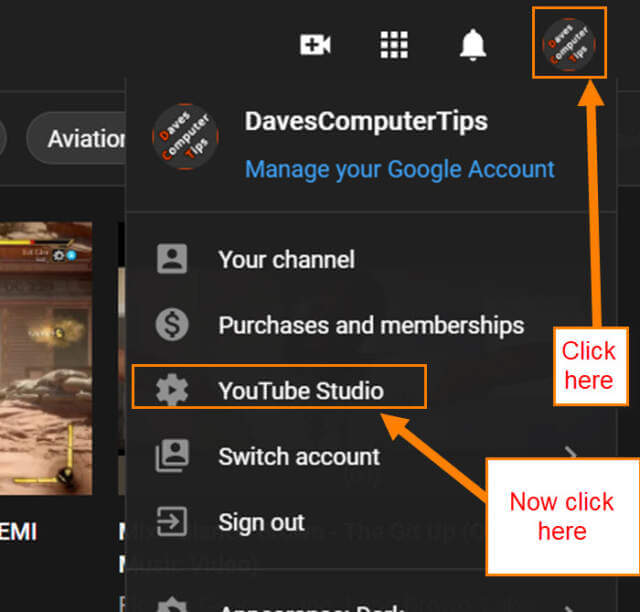
Step 2: Now go to the top right and click on your profile image again to bring up a menu. Click YouTube Studio.
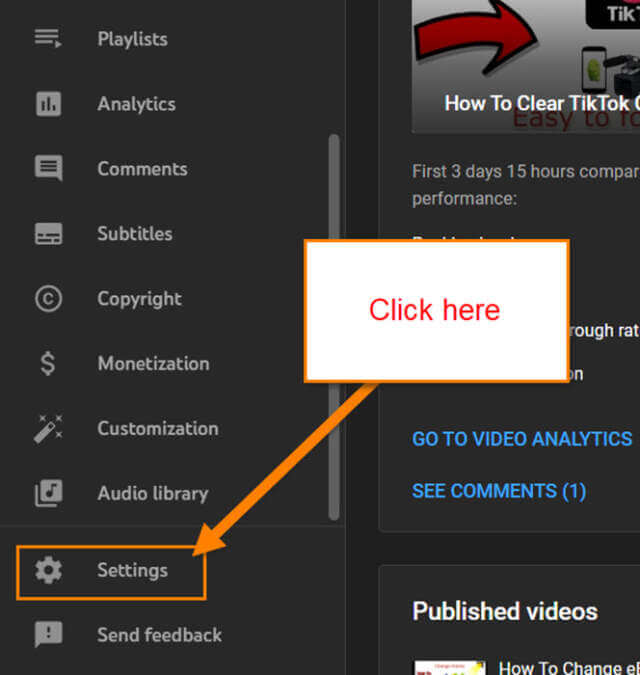
Step 3: Once you are on the YouTube Studio screen, look to the left menu. Scroll down until you see the Settings link. Click it.
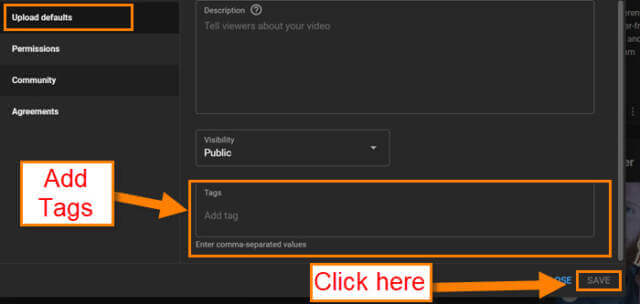
Step 4: On the settings window, look to the left menu and find Upload defaults and click it. You will see that you are on the Basic info tab now. Here you have a few options to work with:
- Title (Add Your Default title here)
- Description (Describe your video)
- Visibility (This is if you want to make it Private or Public)
- Tags (add tags here to help people find your video in search)
Fill out all the boxes and select the visibility you want. Time to move on to the Advanced settings tab. Click it.
Step 5: On this tab, we have more options to work with:
- License (Mine is always the Standard YouTube License)
- Category (There are many choices – find the one that best fits)
- Video Language (English is the one I set it to)
- Caption Certification
- Title and description language
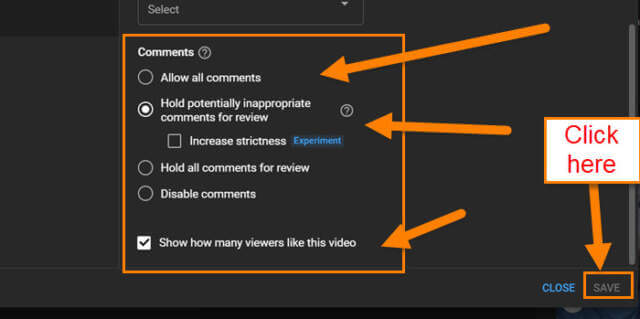
- Comments settings (this section needs a little more description – look to the next step)
Step 5.1: Here are the Comments settings and their options:
- Allow all comments
- Hold potentially inappropriate comments for review
- Hold all comments for review
- Disable comments
Choose the one that you feel fits your videos the best. For the DCT videos, I selected “Hold potentially inappropriate comments for review,” since that is the best choice for us.
Step 6: On the last tab called Monetization, you can select the Types of ads that will show. You might not have this option if you are not set up for this service:
- Overlay ads
- Sponsored cards
- Skippable ads
- Non-skippable video ads
As you can see below, we allow all on DCT. The other option here is the Location of video ads.
Ads before and after your video will be enabled automatically.
Then the last option here is During Video (Mid-roll).
By default, mid-rolls will be placed at natural breakpoints to balance the viewer experience and creator revenue.
That is it. Aall you have to do is click that Save option and you are good to go. Done!
It might take you a little bit to decide what you will choose and put in these settings. Remember, you can change these settings when uploading the video – these settings are not set in stone. Guess it is time for you to share this new knowledge with the world.
—
