Microsoft made several changes to the taskbar in Windows 7. The biggest change was the consolidation of the Quick Launch toolbar into actual taskbar. This allows a user to pin frequently used programs right to the taskbar. It also solved one of my biggest peeves – I always started several programs in a particular order so they appeared in that order in the taskbar. This change also allowed Microsoft to make several more subtle changes, such as moving the Show Desktop button to the opposite end of the taskbar.
While I love the new taskbar, and use the show desktop button in it’s new location, I often find myself working to the left of the screen and having to mouse to the complete opposite side of the screen to use it. I’m sure some of you miss the old Show Desktop button location also, but what can we do about it? We can make our own!
How to add Show Desktop to the Windows 7 Taskbar
- Open Notepad. Start Orb>Accessories>Notepad.
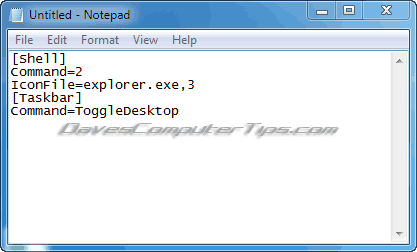
- In Notepad type the following:
- [Shell] followed by the Enter key
- Command=2 followed by the Enter key
- IconFile=explorer.exe,3 followed by the Enter key
- [Taskbar] followed by the Enter key
- Command=ToggleDesktop followed by the Enter key
It should look like this:
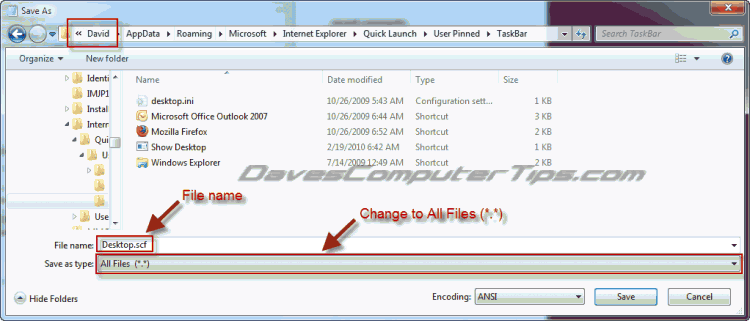
- Click File > Save As which will open a Save As dialog window
- Navigate to C:\Users\YourUserName\AppData\Roaming\Microsoft\Internet Explorer\Quick Launch\User Pinned\TaskBar where YourUserName is your user account.
- Change the Save as Type to All Files (*.*).
- Type Desktop.scf for the File Name and click Save.
Now we need to find a program shortcut to pin to the taskbar. Shortcuts on your desktop are the easiest to access, so I chose Desktop Manager for Blackberry. You can choose any program shortcut on your desktop that does not already show on your taskbar. In the following steps we will change the properties of the shortcut, but don’t worry – we can change it back!
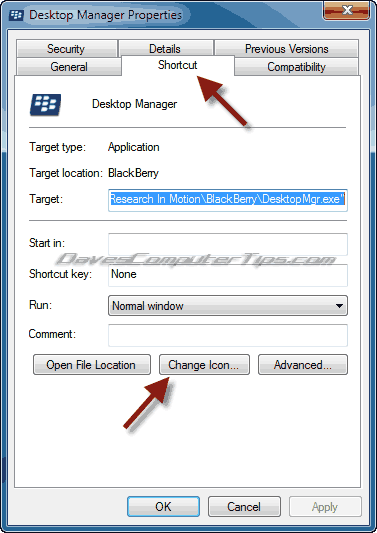
- Right click the program icon and choose Properties from the menu that opens
- In the window that opens click the Shortcut tab at the top and the Change Icon button at the bottom.
- A new window will open displaying available icons. Copy the current location in the “Look for icons in this file:” box to another location (paste into Notepad or a blank email) for safekeeping. Click the Browse button and a new window will open displaying the “C:\Windows\System32\” folder. Scroll down and find the “shell32.dll” file. Click the shell32.dll file to highlight it and click Open at the bottom of the window.
- A new window will open showing the available icons in the shell32.dll file. You can choose any icon you will, but the one I’ve highlighted is the actual show desktop icon. Click your choice of icon and click OK.
- The icon window will close. Click OK at the bottom of the properties window.
- You will need to click OK to provide Administrator Permission to continue. If all is well the properties window will close.
Notice that the shortcut’s icon has changed to the one you selected.
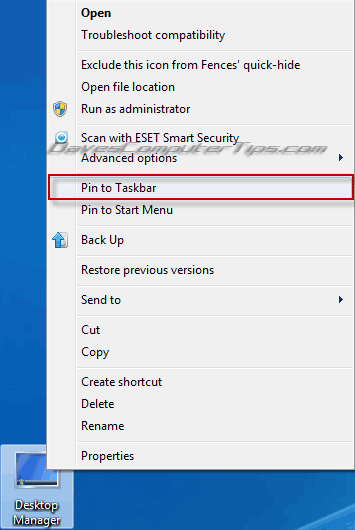
- Right click the icon on your desktop and click Pin to Taskbar from the menu that opens.
You will see the shortcut appear on your taskbar with the changed icon. You can drag it where you want it.
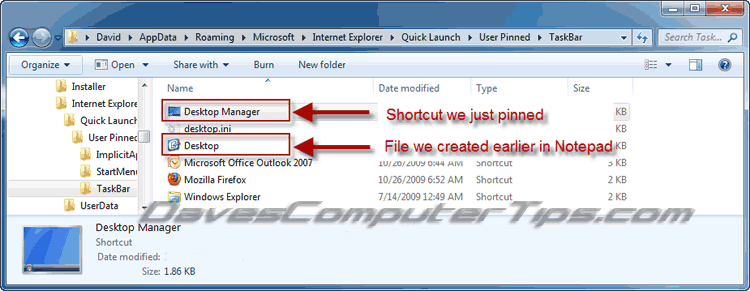
- Open an Explorer window and navigate to C:\Users\YourUserName\AppData\Roaming\Microsoft\Internet Explorer\Quick Launch\User Pinned\Taskbar. Change YourUserName to your actual account name.
Notice that both the desktop.scf file we created earlier and the shortcut we pinned to the taskbar are both in this folder.
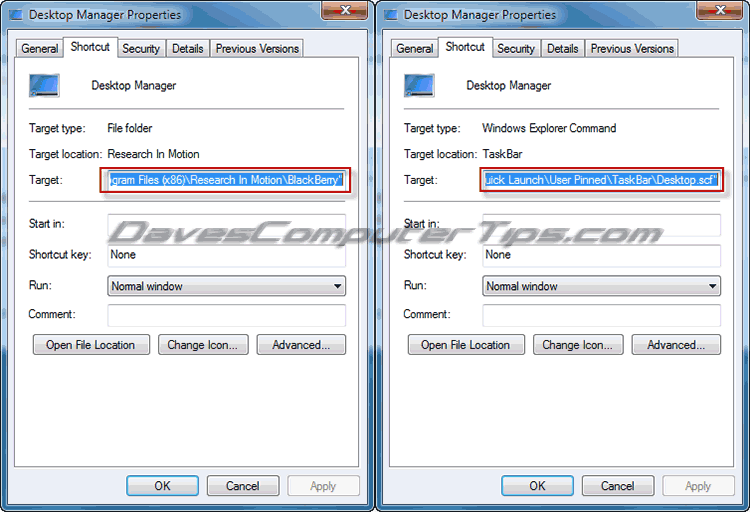
- Right click on the shortcut you previously pinned to the taskbar and choose Properties.
- On the Shortcut tab you will see the Target point to the original location of the shortcut before we pinned it to the taskbar.
- Change the Target to C:\Users\YourUserName\AppData\Roaming\Microsoft\Internet Explorer\Quick Launch\User Pinned\Taskbar\Desktop.scf. Be sure to substitute your account name for YourUserName. Click OK at the bottom.
- Close the explorer window.
- Return to the original icon on your desktop. Right click the icon and choose Properties.
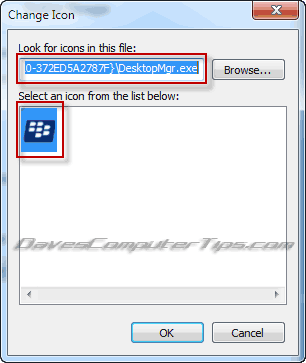
- On the Shortcut tab click the Change Icon button.
- This window should look familiar! Paste the icon location we copied earlier into the “Look for icons in this file:” box. If you failed to copy the location earlier you can navigate to the original program location and choose the program “.exe” file. Software authors usually include the program icon in the program itself.
- If there is more than one icon displayed below choose the correct one and click OK.
- You may need to click Continue to grant Administrator Privileges for this operation.
Your original desktop shortcut should retain the original functionality and icon – it should open the correct program and display the correct icon. More importantly (and cool in general) you should have a working Show Desktop icon on your taskbar! You can drag the Show Desktop icon and place it anywhere you wish. I choose to have mine in the old location next to the Start Orb.





thanks for this tutorial
You rock. Rare that these web pages with “helpful” tips and methods actually work. This does and your instructions are thoughtful and complete.