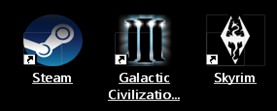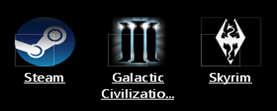
The Shortcut Arrow
Be forewarned that this “Quick Tip” isn’t so quick.
Last week I wrote a Windows Quick Tips article about removing the word “Shortcut” from shortcuts. In response to that post, our DCT Forums moderator, Dandl, asked about removing the little arrow that Windows also superimposes there. Well, not only can you remove it, but you can replace it with another; you can even create your own icons if you like.
How to Remove the Shortcut Arrow
Note: The next few steps involve using the Windows Registry Editor. The standard warning is, before any changes are made to the Registry, Back It Up! If you don’t know how to do that, here is another Windows 10 Quick Tips post that will show you.
- To open the Windows Registry Editor use the Windows Key + R Hotkey combination to open a Run Box
- In the Run Box, type regedit and hit Enter
I have not included an image of the Registry Editor because, in fact, we are not going to use it today. This does not in any way excuse you from making backups. Sorry, you’re not getting off the hook that easy.
Registry Entries that Need Changing
There are basically two ways this can be approached. If you are brave and not lazy, you can enter the changes manually as usual or, if you are lazy like me, then you can create your own .reg file and simply merge the changes with a couple mouse clicks. This second choice will please you to no end if you plan to experiment a bit with different types of arrows or whatever images you may create on your own.
I am only going to discuss the lazy way. Besides, it’s a lot safer and not nearly so prone to error.
Copy and Paste the following lines into Notepad or any plain-text editor. Be sure to save it as a .reg file and not the typical .txt file. Windows may complain about changing file extensions, but pay it no mind. Simply move on as though you know what you’re doing and you won’t be noticed or questioned further… until next time, of course.
Windows Registry Editor Version 5.00
[HKEY_CLASSES_ROOT\IE.AssocFile.URL]
“IsShortcut”=””
[HKEY_CLASSES_ROOT\InternetShortcut]
“IsShortcut”=””
[HKEY_CLASSES_ROOT\lnkfile]
“IsShortcut”=””
[HKEY_LOCAL_MACHINE\SOFTWARE\Microsoft\Windows\CurrentVersion\Explorer\Shell Icons]”29″=”%windir%\\System32\\shell32.dll,-16769″
That last line, with -16769 at the end, is where the magic happens. That number represents the position within the shell32.dll file of the icon you want to use as the arrow overlay. 16769, incidentally, is the Large Arrow you will see in a minute.
Note: The last line has wrapped in the above example due to space limitations, but it is actually one long line, not two.This is how it should look in Notepad (click to enlarge):
Examples
Here are examples of some standard icons that can be found within the shell32.dll file:
Classic Arrow

Remember these? These are less obtrusive than the current Windows 10 versions but still serve as a reminder that you are looking at a shortcut.
Large Arrow

Then, of course, there are these hideous attacks on your senses. Reminds me of the sadistic Vista system.
No Arrow – What We’ve All Been Waiting For

This shows an example of how the icons look without the arrow. Sharp-eyed readers will have noticed there is a barely visible outline where the superimposed arrow would have been. It is more noticeable on some icons than others.
Custom Overlays
Remember this line from above?
[HKEY_LOCAL_MACHINE\SOFTWARE\Microsoft\Windows\CurrentVersion\Explorer\Shell Icons]
“29”=”%windir%\\System32\\shell32.dll,-16769″
Well, you don’t have to point to the shell32.dll file at all. You can point it directly to an .ico file that you have created or one you’ve gleaned from the Internet. To do so, simply change that last part to a path pointing to your new file. As an example, in the Green Curved Arrow below, I used the following line:
[HKEY_LOCAL_MACHINE\SOFTWARE\Microsoft\Windows\CurrentVersion\Explorer\Shell Icons]
“29”=”%windir%\\System32\\“%windir%\\System32\\curved-arrow-icon.ico”
Note: Be sure you have that file where you say it is or things may break, or simply won’t work as expected. I like to enclose that path in quotes, too. Technically, it isn’t necessary unless there are spaces in the path, but it’s a good habit to get into in any case.
Note #2: Your custom icons should have dimensions of 48 x 48 pixels. This may not be critical, but I know it works with this size. If you know of other dimensions that work, please tell us about it in a comment.
Whimsical Green Arrow
 To spark your interest I thought I’d share a whimsical curved green arrow to demonstrate the possibilities.
I downloaded this PNG file off the Internet, resized it to 48 x 48 pixels and saved it as an .ico file. It is important to start with file-types that allow for transparency, which the PNG format does.
The Values
Of course, to implement all you’ve learned, you will need to know the values for the various icons. In all cases, with the exception of the default icon, it is a simple matter of replacing the value at the end of the line with one of these:
- The Classic Arrow: 30
- The Large Arrow: 16769
- Small Down Arrow: 232
- Large Down Arrow: 231
- No Arrow: 50
Default Windows 10 Arrow: This is a special case and in order to get it back you’ll need to delete the “29” Value by changing this line in your .reg file: [HKEY_LOCAL_MACHINE\SOFTWARE\Microsoft\Windows\CurrentVersion\Explorer\Shell Icons]”29″=-
This will effectively delete the entry from the Registry causing Windows to use its default behavior.
Refresher
- Create your .reg file using the text provided
- Change the value at the end of the last line in the .reg file to implement one of the icons, or, enter a path to one of your own images
- Save the .reg file
- Click the .reg file to Merge it with the Registry (this is another spot where Windows will yell, “Warning! Warning, Will…”
- Ignore the flailing
armswindows - Reboot your computer (or log off then back in to your account) so your changes will take effect
Creating Your Own Icons
I’d like to be able to tell you that Icon Editors are a dime a dozen, and maybe they are, but the truth is that only a few really good ones can be found. Here are two that may strike your fancy; one is free and the other is not even close:
Greenfish Icon Editor Pro – Don’t let the “Pro” part fool you. This is a free program that is available in both an installed version and a portable version. You will find it at this Greenfish Site.
Note: Clicking either of the download buttons will take you to Softpedia, a typical software download repository. I don’t normally recommend using them, but in this case I have thoroughly scanned the files for viruses and and other Possibly Unwanted Programs (PUPs) and they came up clean as of this writing.
Microangelo – Microangelo is far from being a free program, but if you are serious about icon creation and editing, this is the way to go. It’s the best icon editor I know of and it isn’t limited to mere icons, either. You will find it at this Microangelo Home Page.
An interesting point about Icon Editors is that you will be able to open all sorts of files in order to peek inside and see what icon treasures they hold. DLL and EXE files hold many. If you tire of shell32.dll, try imageres.dll just for fun; they are all free game and there are hundreds, if not thousands of them. Check out one of your favorite program files, too.
Whew! Not so quick, huh…
I hope this helped, and have fun!
Update
One of our readers commented on the Quotation Marks not being the same. It’s true. the beginning and ending quotes are different. If you are having problems, check those quotes in the .reg files you created. They could be the problem.
Thanks to Kevin and his eagle-eyes for pointing this out!
Richard
—


[HKEY_LOCAL_MACHINE\SOFTWARE\Microsoft\Windows\CurrentVersion\Explorer\Shell Icons]
@=””
“29”=”%windir%\\System32\\shell32.dll,-50″
To prove it works, this is what my Shell Icons Key looks like, and no more arrows. This is accomplished without even using Ultimate Windows Tweak. Thanks Richard.
Glad I could help
Thought I would pass this on to other users, especially “NightwishFan”. To get rid of the black box in W10 where the shortcut used to be, I had to do this.
Under the Explorer/Shell Icons key I had to modify the key and remove everything but the value name, no more black spots.
For some reason I have had no issues with the above key in W7.
Thanks for the excellent explanation of changing the shortcut arrows. Even more annoying to me are the blue and yellow UAC shields on desktop icons for shortcuts pointing to programs with elevated rights. Windows is inconsistent about this, however, at least on my Windows 7 system. There MUST be a way to substitute a blank, transparent icon in the registry. Can this be done?
Hi Thomas,
I did a quick search and found two potential solutions. I have no way at the moment to test either of these out.
Solution 1:
1. Uninstall the application that the shortcut relates to.
2. Reinstall the application.
3. DO NOT take any actions to open the program using the desktop shortcut icon until you complete the next two steps. You can do any updates, registration etc. later.
4. Right click on the desktop shortcut icon and select “Properties”. Select tab for “Compatibility”.
5. On “Privilege Level” at the bottom of this window: remove check from the box next to “Run this program as an administrator”.
Note: You might want to check the shortcut properties for the Admin level check box before uninstalling the program first. This sounds like a real pain of a solution. I’m sure there is a better way.
Solution 2:
1- Right-click the shortcut.
2- Click the Open File Location button.
3- Make a copy of the target file (e.g., WinRAR.exe -> WinRARcopy.exe)
4- Right-click the new copy.
5- Send to > Desktop (create shortcut)
6- Delete the original shortcut from the desktop.
7- Rename the new shortcut to suit.
Note: If this works, it’s much easier than the first idea.
—
I work on a home desktop computer with no other users to contend with so I’ve always disabled UAC. “Do as I say, not as I do.” – This is not what I recommend to others.
If you have no luck with either of the above options, let me know and I’ll dig a little deeper next week.
Happy Holidays,
Richard
I copied and pasted the lines. Then I got to Examples, Custom Overlays, Values…
And then I got lost after that, and was too afraid to try anything.
I could not follow what you said.
Hi NightwishFan,
I’m sorry you are having troubles.
Which option do you want to implement? Classic, arrow, no arrow, etc…
Let me know and I’ll try to help you,
Richard
Richard Pedersen, thank you for the prompt reply.
I just want to get rid of the arrows. I tried the Ultimate Windows Tweaker program once, but in Win10, it not only removes the arrows, it puts a black box where they used to be. So, I wanted to try to remove them myself, but I was unable to follow your instructions which I’m sure were quite clear to the more learned of your followers, but I got lost.
Thank you for your time today.
Hi NightwishFan,
The UWT black box issue should be correctable with a reboot. I don’t recommend tweaking software to regular Windows users. They are too powerful a tool in the hands of the inexperienced and can be the source of much misery and confusion.
1. Make backups first!
2. Copy the following text and Paste it into Notepad:
Windows Registry Editor Version 5.00
[HKEY_CLASSES_ROOT\IE.AssocFile.URL]
“IsShortcut”=””
[HKEY_CLASSES_ROOT\InternetShortcut]
“IsShortcut”=””
[HKEY_CLASSES_ROOT\lnkfile]
“IsShortcut”=””
[HKEY_LOCAL_MACHINE\SOFTWARE\Microsoft\Windows\CurrentVersion\Explorer\Shell Icons]”29″=”%windir%\\System32\\shell32.dll,-50″
—
Now save it as “anyname.reg” Ignore Windows’ complaints and “OK” and “Yes” your way through them. The important thing here is that extension. It needs to be a .reg file, Not .txt.
Once you have done that, simply click on that new .reg file and Windows will prompt you with “are you sure?”-type warnings.
Once you OK yourself through the warnings, Windows will merge that .reg file information into the Registry.
Reboot your computer (or log out, then back in).
You should now have no arrow overlays on your icons.
I’m sorry if my original explanations weren’t clear.
Hope this helps,
Richard
Will do. Thank you for the assist. Very kind and much appreciated. I’m going to try it now.
It didn’t work, but it doesn’t seemed to have hurt anything either. So, thanks just the same. I appreciate your taking the time. I’ll live with the arrows.
Hey Richard,
It didn’t work for my computer which is an older HP Pavilion (but running current Win10).
Also, neither seems to be causing problems, but I created a restore point ahead of time, and will go back to it just the same.
So I will live with the arrows.
Thank you for your time today.
NightwishFan
It’s because the quotation marks in the text above is of 2 different types. Try putting the following 4 lines in a text-file, and save it as “anything.reg”:
Windows Registry Editor Version 5.00
[HKEY_LOCAL_MACHINE\SOFTWARE\Microsoft\Windows\CurrentVersion\Explorer\Shell Icons]
“29”=”%windir%\\System32\\shell32.dll,-50″
Hi Kevin,
Good eyes!!
Thanks for the help,
Richard
Kevin & Richard…
Thank you! I made sure the quotation marks were all of the same kind and YES! It worked! No more silly arrows to look at! You guys are the best of the best! Thank you!
Would you believe it, I booted up this morning and there are black boxes where the arrows used to be. I went to Properties and changed the icon to something else, but the something else has a black box on it too. I will restore to a previous time. Thanks everyone; i’ve taken enough of everyone’s time and space here. I’ll figure it out someday.
Found “Rebuild the Icon Cache” instructions, run thru the Command Prompt. Black boxes are gone now. So far, so good…