Windows Libraries

Last week, we talked a little bit about the Windows Library feature. If you are interested in reading it first, please go to this Windows 10 Quick Tips – Enabling Libraries page. In that article we briefly touched upon enabling Libraries, but didn’t say much, if anything, about good uses for them. If you have not yet enabled Libraries on your Windows 10 system, you should read that article to learn how. This will help you to follow the instructions given in this article.
I asked you to let me know if you would be interested in a follow-up article on the subject and the response was positive, so here we go with another post about Libraries. This week’s Quick Tips article will dive a little deeper into the Library topic and will try to give you some ideas about how they work, how to add your own, and how to use them.
How Libraries Work
Libraries don’t exist. Windows is tricked into believing they do, and therefore people believe it, too. Since Windows believes it, File Explore will show them to you in the Libraries section of that program. I’ve talked before about Symbolic Links and that’s how Libraries work.
A Library is really nothing more than a “pointer” to another location. In the case of the Music Library, it points to the Music folder in your Users directory on your drive. (The Music folder actually does exist.) The other default Libraries work in exactly the same way, each pointing to their respective folders in your Users Directory.
If Windows is left to its own devices, it will recognize and save different file types to the default folders. Music files to the Music folder, Videos to the Video folder, and so on. These will all be saved on your system drive in your Users Directory, or “folder” as is now the naming convention used by most.
My Problem With Library Default Behavior
The biggest problem I have with this default behavior is that movies, for example, can take up many hundreds of gigabytes of space. I don’t want all that space used on my system drive. Consider backups, for instance… do you really want to make a backup of your system drive every day when it includes huge numbers of movies? That rarely change, anyway? I didn’t think so. That’s why I dedicate a separate partition to just movies. And another to the hundreds of thousands of pictures I have. It makes things so much easier to manage, and daily backups go much more quickly (less than 10 minutes for me). Static files like movies don’t need to be backed up every day.
Managing Libraries
Adding Folders to Libraries
Once you have Libraries enabled in Windows 10, adding your own folders to a Library is a snap.
Note: If you don’t have Libraries enabled on your system, this won’t work as expected. See the opening paragraphs of this post to learn how.
- Right-click on a folder you would like to add to a Library
- In the menu that opens, choose Include in library
- Another menu pops open where you can choose which Library you want to add your folder to
- There is also a choice to add a completely new Library, if you like

In this case, the folder “WC7” holds an assortment of landscape and animal pictures. (The folder name is a holdover from days gone by and I never bothered to change it.) In any case, I added it to the Pictures Library and here are the results:

Since this WC7 folder is now added to the Pictures Library, I no longer have to drill down a convoluted path to get to this folder. Don’t be tricked by this bit of magic like Windows is. The WC7 folder is not on the system drive. It is exactly where it has always been, but now there is a new pointer to it in the Library. In fact, if you right-click on any of those folders, there is a menu entry offering to bring you to the Folder Location– the real folder location. You can create as many of these pointers as you like by adding folders from anywhere on your computer to these Libraries. Pretty slick, don’t you think?
Adding New Libraries
- Right-click on the Library folder
- In the menu that opens, choose New
- Choose Library
- Give it a descriptive name
- Start adding folders to your new Library
Pretty darn simple…
Note: See the next section for another method to add folders to your Libraries.
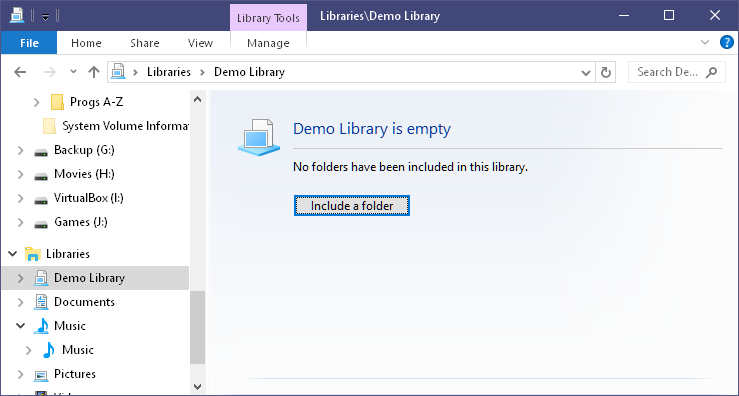
I added a Library called “Demo Library” for, well, demonstration purposes. There is currently nothing in this Library, so it shows an Include a folder button. Clicking on this button will let you browse your computer for folders you would like to add to your newly created Library:
Removing Libraries And Folders
Removing Libraries and folders is a simple process. Here’s how:
- Highlight the Library or Folder you would like to remove
- Click the Manage tab
- Click the Manage library button
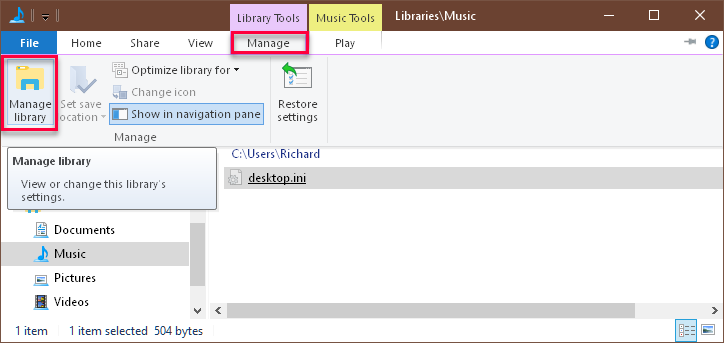
That should bring you here (I used the Music Library as an example only):
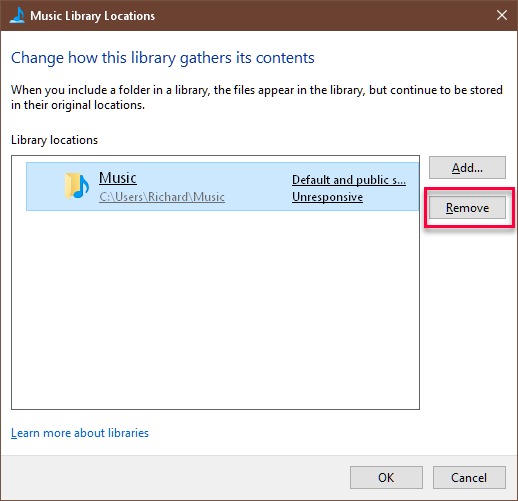
Note: Removing Libraries and/or folders in this way does not remove the contents of the folder they are pointing to. Nevertheless, it is better to be safe than sorry, so make sure you have backups, or copies at the very least, in case something goes wrong.
Note 2: You can also use the Library Manager to add folders to existing Libraries.
Note 3: WARNING – Do not use the right-click menu’s “Delete” option to remove folders or files from Libraries as this will not only delete the Library, but also delete the actual folder/file from its physical location. (Thank you, Jim!)
Conclusions
Libraries are a very useful feature in Windows. By creating your own specialized Libraries, you can include folders and types of files grouped in ways that Microsoft never thought of, and they’ll all be one click away. Sweet!
One of our readers asked to have Windows 7 included in this post. As far as I know, everything we discussed in this article will work in Windows 7, too. The only differences might be slight variations in the interface which should not be a big hurdle to overcome. The same can be said for Windows 8.x, as well.
I want to give a big thank you to all the people who commented on the last Quick Tips article. You all had kind things to say and that makes this job worth the effort. Thank you so much…
As always, if you have any helpful suggestions, comments or questions, please share them with us,
Richard
—
Wow, Richard, what an eye-opener! I’ve always ignored the Windows Library feature because it just didn’t jibe with my methodology for file organization.
I’ve used the same organizational structure for nearly 30 years, and it has served me well. But after reading this article, I’m intrigued by the idea of how easy it is to tweak the Windows Library feature to my liking. I’m now inspired to take some time to play with it and see if perhaps it can replace my existing system – without having to give up anything, and perhaps even improving on it.
Thank you for sharing this wonderful tip!
You are welcome, KarenS. I’m glad it helped.