Group Policy Editor
Today’s Quick Tips article is going to be truly “quick”, but I hope it will also be a useful tip. Please note that only the Pro, Enterprise, and Education editions of Windows offer a Graphical User Interface (GUI) for the Group Policy Editor (GPE).
Over the years I have made many changes in the GPE. I have undone many of those changes as well. Unless you take notes as you go, it easy to forget what you’ve changed. Today’s Quick Tips article will show you an easy way to discover what has been tampered with and what has been left alone.
Open the GPE
To run the GPE, follow these simple steps:
- Use the Windows Key + R to open a Run Box
- Type gpedit.msc and hit Enter
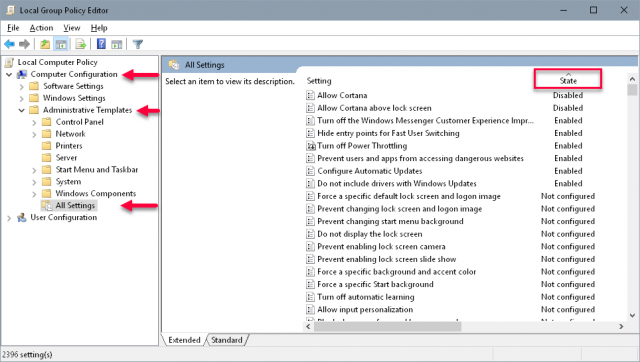
That should bring you here (click the image for easier reading):
- In the left pane, expand the Computer Configuration folder
- Expand the Administrative Templates folder
- Click the All Settings folder
This will bring up a list in the right pane showing all the available Administrative Templates. By clicking on the header labeled State, you can sort that column (either ascending or descending). An ascending sort will bring all the changed templates to the top of the list. Anything marked as Not configured is still in its default state (i.e., not changed).
A single-click on an entry in the right pane will display a description of that template’s options. Double-click on it to bring up another window where you can change the settings.
Using the GPE to change the way Windows behaves is generally much easier, and much safer, than monkeying around in the Windows Registry.
As always, if you have any helpful suggestions, comments or questions, please share them with us,
Richard
—


Thanks for the tip Jim. Saves my brain, and pencil.
Simply typing GPE or gpe into the windows search, gives you this search result:
https://screencast-o-matic.com/screenshots/u/Lh/1526135570340-82386.png
This makes opening the Group Policy Editor very easy and you don’t have to use the Run command.
Thanks for the tip!