 Environment Variables have been around since the DOS days. These variables are used by Windows, Apps, and various other programs to know where things are on your system. For example, it would be difficult for a file manager to know where the AppData folder is without a variable pointing to it. How would Windows and other utilities know where to consistently store all those thousands of temporary files if there was no consistent folder defined by a variable. Basically, there needs to be a way for all programs and Apps to know how to find these locations and where to put your stuff without having to tell it every time you run the program. This week’s Quick Tips article will show you how to modify these variables and how to add your own new ones, too.
Note: I recommend against changing the default settings of these variables unless you have a very good reason to do so. You can really muck things up if you’re not careful.
The Temp Variable
One variable I tend to change on my computers is the Temp variable. This variable, by default, points to a Temp Folder on your system drive (usually the C:\ drive). This is where Windows, et al, stores temporary files, ie, files that it only needs… well… temporarily. Think of it as a scratch pad of sorts. Unfortunately, Windows is not the best of housekeepers and this folder can fill up with lots of no longer needed, useless, and superfluous junk. And by “lots”, I mean into the thousands of files adding up to many megabytes of disk space. That is the main reason I don’t want that stuff on my system drive. The Temp folder on my computer currently contains 38MB of stuff and I only just cleaned it out a couple of days ago! You get the idea…
Another reason is speed or a lack thereof. If you have a fast Solid State Drive (SSD) then this is not much of an issue, but on a mechanical hard drive it can really bog things down. You might even want to move this Temporary Folder off an SSD due to all the writes it imposes on that drive although that is not so much of an issue today as it was in earlier times.
Another consideration is that you want that Temp folder on the fastest drive you own. If you have a RAMDrive set up, for instance, that is the perfect spot for it. It can turn into a bit of a juggling act but if you have the drive resources, then it can really help to give your computer a bit of a speed boost. Plus, it cleans up the system drive and I’m all for that.
Note: If you would like to learn more about RAMDrives, please read RAMDrive: Increase Computer Speed by up to 50%
Getting To The Setting
There are a number of ways to get here but I will show you the one that I find the easiest:
- Open Control Panel (click the Start button, type control. Control Panel should be at the top of the list). Click it. To learn how to create a handy Control Panel icon on your Taskbar, Start Menu, or Desktop, please read Windows 10 Quick Tips – Control Panel
- Choose User Accounts
- In the window that opens, in the left panel, choose Change my environment variables
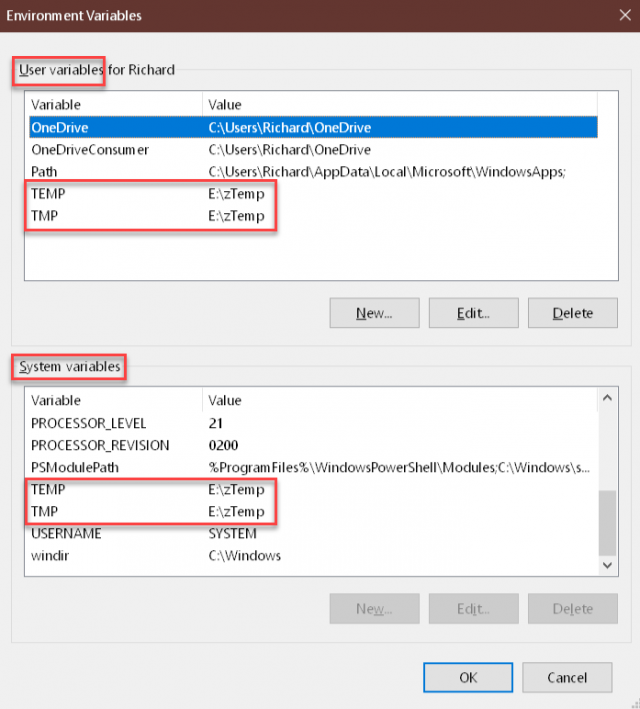
That should bring you to a window similar to this one:
There are two sections here: User variables at the top and a System variables section below it. In both of these sections, there are a TEMP and a TMP variable listed. The TMP variable is a hold-over from older days. Incidentally, this is one of the reasons Windows is such a cumbersome beast– backward compatibility, without which Windows 7 users would be left in the dust, but I digress.
Under normal circumstances, these variables will point to C:\Temp. As you can see, though, my variables are pointing to a completely different drive and folder. This was done for the reasons I pointed out earlier and they were speed and to keep all that clutter off my system drive. (I don’t like clutter.)
To change a setting, simply Select it, click the Edit button, change the Path or Value, and click OK. In this case, you will have to change it in four places.
Create A New User Variable
Creating a new User Variable is pretty straightforward:
- Click the New button
- Give your new variable a Name and a Value
- Click OK
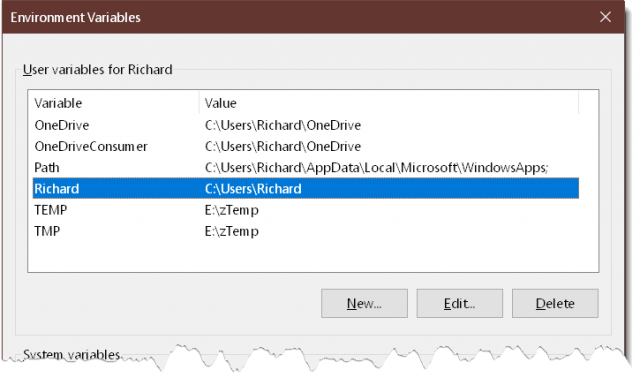
Here are the screenshots in sequence:
In the above example, I named a new variable after myself (for reasons which will become clear in a moment), and pointed it to my User folder. From now on when I’m in File Explorer, I won’t have to drill down through the directories to get to that folder. I only have to type %Richard% in the File Explorer’s address bar, hit Enter, and I will be brought directly to that folder. Simple, yes?
Note: Any of these path variables can be used in this way by surrounding them with “%” signs. I’m sure you’ve seen %appdata% in previous discussions on this site.
Note #2: I don’t actually have this variable set up on my computer because I don’t use File Explorer and don’t need such a silly workaround. It was for use as an example only.
As always, if you have any helpful suggestions, comments or questions, please share them with us,
Richard
—


On User Variables; I’m not clear as to the usefulness of a new variable. Why would one want to make their user space into one?
On Note #2, if you don’t use File Explorer? What do you use? I constantly need to view the contents of quite a few directories and access them with AutoIt scripts and hot keys. I’ve tried alternatives like Explorer+ and such, but Windows insists on its native File Explorer.
So the question is, what do you use and can Windows be configured to default to it?
Hi DJ,
1. If you visit a directory often, it might be convenient to have a User Variable in place if only to save you some typing. This becomes obsolete with more mature file managers. I only added it to the article in an effort to be thorough.
2. I use Explorer++ in Portable mode. It will use Tabs, you can set up buttons to bring you to any directory you want, and there is a launch menu where you can set up buttons to run any utility/program you like.
It will remember a favorite layout (in my case “Details View”), column widths, and will always open to the folder that you want it to.
All the menu bars are completely customizable.
I keep a shortcut pinned to the Taskbar for single-click access.
3. I’m not sure that Windows defaults to a particular file manager. When I want to use it, I click on it.
In general, I despise File Explorer for being such a clunky file manager during these more modern times. Explorer++ is free, can be installed or run as a portable program, and you can get it here:
https://explorerplusplus.com/
Hope this helps,
Richard