Quick Tips Times Two
 Boot times don’t fall under the “have to have” category. Shortening your boot time by a few seconds isn’t going to make or break your day. Remember the days when you could fire up your computer, then go make yourself a cup of coffee, and maybe when you got back your computer was ready and waiting? I sure do, but those days are long past us now. Today’s systems will easily hit the desktop in under a minute, and if you are equipped with a Solid State Drive (SSD), those times will be much shorter. Bragging rights aside, my system hits a usable desktop in about 15- 20 seconds from the time I hit the Power Button — not too shabby — and most of that time is waiting for the initialization goings-on in the BIOS/UEFI system (about 11 seconds).
A quick note about the steps in this post — anything older than Windows 8 won’t have some of the information contained here. Also, some older UEFI systems won’t have all of the options discussed here.
Today we’ll be showing you two ways to help shave a few seconds off your Windows 10 boot times. I know it isn’t much, but it’s better than nothing. Your mileage will vary depending on many variables. My speed increases, for example, weren’t anything to write home about. Who knows, maybe your results will be so dramatic that you’ll actually want to write an article in the New York Times. You won’t know unless you give it a try, and this week’s Quick Tips article will show you how.
Quick Tip #1 – UEFI [Ultra] Fast Boot
I did a lot of “by golly and by gosh” experimentation today and was only able to trim 2.3 seconds off the time I spent in the Unified Extensible Firmware Interface (UEFI). This is the new kid on the block that replaces the legacy Basic Input Output System (BIOS). I for one, would never obligingly go back to the text-based system of old. Anyway, 2.3 seconds is barely worth the time I spent, but it shows you that it is still possible to speed things up a tad.. Here’s how…
Note: Every UEFI interface is different depending on the brand of motherboard you own, and for that reason I cannot give you step-by-step instructions on how to approach this. I can only generalize.
Reboot your computer and enter the UEFI system. As noted, the method of doing so will differ for each of you. On my system, I need to hit the DEL or F2 key during the Power On Self Test (POST). This is that short window of time between hitting the Power Button and when Windows begins to boot. If you’re too slow, and Windows boots, you’ll have to try again– only be faster this time around. If you don’t know what key to hit, then either check your user manual, or look closely at the POST screen– it should tell you.
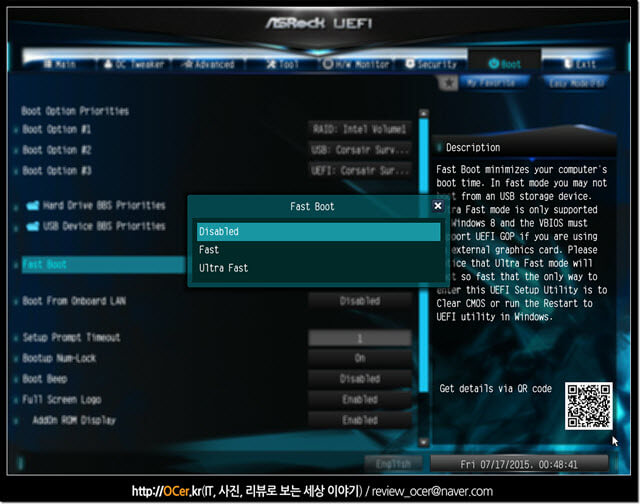
That should bring you to a screen giving you many, many options which may be unfamiliar to you. What you are looking for is probably under a Boot Options section similar to this one:
There are some things you should know about when changing this setting:
- If you choose Fast Boot, then you will not be able to boot via devices such as USB drives or CD//DVD drives unless you hit a special key during the POST process
- If you choose Ultra Fast Boot, you will not be able to enter UEFI at all without either clearing the CMOS (this can be done by removing the battery on the motherboard, or by using some jumpers – read your user manual), or having a utility installed in Windows that will allow you to do so
Settings You Can Change
The Fast Boot setting is only one of a few things you can change to help speed things up a bit:
- If you have UEFI set to check a list of boot devices that you don’t use, then disable them. Whether you use them or not, UEFI still has to check them and that takes time
- If your UEFI offers you POST options that you don’t care about, disable them. One example of this might be memory testing which can add a lot of time to your POST initialization
These are only two things to check out, but it is a good beginning. By changing the settings in these two areas, I was able to take the aforementioned 2.3 seconds off the UEFI POST.
Caution: Changing settings willl-nilly in UEFI can be just as debilitating to your computer as rampant alterations to the Windows Registry. You can back up the Registry, but this can’t be done with the UEFI system. My advice is to make a change, see if everything still works properly, then go in and make another change. If you change a number of settings all at once, it becomes easy to forget what you’ve done, and impossible to know what change caused a problem.
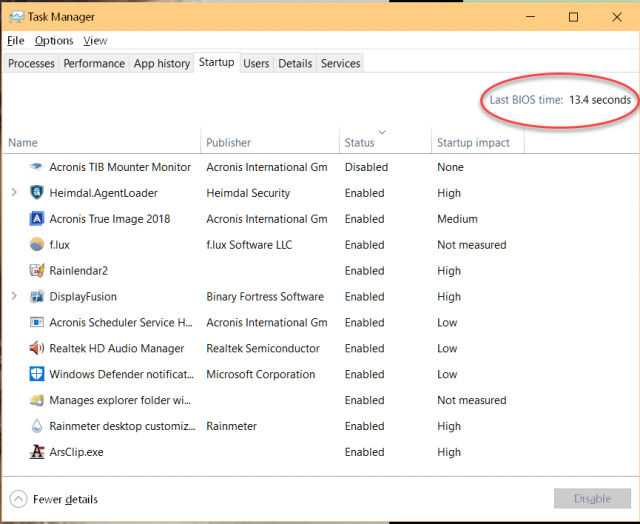
If you would like to see how much time your computer spends in UEFI before Windows takes over, open the Task Manager and click on the Startup Tab:
The above image shows the Last BIOS Time before tweaking a few things on my computer. It currently stands at 11.1 seconds. As noted at the beginning of this article, this will not be displayed on Windows versions prior to Windows 8.
Quick Tip #2 – Windows Fast Startup
Hibernation File
Let’s start at the beginning. Windows Fast Startup will not work if the Hibernation file is disabled. By defult, it is enabled, but some off you have disabled it to save on drive space. I did. The Hibernation file will eat up huge amounts of space and how much depends on how much RAM (memory) you have installed. I’ve read that it will create a file equal in size to about 75% of your installed RAM. I have 32GB of RAM, so 75% of that is about 24GB! That’s a really big file, and many smaller SSDs won’t have that kind of room to spare. Incidentally, the hibernation file (hiberfile.sys) must be on your System Drive (the one containing Windows) and cannot be moved to another location like so many other system files.
By changing a setting, you can lower that files size by greater than half. By doing so, keep in mind that you won’t be able to use it as a Hibernation system on your computer anymore; it will only be useful for Windows Fast Startup purposes.
How To Enable Hibernation
- Click the Start Button
- Type command prompt
- Right-click Command Prompt in the menu and choose Run as administrator
- In the window that opens, type powercfg -h on and hit Enter. To disable Hibernation, type powercfg -h off
How To Change Hibernation File Size
- Click the Start Button
- Type command prompt
- Right-click Command Prompt in the menu and choose Run as administrator
- Full Size – In the window that opens, type powercfg /h /type full and hit Enter
- Reduced Size – In the window that opens, type powercfg /h /type reduced and hit Enter
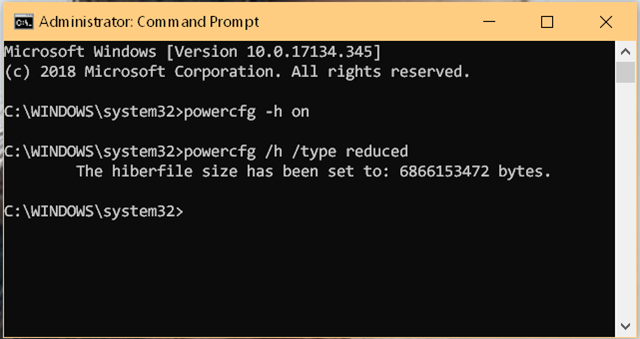
If all has gone according to plan, and you chose “reduced”, you should see something like this:
Even after being reduced, that’s still a whopping 6.7GB file. Only you can decide if it’s worth it to have that sitting on your drive to possibly trim a second or two off your boot times. (Your file sizes will vary depending on how much RAM you have installed.)
How To Enable Windows Fast Startup
- You can either choose Power Options in Control Panel, or type power options after clicking the Start Button. Either way, you should be looking at the Power Options/System Settings window
- In the left panel, select Choose what the power button does
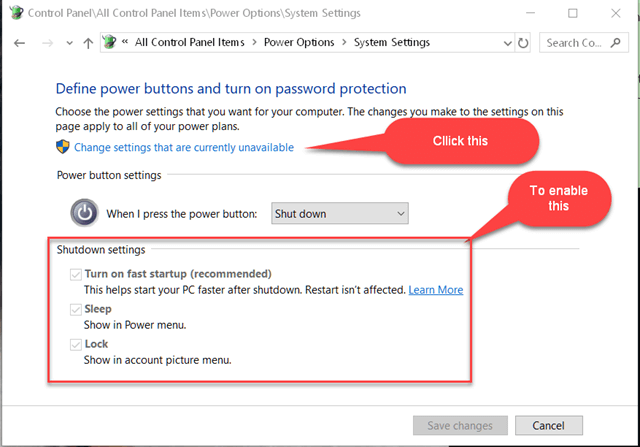
This should bring you to a window similar to this one:
- Click the link labeled Change settings that are currently unavailable. These will probably be grayed-out until you do this
- Check the box labeled Turn on fast startup (recommended)
Note: This Fast Startup setting will have no effect on system restarts, but only when cold-booting your computer (i.e., from a turned off state)
Conclusions
It is worth mentioning again that this may be a lot of monkey-business to go through for only a small gain in boot times. Truth be told, we don’t sit around waiting for computers to boot these days and are a lot more interested in how fast it runs, and how well it responds while we are actually using it. I can totally understand where you’re coming from.
The other side of the coin says there are Geeks in this world who love squeezing every last ounce of performance out of their machines, and in case you haven’t noticed, I belong to that strange fellowship. Thank you for listening…
Update #1
Windows 1809 strikes again!! Here are two more possible problems with this update that we can add to the ever-growing list:
- Updates may not install with Fast Startup enabled – You can read about this update installation problem here
- Fast Startup causes hibernation or shutdown to fail – You can read about this hibernation/shutdown problem here
Shee, Microsoft!! Get your act together!!
Update #2
After a few re-boots, Task Manager is now reporting 7.7 seconds in UEFI. That’s half the original time before all this tweaking. Not bad!
As always, if you have any helpful suggestions, comments or questions, please share them with us,
Richard
—


I am running Windows 10 Task Mgr. /start up has no box showing boot time.
Hi James,
I could tell you that mine does, but of course that is of no help to you.
I have no idea why yours is not showing the time spent in BIOS/UEFI.
Maybe one of our readers knows what I’m missing?
Richard
Update
I happened upon this while surfing:
Hope this helps,
Richard
Last Bios boot time 12.1 seconds on my machine.