If you’ve been a Windows 10 user since its first release, or have been updating Windows 10 through multiple new builds, you will likely see that your hard drive now contains more than one recovery partition. These partitions do not display under ThisPC and you will need to go to Disk Management in order to view them:
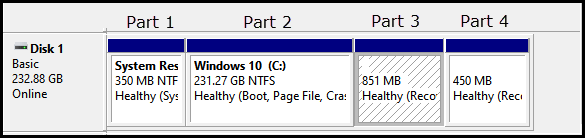
In the screenshot above, you will see two recovery partitions– Partitions 3 and 4. Partition 3 is the current active recovery partition and partition 4 is the original and now obsolete recovery partition. This happens when major feature upgrades need more space to store the recovery environment but the existing recovery partition cannot be expanded, and so a new recovery partition is created.
The current active recovery partition will normally be the partition that is immediately adjacent to the system partition. You can verify which is the current active recovery partition by opening an elevated PowerShell (Admin) and entering the following command: reagentc /info
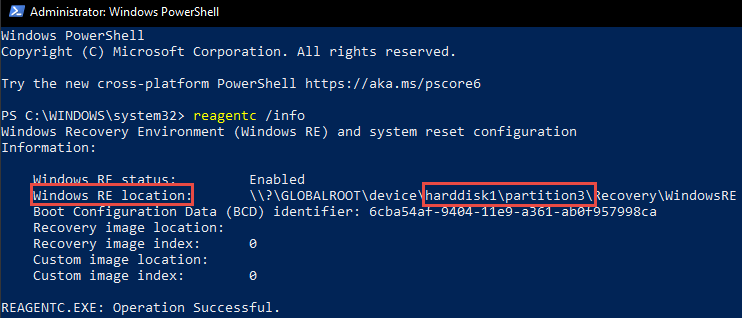
In the above PowerShell screenshot, you will see that the active recovery partition location is verified as harddisk1\partition3, which matches perfectly with the information as shown in the Disk Management screenshot. So, now we’ve identified exactly which recovery partition is current and which is obsolete, what can we do about it?
How To Deal With Multiple Recovery Partitions
Option number one is to simply do nothing. The obsolete recovery partition isn’t using much disk space and won’t hurt anything. That said, if you’re really short on disk space or anything like me (OCD about messy hard drive partitioning) you can safely delete the obsolete recovery partition and regain the disk space.
Unfortunately, Windows Disk Management is somewhat limited and, while you can easily delete the partitions, you cannot merge the resulting unallocated disk space using Disk Management. The simplest way to achieve this is to use a third-party partition manager, the best of which, in my opinion, is Aomei Partition Assistant Standard.
Using Aomei Partition Assistant To Delete & Merge Partitions
Fire up Aomei Partition Assistant Standard and you’ll see all hard drives and their partitions displayed in an intuitive interface. Identify and select the partition you want to work with– it’s extremely important that you get this part right, select the wrong partition and you’ll likely end up in real trouble. Left-click on the partition you are going to work with and it will be highlighted:

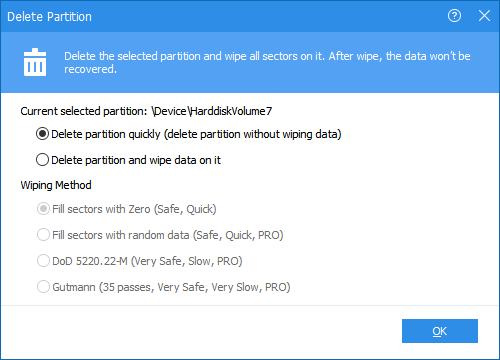
From the left-hand menu click Delete Partition. Alternatively, you can right-click on the partition and select Delete Partition from that menu. You will then be presented with options to either quickly delete or delete and securely wipe data. The secure wipe feature is only available in the Pro edition but, in this case, a quick delete will do the job– no worries.
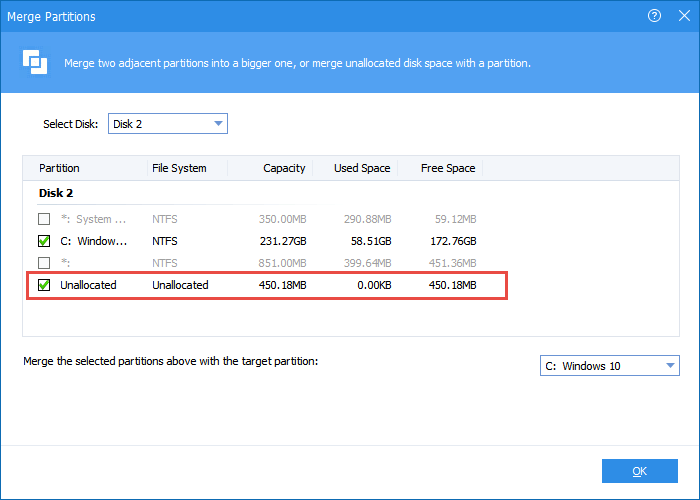
Click OK and you see immediately that the selected partition is now all free space. Now we’re going to add that free space into the system (C) drive using the Merge feature. Highlight the system partition (left-click on it) and from the left-hand menu click Merge Partitions. A new window will pop up with the system drive already selected, all you need do now is select the partition with the unallocated space as the one to merge:
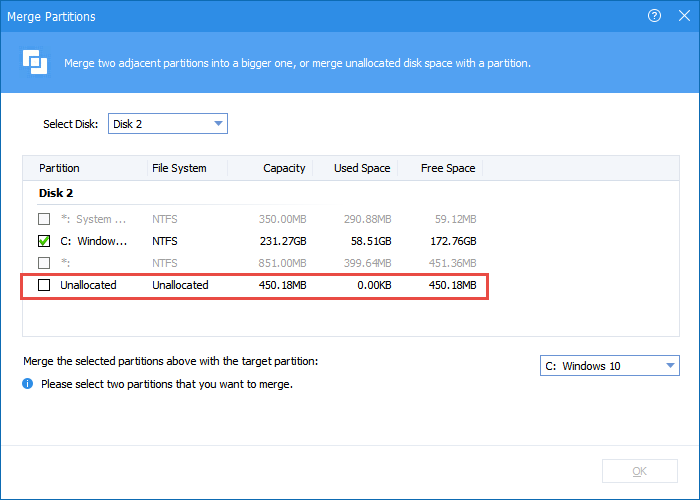
When you’ve selected the correct partition (with the unallocated space) click OK.
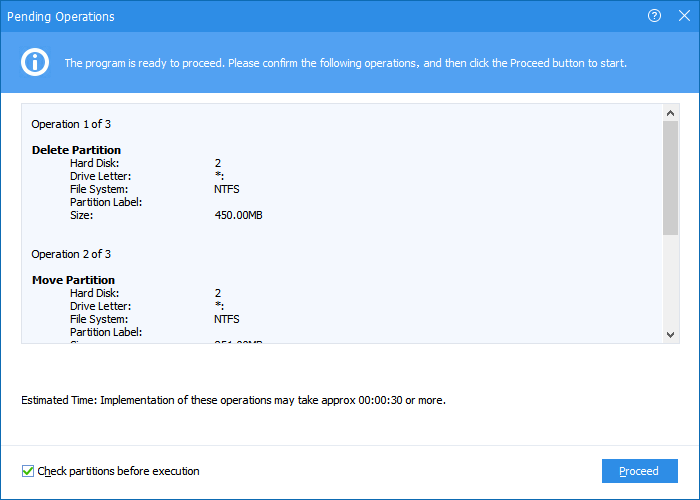
At this stage, even though Aomei’s graphical interface reflects the changes you’ve put in place, nothing has actually been done. You will now need to click the Apply button at the top left of the interface for the changes to be put into effect:

You’ll then be presented with a summary of all changes that will take place. Check through the list and when satisfied click the Proceed button:
A progress window will appear and finally a little ”all done – well done” message.

Checking back in Disk Management, you will now see that the obsolete recovery partition is gone and the size of the system partition has increased– in this case from 231.27 GB to 231.71 GB:

Bottom Line
As I mentioned earlier, unless you are hard-pressed for free disk space, deleting obsolete recovery partitions is far from essential. That said, I always perform this operation myself because I can’t abide when things are not quite right, but that’s just OCD me.
- Disclaimer: If you are not confident or competent working with partitions, I suggest leaving the obsolete recovery partition alone. As I have said, it won’t hurt anything.
Cheers… Jim
—
W10 will run just fine without a recovery partition, one just has to keep an updated bkup. I also use Aomei for bkup also.
I would NOT recommend deleting the recovery partition altogether as it provides useful tools to help users repair and/or recover the system. I agree that having a regular image backup strategy in place makes the RE somewhat redundant but two options are always better than one, and sometimes the RE can provide a simple fix.
Personally, I would never delete the recovery partition altogether.
I haven’t ran a recovery or a system reserve partition on W10 in a long long time, of course I still run W10 in legacy boot and do not use UEFI. I do keep a updated system image, for just in case. I frankly do not have any trouble in running W10 in one partition.
The recovery partition has nothing whatsoever to do with running Windows 10 or how Windows 10 runs. The recovery partition contains tools to help a user repair or recover a problematic operating system.
It’s fine for someone such as yourself not to have a recovery partition, that’s your choice, but it’s not something I would generally recommend.
I understand Jim!!!!
Jim
My reagentc view is different to yours.
can’t paste actual image in but showing as partition 2
“extracted text below”
? X GLOBAL ROOTXdevi ce harddisk partition 2 Re cove ryXWindowsRE
Disk manager is showing partitions 5 6 7 as recovery partitions
Shows 1 100Mb boot?: 3 OEM: 5 6 7 recovery: C: D: Recovery which contains drivers etc from 2011 (old laptop)
Win 10 V1909 installed
Hey David,
I suggest you take this over to the DCT Forum where you can post screenshots and we can discuss to and fro.
Partition 1 is the system reserved partition which contains all the boot files required to boot the OS and should be left well alone. Partition 3 OEM is likely the manufacturer’s recovery partition where you can recover to factory settings. Sounds like you have 3 recovery partitions and we would need to identify which is active.
If you go to the DCT Forum and post screenshots from Disk Manager and Powershell (after running the reagent command) we will be able to help.
Cheers… Jim
Ok, have just done that. Hopefully under Win10, topic is Windows recovery platforms
Yes, I saw that on the Forum, but there are no screenshots?
Hi Jim, I have what seems to be an extra recovery partition, but also a partition called EFI System Partition. It is sitting between the two recovery partitions. What is the purpose of this one?
Hey Peter,
The EFI System Partition contains all files required to boot the operating system and it should be left well alone. If that partition is deleted or messed with, the operating system won’t boot.
Thanks Jim, I have problem with your DCT forum. When I tried to register, it says my email is already registered. I tried logging in with some of my usual passwords, but they all failed. I then tried the reset password option and it said Password Reset Not Allowed For This User. I am kind of stuck.
Okay mate. Sounds like you might have been blocked. This can happen when someone tries to sign-in to the forum multiple times without success. I’ll pass this information over to Dave and he should be able to fix this problem for you.
Will notify you when it has been fixed.
Mr. Jim
Should a bootable USB recovery disk be made, even if their is a recovery partition on the C Drive?
It’s not essential Daniel but having more than one option is always good. As you would be aware, the recovery partition is a separate hidden partition, only viewable via Disk Management, and this is deliberate on MS’s part to help ensure users don’t mess with it. Creating a bootable USB recovery disk would cover the possibility of a careless user inadvertently messing up the RE partition. In short; while not absolutely essential, creating a USB recovery disk certainly won’t hurt.
I am in the process of creating my USB recovery disk. It sure does take awhile.