
Over the years, there has been quite a deal of discussion over which order the two system repair commands, sfc /scannow and DISM /Online /Cleanup-Image /RestoreHealth, should be run when trying to resolve issues. First, you’ll need to understand what each command does.
Both commands check for missing system files and system file corruptions, of course, but there is a big difference in the how:
- System File Checker (sfc /scannow): scans for and replaces any corrupt or missing system files with a copy stored locally in the WinSxS folder
- DISM /Online /Cleanup-Image /RestoreHealth replaces any corrupt or missing system files in the local WinSxS folder with those from an online image
From that, it should be pretty obvious that the correct order in which to run the two commands is DISM /Online /Cleanup-Image /RestoreHealth first and sfc /scannow second.
The logic: Considering the SFC command is checking system files against those stored locally, it is essential to first make sure there are no missing or corrupt files in the local WinSxS folder. Once that has been confirmed by running the DISM command, you can then go ahead and run the SFC command, safe in the knowledge that it is checking system files against a known good source.
SFC Scan Results Explained
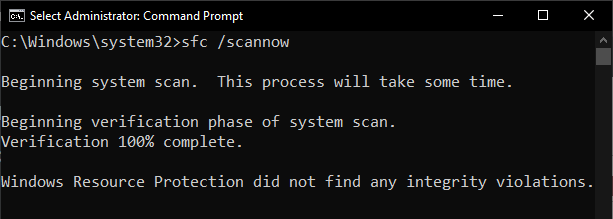
There are three main results following a completed SFC scan:
- Windows Resource Protection did not find any integrity violations: this is the optimum result, meaning all is well
- Windows Resource Protection found corrupt files and successfully repaired them: this is the next best result, but following this result, you should restart the computer and run the command again
- Windows Resource Protection found corrupt files but was unable to fix some of them: this is not the message you want to see. However, running the DISM command beforehand will help decrease the chances of receiving this message
SFC /Scannow Tip!
Most users only run the sfc /scannow command when they are experiencing issues, which is a mistake. I am not sure how system files go missing or become corrupt, but I know they surely do, and in this case, time is the enemy.
The longer you leave between scans, the more chance there is of missing or corrupt system files, and if those missing or corrupt files accumulate, that’s when you’re more likely to see that dreaded number 3 message.
I run the sfc /scannow command every two weeks, just before I create a new image backup. I am not suggesting you do the same, but I would suggest running the command at least every couple of months, preferably every month.
Rule of thumb: System file corruptions are not necessarily obvious, and the more they accumulate, the less chance there is of a successful repair.
—
As always Jim, your explanation is simple and to the point. Do not know who recommended a program named Windows Repair Toolbox, but I use it often. Among the list of tools, it features both the sfc and dism commands. But selecting Dism, you receive the following options:
1 – CheckHealth
2 – ScanHealth
3 – ResoreHealth
4 – sfc / scannow
5 – close
And it is also portable, Mindblower!
I went with the recommended dism command and ended up going down a rabbit hole.
It would run up to 62.3 % then fail saying it couldn’t find the restore files anywhere. Tried to use a fresh, mounted copy of W1125H2 and it still failed. Lots of commands and no restore health. Checked with the scanhealth and checkhealth commands and was told that the file was repairable. No idea where to go next. Any ideas?
This is a common issue that usually indicates Component Store corruptions.
Try this:
Download the portable freeware called FixWin 11: https://www.majorgeeks.com/files/details/fixwin_11.html
Create a System Restore Point or, better still, create and save a system image backup
Extract the files and then run the extracted executable
Select “System Fixes” (from the left hand panel)
At the top of the list of fixes you’ll see “Windows Component Store is corrupt. Repair it suing Deployment Imaging and Servicing Management (DISM)”
Click the Fix button associated with that option
If that doesn’t fix it, suggest you take this over to the DCT Forum where we can provide further assistance.
I had the same problem. Try turning off your VPN. Worked for me. Hope it works for you too.
Thanks for the tip Jim, but unfortunately I still get a error stating that it could not repair or repair failed.
As far as a VPN, it is not an issue since I don’t have one.
I guess it’s off to the forum or maybe a repair reinstall.
Another good find. I took it one step further by writing a PowerShell script that automates the procedure. Copy the following into a note program and save it as a “.ps1” file.
# Relaunch as Administrator if not already elevated
if (-not ([Security.Principal.WindowsPrincipal] [Security.Principal.WindowsIdentity]::GetCurrent()).IsInRole([Security.Principal.WindowsBuiltInRole] “Administrator”)) {
Write-Host “Restarting script with administrative privileges…”
Start-Process powershell “-NoProfile -ExecutionPolicy Bypass -File `”$PSCommandPath`”” -Verb RunAs
exit
}
Write-Host “Starting DISM health restore…” -ForegroundColor Cyan
DISM /Online /Cleanup-Image /RestoreHealth
Write-Host “”
Write-Host “DISM completed. Press Enter to continue to SFC…” -ForegroundColor Yellow
Read-Host
Write-Host “Running System File Checker…” -ForegroundColor Cyan
sfc /scannow
Write-Host “”
Write-Host “All operations completed. Press Enter to close this window.” -ForegroundColor Green
Read-Host
You should run Daily. Modern SSDs may be faster, but are prone to more errors. They are crap in my estimation. They do not last as long as the older H.D. and wear out at a rate of 1% per month!
I run this daily; dism /online /cleanup-image /restorehealth
sfc /scannow
Finally fixed my issue with DISM with this command:
DISM /online /cleanup-image /StartComponentCleanup
After that, the regular DISM command completed and scannow was able to do a scan, find corrupt files, repair them and after a second run, found no issues.
Hope this helps someone else.
Thanks for posting back with your solution Ken, much appreciated.