Usually, once I have taught people how to use their Rule in Word documents, they are so surprised at how much easier and quicker it can be once they know how! I hope that will be your reaction as well.
Before I start, the first thing you need to do is make sure your Ruler is visible. If you do not see it at the top of your Word document, follow the steps below to enable it.
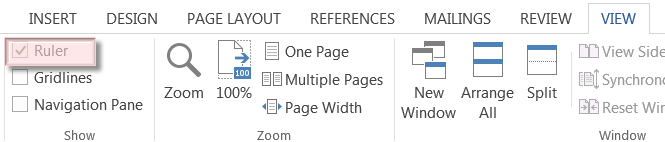
On your Ribbon, on the View tab, select Ruler to enable it.
Ok, now that we know how to enable the Ruler, I can show you how much you are going to love using it. First, I will cover how to set a Tab Stop using your Ruler. Yes, I covered this in an earlier post but this has a bit more detail.
Follow the steps below to learn how:
Select Left Tab at the end of your horizontal Ruler to change it to the type of tab you would like to use.

Select one of the types below by simply clicking on the L shown above to cycle through the different options.


the same position.

A small caveat with this one – if you fail to clear the Bar stop before you print your document, the vertical line will be printed.
Click or tap the bottom of your horizontal ruler where you would like your tab stop to appear.
I still remember when I learned how to use this years ago and how much easier it made my job. I worked in a law firm and I had so many uses for these! I hope this post is just as helpful to you!
PLEASE, PLEASE—
SOLVE THE CHALLENGE
before my next birthday ..”.How to delete a blank page
in Word”. Any blank page – my document that I created
and am working on ….Tried everything…did searches…no
success.
THANK YOU THANK YOU
I would, of course, have to see the document to give you a definitive answer but the first thing I would ask you to do is turn on Show/Hide so that you can see everything on every page, including page breaks. Once you find that page, it will be much easier to get rid of. I hope this has been helpful to you.
It showed all the marks, etc…but still could not delete the three pages that were blank…
Tried all kinds of ways.
I would settle to know if I could only send page 3& 4 ….to recipient – instead of the whole 6 pages. [?] solution ??
[.I have a love the weekly newsletter for long time].
Unfortunately…not.
I just made new document…copied and pasted ..
Renamed….it.
But l do hate giving up.
ThankYouVeryMuch!!
Try this:
Click or tap anywhere in the page you would like to delete, press Ctrl+G.
In the Enter page number box, type \page.
Press Enter on your keyboard, and then select Close.
Verify that a page of content is selected, and then press Delete on your keyboard.
Let me know if this resolves your issue please.