The terrific DVD ripper/backup freeware DVDShrink has been around for ages. I’ve been using it now through 4 versions of Windows and it has worked flawlessly on all operating systems right through to and including Windows 7. That alone, considering it has not been actively developed for years, is a glowing testament to the brilliance of the original software. The fact that DVDShrink also continues to perform its core tasks very well has made it one of the most desirable and widely used freeware products around.
I am aware a lot of people think they know how to use DVDShrink properly, in fact many of you more than likely already do. Just in case, here is a pictorial guide on the method I use to help achieve optimum quality.
First a few pertinent facts:
Most commercially produced movie DVD’s are distributed on dual layer discs which have a large enough capacity to comfortably hold all the necessary files/data. When we backup those movies we are generally attempting to do so using single layer blank discs. That means the original data needs to be shrunk (compressed) in order to fit onto the lower capacity media. DVDShrink helps us achieve that by compressing data and allowing the user to eliminate non-essential extras such as; menus, audio for multiple languages, subtitle menus, trailers, etc.
The most relevant ingredient in DVDShrink is the “Compression Percentage” and the most important goal, to assure good quality, is to get that as close to optimum (100%) as possible. In my experience that is difficult to achieve for movies with a duration time in excess of 2 hours. However, DVDShrink does include some additional options to help with that eventuality.
The most common result of trying to cram too much data onto a single layer DVD is severe picture stuttering and pixelation… this is what we are trying to avoid.
For this guide I am using a commercially produced movie DVD with a running time of just on 2 hours.
So, on to the process:
With DVDShrink running and our movie DVD inserted into the computer’s ROM-drive, the obvious first step is to click on the Open Disc button in the main menu across the top.
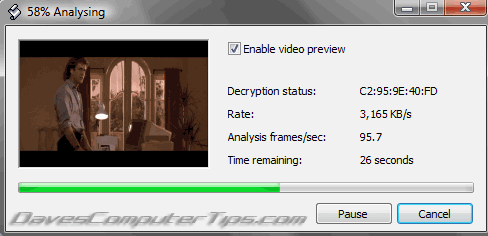
As soon as you do that you will see an overlay window containing references to the movie title and ROM-drive letter. Click OK and the ‘Analyzing’ screen will appear, including a preview. Analysis is a relatively short process generally taking between one to three minutes only.
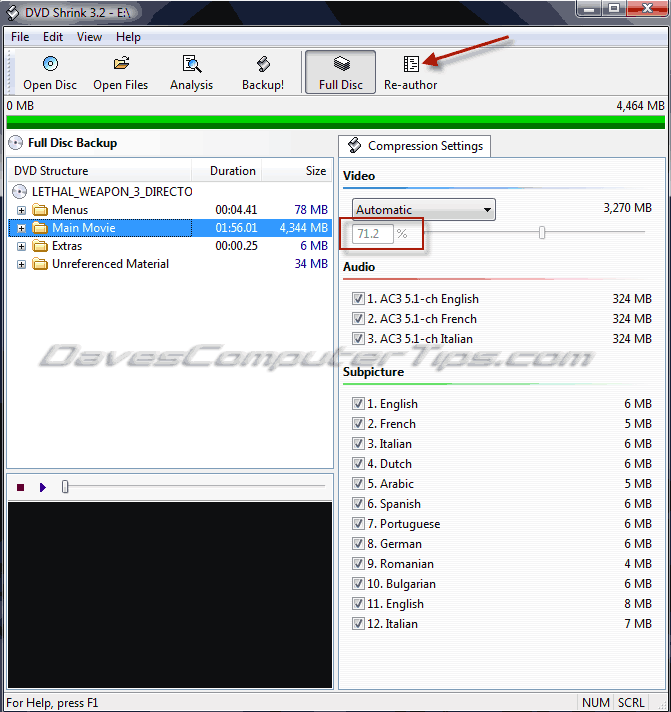
As soon as analysis has finished, that window will close automatically and you will now see details of the movie files. The details in the left hand pane comprise the files/data currently selected for backup, which at this stage, is the full movie including all menus, trailers, etc. Note compression is at 71.2%. We need to raise that to 100%, or somewhere near. Next step is to click on the Re-author button.
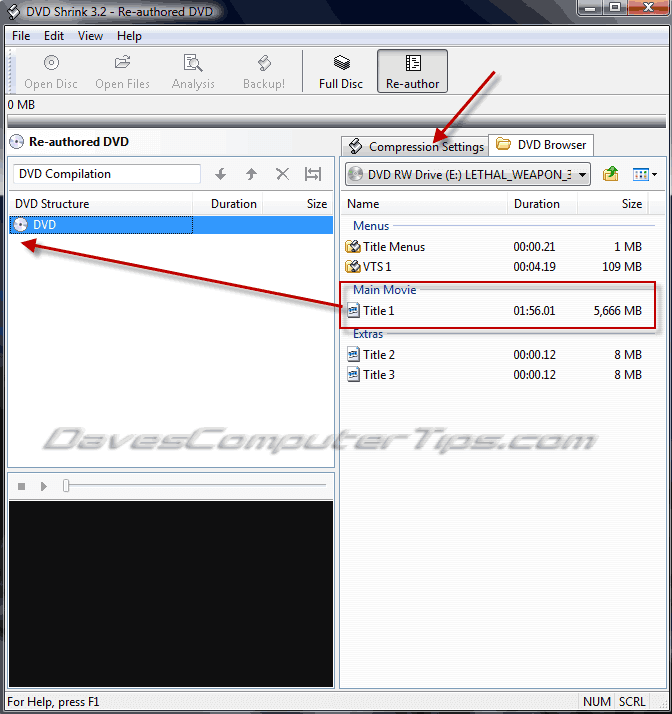
You will see everything has now disappeared from the left pane meaning nothing is currently selected for backup. Now we need to locate the entry for the Main Movie in the right hand pane and drag and drop that into the left pane. So now we have selected the main movie only for backup, omitting most of the non-essential extras. Now click on the Compression Settings tab in the right pane.
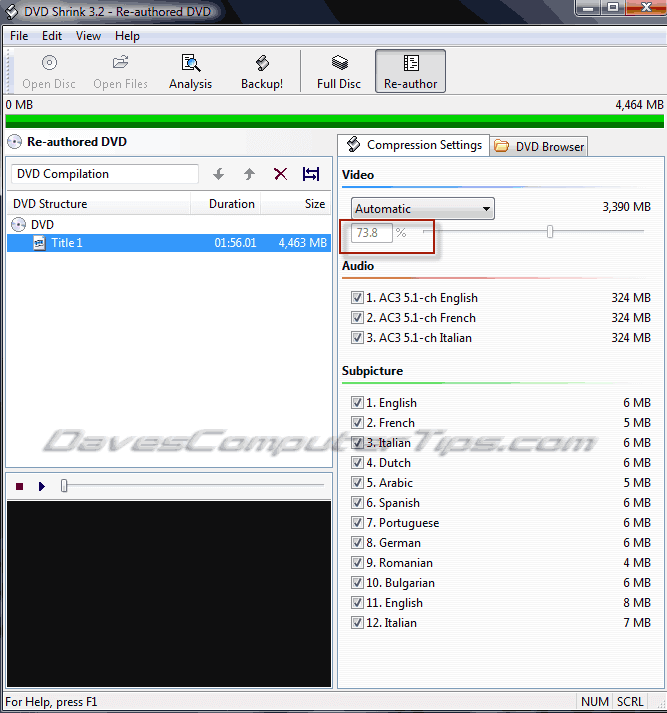
Note compression is now at 73.8%. Not a huge improvement but we have more to do yet.
Now deselect all the non-essential items in the right pane. In this case they would be; everything under ‘Subpicture’ plus all items under ‘Audio’ except for ‘AC3 5.1-ch English’. Unless you would prefer to listen to the movie in French or Italian that is!
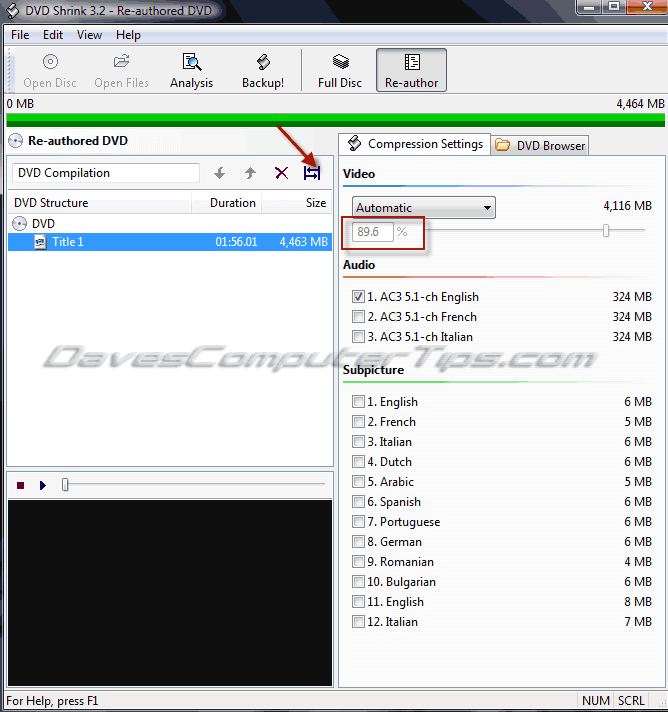
With those items now deselected you will see compression is looking a lot healthier at 89.6%. One more step and we are there. Click on the little opposing arrow icon as indicated by the red pointer I have added into the screenshot.
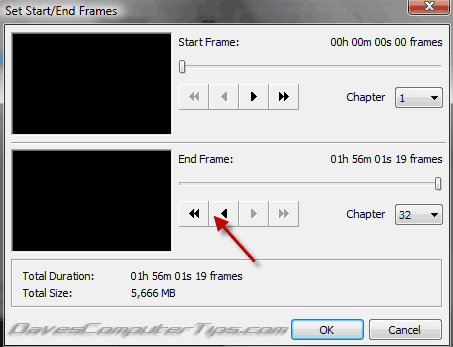
After clicking on the arrows you will see a new window with ‘Start Frame’ and ‘End Frame’ including a preview for each. By pressing on the back and forward preview control buttons you can edit the start or end position of the movie. I would suggest leaving the start of the movie alone; there is generally not a lot to be gained by shortening the intro. The end of the movie is a different ball game altogether. You can get rid of all those annoying credits which seem to take an eternity to roll by. This will often shorten the movie by up to 12 and 14 minutes thus helping reduce the amount of space needed. Just keep clicking on the back arrow in the End Frame preview control bar (or hold it down) until you get to the last frame of the movie, just before the credits begin to roll. When you are satisfied, click OK.
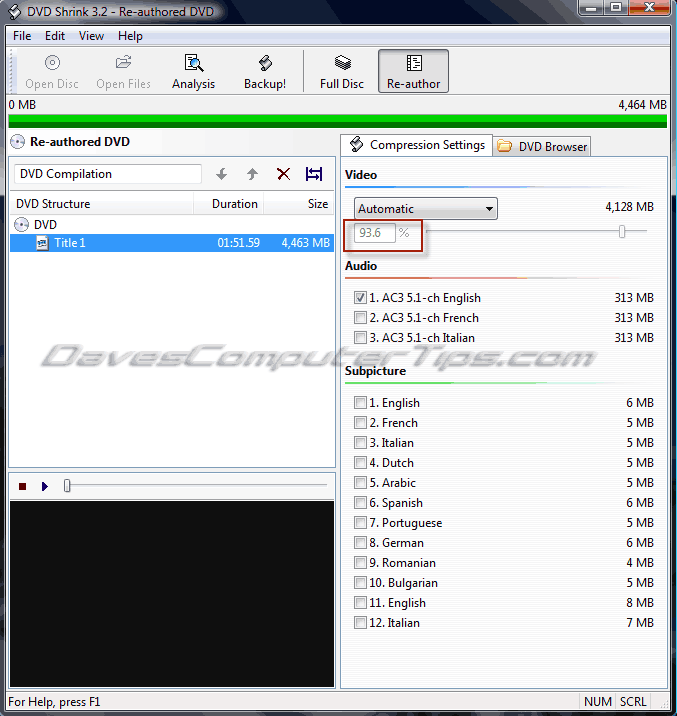
You will see compression is now at a much better 93.6%, an overall improvement of some 22.4% from our starting position. Not quite optimum but near enough.
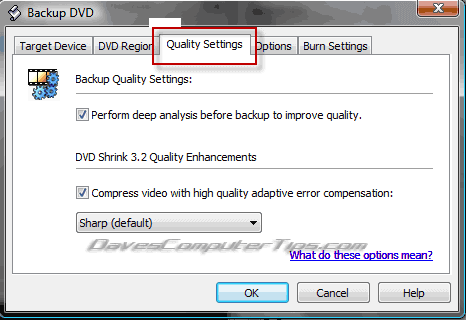
Now we are ready for the backup. Click on the Backup button in the main menu and you will see the backup options window. Click on the Quality Settings tab and this is where those extra options to help improve quality come into play. If you cannot achieve 100% compression these two settings will generally be enabled by default, if not then enable then manually by placing a checkmark in each of the little boxes. If 100% compression has been reached these options will not be available, simply because they are not needed.
DVDShrink automatically syncs with Nero for the burning process. If Nero is not installed then DVDShrink will automatically save the backup files to the hard drive for later burning with another program. If you do not have Nero on board, one of the best products for performing this task is the open source freeware ImgBurn. ImgBurn is a versatile program but somewhat confusing, the GUI is not terribly intuitive, but we have an ImgBurn How-To article for that!


Great instructions. Really lays it out.
Thank you for this. I would love to read an article on how to use DVD shrink and then change the VOB files on the hard drive. i.e. edit the VOB by muting audio in certain places of the movie and then burn it again with the correct menus etc. any ideas?
To cut audio using DVDShrink, use the beginning and ending frame editing feature to select the part of the video that you want to silence, click on OK, then click on the tab called “Compression Settings” and you will see all the audio streams. Uncheck all of the audio streams. Then go back into the beginning and ending frame editing feature and move the start slider bar back to the beginning of the movie and the end slider bar to the end of the movie. Then click on OK. Proceed with authoring your ISO or VOB files. When you play the newly authored video file, you will notice that the movie will be missing audio in only that 1 spot. Please note that you can create as many of these audio cuts as you want as little as 1 second each cut. One other note, when playing the authored video, there is a slight A/V re-synch that takes place when the audio come back on. The video speeds up a little but it’s not too noticeable. Good Luck
Thank you! I have been using DVDShrink for years but did not know about the beginning and ending frame editing feature. Article was great and very informative!
interesting and easily explained very good
Hello Jim
I have just read your article on “How to use DVD Shrink properly”. I have tried to do what I want to do with many programmes but no go.
I have movie files on my hard drive as AVI files which I play through Real Player and the same files reauthoured through Ashampoo 10 which I won in one of your giveaways. What I want to do is shrink these files so I can put 3 1hr 20 mins movies onto 1 DVD.
When I reauthour then through Ashampoo 10 it fits 2 and quality is only just “Fair”. Can I use DVD Shrink to do this if so how?
Regards
Hugh Williams
[email address removed to protect subscriber from spam]
Hey Hugh – No, DVDShrink works only with DVD video files, not AVI.
The only way I know of that you could accomplish this is by burning the AVI video files to DVD as a data disc rather than authoring. However, the success of this method is wholly reliant on your DVD player supporting this type of playback.
When you use the authoring method the AVI files are re-encoded to a format which is compatible with DVD player standards, this process results in much larger files. These days, most newer DVD players also support playback of data discs.
Movies encoded in Xvid/DivX format (or AVI) generally average out at around 700-800MB per movie. A DVD disc will hold up to 4.7GB of data. So, it’s possible to have 4 or 5 AVI movie files on one DVD. BUT, as I said, this will only work if your DVD player actually supports playback of data discs.
Does your TV include a USB input? Most newer TVs do and this will allow you to simply copy over multiple movie files to a USB flash drive and play them back that way.
HTH,
Cheers… Jim
i want to Compress 11gb vob file into lessthan 4gb is it possible with DVD Shrink?
Hi Rifath – I seriously doubt DVDSHrink could compress to that extent.
Sir, actually i compress 9gb file(.VOB files) to 4gb, but more than 10gb file shows error in DVDShrink,
so i also doubt is it possible to compress morethan 10gb file In any software like DVDShrink. please give me information can we compress more than 10 gb (.vob files) in DVDShrink or any other software.
Sure, there is plenty of software that will do the job, BUT none free that I know of… they all cost $$$$
If maintaining highest quality is not imperative, you could always convert to AVI.
I would suggest compressing as small as you can and then choose that file again and compress it. I’ve done it many times with Shrink it comes out looking not too bad, actually.
I’ve been using Shrink since it first came out, too!
Hi Jim, I have followed these instructions (great by the way) What i’m wanting to do is copy my DVD’s For example the Simpson, per episode from each disc but be able to watch them on my computer or transfer to my Windows 7 or 8 phone. Will I then need to convert the dvd shrink videos to another format once completed this process? Thanks, if you can help. Sean
Hi Sean – You can view the video files produced by DVDShrink on the computer (as video) but to view on Windows Phone, you will need to convert the videos to a Windows Phone compliant format. DVD Shrink rips DVDs to VOB (standard DVD format). These can be viewed on your computer from the hard drive but are not compatible with mobile devices.
Your best bet for Windows Phone would be to install DVD Ripper software which rips the contents of a DVD direct to a variety of formats. The main criteria is that the list of output formats supported by the software must (obviously) include Windows Phone compatible formats. The other problem may be overcoming DVD protections. Here is a link to a freebie which is very easy to use and includes a decryption feature: http://www.winxdvd.com/dvd-ripper/
You’ll just need to check and make sure Windows Phone formats are included. Here’s some reading material relating to Windows Phone and video formats:
http://www.msdonkey.com/windows-phone/supported-video-formats-and-converting-files-to-play-on-windows-phone-8/
http://www.windowsphone.com/en-GB/How-to/wp7/music/music-and-video-faq
Cheers… Jim
I’ve been using DVD badly for years! Thanks doubly so.
Thank you for your fabulous & very simple instructions. I LOVE DVD shrink for my kids movies. My I ideal goal is to be able to put them on USB or transfer them directly to our Kindle or Android Transformer tablet, which I don’t have enough tech knowledge to accomplish. I have them on a USB, but I don’t know what programs I need on the kindle or the Android to get them to play. Do you have any suggestions? Thanks! 🙂
Hi Paula – DVD Shrink rips to VOB format only. VOB output files are very big so unsuitable for flash drives and not supported by your mobile devices. What you need is software which will rip DVDs to a variety of smaller sized output files (Xvid, Divx, H264, etc) including those formats supported by your mobile devices.
Unfortunately, the best software in this genre is mostly shareware (as in costs $$$). Take a look at this one (it’s one of the best): http://www.winxdvd.com/dvd-ripper/, and is available in free and shareware editions. This is the type of software you will need.
Cheers… Jim
Jim,
You should show people how to make a mixed DVD with a variety of different episodes on one disc, like a series, for example. You can take episodes from different discs within Shrink to author one single disc! I’ve been doing this for like a decade now and no other program does it quite like DVD Shrink does!
Went through every step as instructed then clicked back-up and the film starts analysing again???????
I think it’s ripping, not analysing once you click backup.
Btw, DVDshrink is great! Thanks for the tutorial.
Hi All! Ok so I am not really new to using DVDShrink, however, I installed it on a computer several years ago and now that computer has “died”. Can anyone let me know where I can get a safe version of it now? And does it work with Windows 8 (Not too happy about utilizing this operating system right now)? I think I may have installed a bad version on a desktop I purchased on Black Friday. Ended up having to take it back!!!
Sure, DVDShrink can be downloaded from MajorGeeks here: http://www.majorgeeks.com/files/details/dvd_shrink.html
Not too sure if it works in Win 8 or not, haven’t tried it myself. However, the software has worked in all versions of Windows up to and including Win 7 so there is good reason to suspect it will also work in Win 8.
Cheers… Jim
Jim, I wanted to thank you for providing me info on where to get the DVD Shrink freeware that I needed.
Hi Jim I have nero but it wont auto sink with dvd shrink but I do have dvd decryptor but I am having problems burning discs. I have just done a disc and will check this. Why doesn’t nero work for me?
Thanks brett
Ok I managed to burn the dvd with dvd decrypter but id like to know why nero wont sink? Any ideas?
Thanks brett.
Brett, try this:
*Open DVDShrink and click on Edit (in the top menu between File and View) and then click on Preferences.
*Now click on File I/O to open that tab.
*You should now see an option to Enable burning with Nero… make sure that option is enabled (ticked).
That should do it for you,
Cheers… Jim
Hi Jim thanks for your reply. I checked my enable setting and its actually checked so I will test this again soon but think maybe it still might not work. I will get back to you.
Thanks brett.
If I remember rightly Brett this has something to do with the order in which Nero and DVDShrink are installed… it has to be Nero first and then DVDShrink after. Apparently, DVDShrink identifies Nero during the install process. So, if you’ve installed the other way round, DVDShrink first followed by Nero, you’ll need to uninstall DVDShrink and then re-install it… that should fix it.
Cheers… Jim
AHHHH. Right!! I will try that at some stage.
Many thanks mate!!
brett.
Hi
Wondering if you can help me! When using Dvd shrink the files are saving on my hard drive as several different segments instead of one whole movie even though it’s showing as one large file before the shrink begins
Any ideas?
Hannah, the output is supposed to be broken into a number of VOB files, that’s quite normal. Suggest you read here: http://en.wikipedia.org/wiki/VOB
Hope that helps,
Cheers… Jim
Hey Jim, I have nero 2014 ( installed first) and DVD shrink is not recognizing it also DVD shrink is converting the files to iso files all I want to do is copy to external hard drive to store them and watch on the road ect .
How do i do to put subtitles on the movies?
Jim,
How can I use DVD Shrink on a movie that is spread over 2 DVD’s (ie Titanic) to combine the entire movie on those 2 DVD’s into one file?
Rich,
If you have two ROM (optical) drives it is relatively simple. Load the first DVD into the first drive, re-author and select the main movie only. Then load the second DVD into the second drive and repeat the same procedure. *Do NOT remove the first DVD from the first drive.
If you have only one optical drive; load the first DVD, re-author so the main movie only is selected and then save (backup) the files to a Video_TS folder. Next, load the second DVD, re-author and select the main movie. Leave the DVD in the drive and use DVD Shrink’s “Open Files” menu to browse to the saved folder and load that.
HTH,
Cheers… Jim
Hi
I have been using Dvd Shrink for years, my only problem is if I use Re-author to remove adverts in a film I have recorded, in playback on a dvd player it freeze frames at that point.
And more recently I had a problem where it cut off the end of the films, not putting all chapters to disc even though there was plenty of disc space. (In the temporary files on hard drive whole film was there ?)
Note this only happens when using a laptop PC. Any idea’s
Great Guide! Thank you!. I have a question I was not able to find any answers online. I did a backup of a home video dvd and worked great. The problem, is that the output files VTS_01_1.VOB when I play them back, the file name “VTS_01_1.VOB” appears as a text overlay at the beginning of the video and I don’t want that. I looked at the “preferences” but did not find any reference to why this text overlay is added and how to turn it Off! Can you please help with some instructions. Is it a setup that I have to change or is there no way to remove the overlay file name from the output video?
Thank you
Esha
I’m not sure what’s going on Esha. DVDShrink does not write anything extra to the files, it only copies what’s already there.
It sounds like some kind of menu has been added, perhaps by the authoring software that was originally used to burn the home video to DVD.
When the DVD loads into DVDShrink, is there any mention of a menu in the right hand pane?
If you are playing the files back on your computer, some players like VLC display the title for a few seconds at the beginning of playback. This can be turned off in the player’s preferences.
Hi Dave,
Just wondering if there’s any software that, like the people above have suggested, can convert the original movie file (plus the subtitle track) to a single AVI file (or XVID/DIVX/MP4) etc without so I can keep the DVD at a high quality (but remove the ‘bumf’ – The intro and trailers etc!)
Thanks for the great guides!
Aaran
Aaran,
There are tons of software to accomplish this, but my favorite is DVDFab. Simple to use and effective. http://www.dvdfab.cn/