Snip & Sketch is a useful tool native to Windows 10 for taking screenshots and simple editing.
First off, full disclosure: I’ve been using the professional Snagit screen capture and editing software for years so when I decided to write this guide I was working from a place of virtually zero experience. As it turns out, Snip & Sketch includes a couple of peculiarities so it was also a learning curve for yours truly.
- You might also like: Best Free Portable Screen Capture Tool
Using Snip & Sketch
The often recommended method for opening Snip & Sketch is to use the keyboard shortcut Windows key + SHIFT + S. However, this method has its limitations. That keyboard combination does not open the full Snip & Sketch app but merely opens a control bar positioned at the top center of the screen:
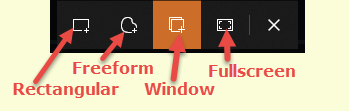
From there you can choose what type of screenshot you want to take: rectangular, Freeform, Window, or Fullscreen. Now, when using this method, the screenshot does not open in the Snip & Sketch app but is automatically saved to the Clipboard. That’s fine if all you want to do is copy and paste the screenshot into a document:
- Open Clipboard History by pressing the Windows key + V keyboard combination
- Highlight the screenshot in the Clipboard (mouse over) and press CTRL + C (to copy)
- Click inside the document and press CTRL + V (to paste)
However, if you want the screenshot to open within the Snip & Sketch app ready for editing you’ll need to run the app. We’ll be covering that in the next section.
Editing Screenshots Created By Snip & Sketch
If you use the keyboard shortcut method and end up with the screenshot saved to the Clipboard but want to apply edits/annotations you’ll need to open the screenshot in Paint or Paint 3D:
- Open Paint (or Paint 3D)
- Open Clipboard History by pressing the Windows key + V keyboard combination
- Highlight the screenshot in the Clipboard (mouse over) and press CTRL + C (to copy)
- Click inside Paint and press CTRL + V (to paste)
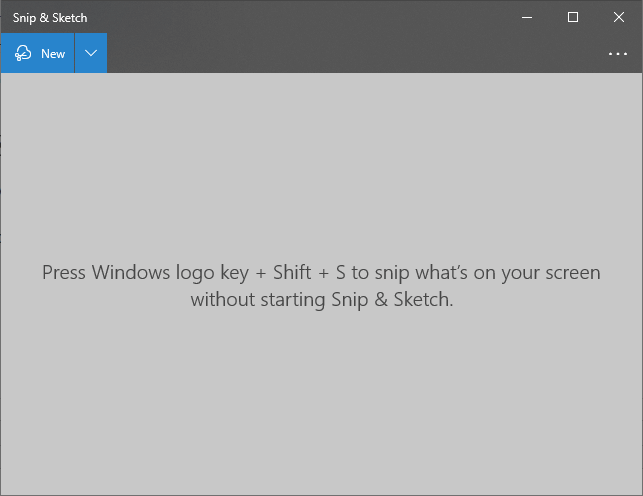
If all you want to do is apply simple edits to a screenshot, you’re better off opening the full Snip & Sketch app:
- Open the Start menu, scroll down the list of all programs, and click Snip & Sketch
- BONUS TIP: If you’d like to pin a shortcut to the Taskbar: right-click the Snip & Sketch item in the list of all programs, select More, and then Pin to taskbar
- Clicking New will open the control bar, take your screenshot and the result will now appear in the body of the Snip & Sketch app ready for editing:

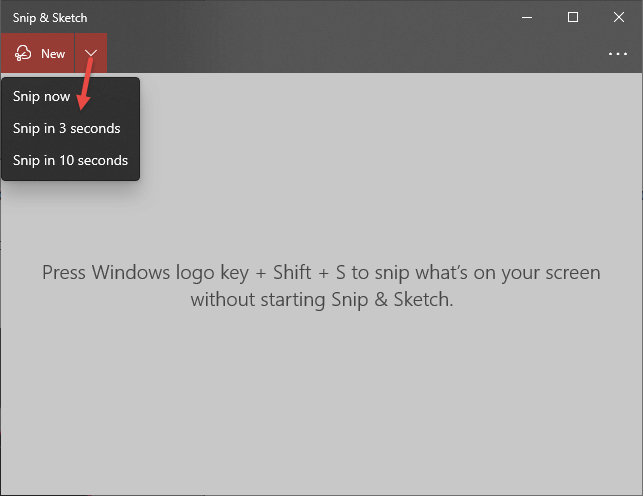
- Clicking the down arrow (v) adjacent to New will open a delayed capture menu (which is not available via the control bar alone):
BOTTOM LINE:
Snip & Sketch is pretty basic and, as explained, does include a couple of peculiarities. However, it’s one big advantage is that it’s already available as part of Windows 10. For basic screenshots and simple editing, Snip & Sketch is quite adequate.
Do you use Snip & Sketch? Let us know via the comments.
—
Interesting read Jim. Do not remember where I discovered Greenshot, but this is the screen shot program we both familiar with making learning and using another program highly unlikely. Have tried one or two other programs with more features, but sometimes the simpler the better, Mindblower!
Nice starter article. I have used both Snagit and Greenshot in the past. These were great for creating instructional articles over the years. I then started exploring Snipping Tool. Why run an extra program if it is already built into Windows.
Yes, there was a easy learning curve. Once I got onto the program and used it for a while, I dropped Greenshot. When I found I could repurpose the Print Screen key for Snipping Tool, it was a game changer. (Windows 11 – Settings > Accessibility > Keyboard > Use the Print screen key to open screen capture)
Great heads up to use PrtSc key which is generally overlooked. To me more efficient than overcrowding taskbar with an additional icon.
Thanks much.
I have been playing with a new to me app called Lightshot. It is similar to Snip & Sketch. It includes a built-in editor that allows me to edit screenshots right after capturing them. With a single click, I can save the screenshot to the cloud and get a shareable link to send to others. When needed, I can also save these images locally on my PC.
Both programs have their strengths. I will need to use this for a while before deciding whether to keep it.
Hey Tom,
Lightshot is a nice tool but there is no native portable version available. With these types of tools, I always prefer portable.
I agree. I prefer portable for these types of utilities. I am not finding that Lightshot is that much better than Snipping tool and will likely drop it soon.
Have you tried PicPick Tom?
I use the professional Snagit myself, for work reasons. However, if my requirements were more modest I’d definitely go with PicPick portable. It’s built-in editor is superior to most.
https://picpick.app/en/download/
Thanks, I will give it a try.
No problem mate. Please let me know what you think of PicPick.
So, I have been using PicPick for over a week now. Works great, especially if I need to annotate an image.
For quick copies for part of a screen is still Snipping Tool.
The only fault I have found with PicPick is even though I set “Run PicPick when Windows starts”, I need to start it up manually. I have not fully investigated this.
Hey Tom,
Yes, PicPick’s strong point is definitely its built-in editor/annotator. The auto-start with Windows option is working fine for me. Not sure why it wouldn’t be working for you.
Thanks for sharing your experience mate, appreciated.