SlipStreaming? What the heck is that?
Deciding whether you want to slipstream Windows 7 depends on if you know what slipstreaming is. In this article I’ll tell you about slipstreaming and how to slipstream Windows 7, the Service Pack 1 update, and the most recent updates since SP1 was published.
Slipstreaming is a great concept and a very useful timesaver. Basically, what it involves is combining the original Windows 7 installation with the following Service Pack 1 and all the security updates that have followed since your original installation. Imagine that!
Next time you decide to do a complete clean install of Windows 7 you won’t have to plug in your SP1 disc nor will you have to wait for umpteen megabytes of downloads to get your Windows system up to date.
The last time I did a clean installation of Windows 7 it took a very long time. Not so much for the installation itself but the biggest burden is all those Updates that have happened in the interim. Last count it was over 100 for me! That took an inordinate amount of time to download, not to mention all the re-boots that were necessary to complete their installation.
Slipstreaming is a way of combining all those things into one single fat installation that ultimately takes care of all of the above in one fell swoop. Cool!
Installing Windows 7, again…
Around here, re-installing Windows is a common thing. I install a lot of different software for reviews, personal curiosity, and testing purposes. This activity leads to a cluttered and possibly infected Windows installation but most certainly a cluttered and inefficient computer. That is where this SlipStream Windows 7 article comes in.
What you will need
In order to perform this magic you will need a couple of things. Get these ready before you start.
- A blank DVD
- Your original Windows 7 installation disc
- You’ll need Windows 7 installed
- RTSe7enLite – this is the utility you will have to download and Run; here’s the link: http://www.rt7lite.com/downloads.html
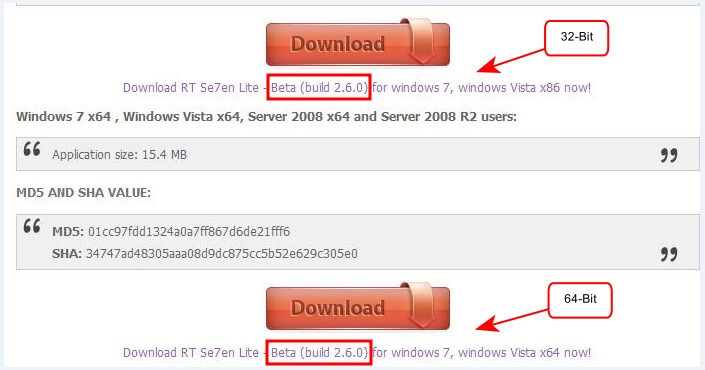
Important Note: The following instructions will not work with Build 1.7.0. You must scroll down the page at the above link to find the Beta Build 2.6.0 and get the 32-bit or 64-bit version– whichever is appropriate for your Windows operating system.
This is what you will be looking for:
- A little bit (or a lot) of time– say roughly an hour or two or three (this depends on your computer’s capabilities and how much you plan to combine in your slipstream)
Slipstreaming Windows and Service Pack 1 (SP1)
When I slipstream Windows I like to copy everything over to my hard drives first. It makes things go much faster and it gives me complete control of the source and destination files locations.
Here is what I suggest:
- Choose a hard drive with lots of elbow room. I needed over 20GB before the task was completed.
- Create a Work folder on the drive of your choice
- Create a sub-folder beneath that called Win7 or anything descriptive
- Create another sub-folder beneath the Work folder called SP1
- Create another sub-folder called Temp– this will be for the temporary files RT Seven Lite produces during processing
- Copy your original Windows 7 DVD to the Win7 folder
- Copy the SP1 disc to the SP1 folder; if you have an ISO file you may use it here instead
- If you do not have an SP1 DVD or ISO file you may download one at this link: http://www.mydigitallife.info/official-windows-7-sp1-iso-from-digital-river/
Note: With the exception of having an SP1 DVD or ISO, the above steps are not essential but I believe it will make this exercise a bit easier in the long run. The choice is yours.
Install and Run RTSe7enLite
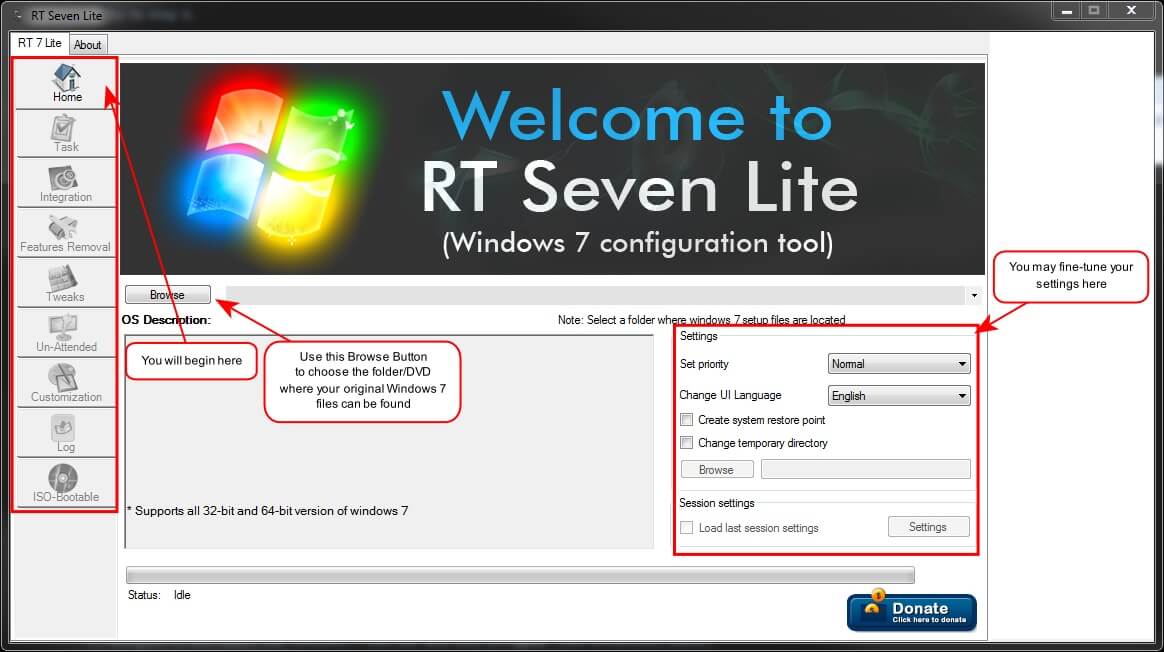
When you fire up RT Seven Lite you will have a few choices to begin with. The left-most panel will be greyed out and unavailable until some preparation work is first done.
1) You must tell RT Seven Lite where the original Windows 7 installation files are located. Choose the Browse Button to do this. If you have followed my advice about file locations you will know exactly where that is.
Important Note: If you are going to use any of the options mentioned below, you must choose them before you select the directory above. You will not have the opportunity to come back to these options without re-starting from the beginning. I learned this the hard way.
2) You now have a couple of options you may choose from:
- Set priority: How much in the way of computer resources do you wish to allocate to the slipstream process. the higher the priority, the faster things will be done. It must be noted this does take away from other processes and may slow them down. Set too high a priority and your computer may become barely usable while RT Seven Lite is doing its work.
- Change the temporary directory: If you do not choose this, then the default Windows temporary directories will be used. If you have created the Temp sub-folder as I suggested, then you may choose this as the folder that RT Seven Lite will use.
- There might be at least one very good reason to change this and that is room. You will need several gigabytes of disk space to perform this operation. Be sure your drive has enough free space to get the job done.
I like to have everything in one place but this is a personal preference and again this is entirely up to you.
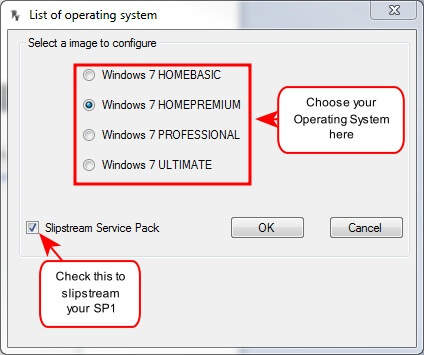
Once you have chosen your Windows 7 source directory you will be prompted for the Operating System:
Choose your weapons…er…Operating System. Some may be hopeful at this point that by choosing a higher Windows version than you own will allow you to get it on the cheap. Sorry. Unless you have the product key for the version you choose here, it won’t work when you get to installing it.. Microsoft will frown upon you. Just choose the operating system that you own and all will be a good thing.
Be sure the Slipstream Service Pack box is checked! If you fail to do this, you will have to start over. There are no Back Buttons in this program!
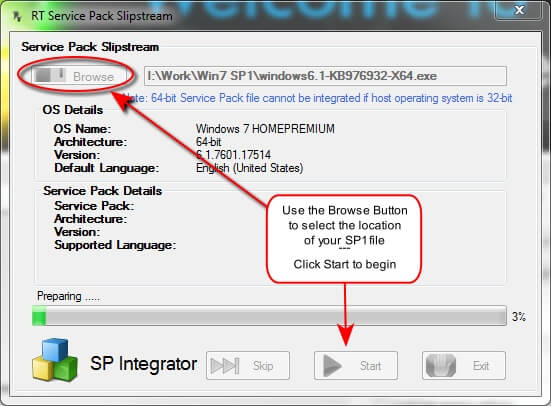
Once you have made your selections you will get a progress window like this one:
SP1 Choices
I had 3 SP1 files to choose from on my SP1 DVD:
- …ia64– Itanium 64 chip
- …X64– 64-bit chip
- …x86– 32-bit chip
You will have to choose the correct one based on your system. If you use an SP1 ISO as your source file I don’t believe you will have to make this decision.
Once you do the above and click the Start Button, you’ll want to go for a walk or do something else healthy. This could take quite a while. On my computer, at Above Normal priority settings, it took 25 minutes. At Normal settings it took ~45 minutes.
That was a Preparation process. Once it has finished there will be a second step which won’t take nearly as long– maybe 5 minutes or so.
Let’s Add All Those Updates to our new Slipstreamed Windows 7/SP1 ISO
This part is tedious but you only have to do it once. In order to integrate the updates Microsoft has provided for your system you will need to download them. I don’t know of a way to download them all in one go. As far as I know they must be downloaded one at a time. If anyone out there knows how to get all the updates at once, please let me know! It would not only be information valuable to me but for all DCT readers.
Here’s how:
- Open the Control Panel and choose Windows Update
- In Windows Update, in the left panel, choose View update history
- In the window that opens, right-click on an update and choose View Details from the context menu that opens. You will then see a window like this:
By clicking the link under More information a page should open in your default browser. This page will have download links matching the update you chose. Be sure to pick the one that matches your operating system, such as Windows 7 x86 if you have a 32-bit system, or x64 for 64-bit systems.
You may download them to any folder you like; just remember where so you can let RT Seven Lite know when you are ready. I put mine in the Work folder we created earlier. When we are finished with this tutorial they will no longer be needed and may be safely deleted.
Continue with the above steps, one at a time, until you have downloaded all the updates you would like to slipstream. Since the list can be a lengthy one you might want to only download the Important updates rather than all the Optional and Recommended updates, too. The choice is yours, of course.
When you are finished, close all the Windows Updates windows.
Back to RT Seven Lite
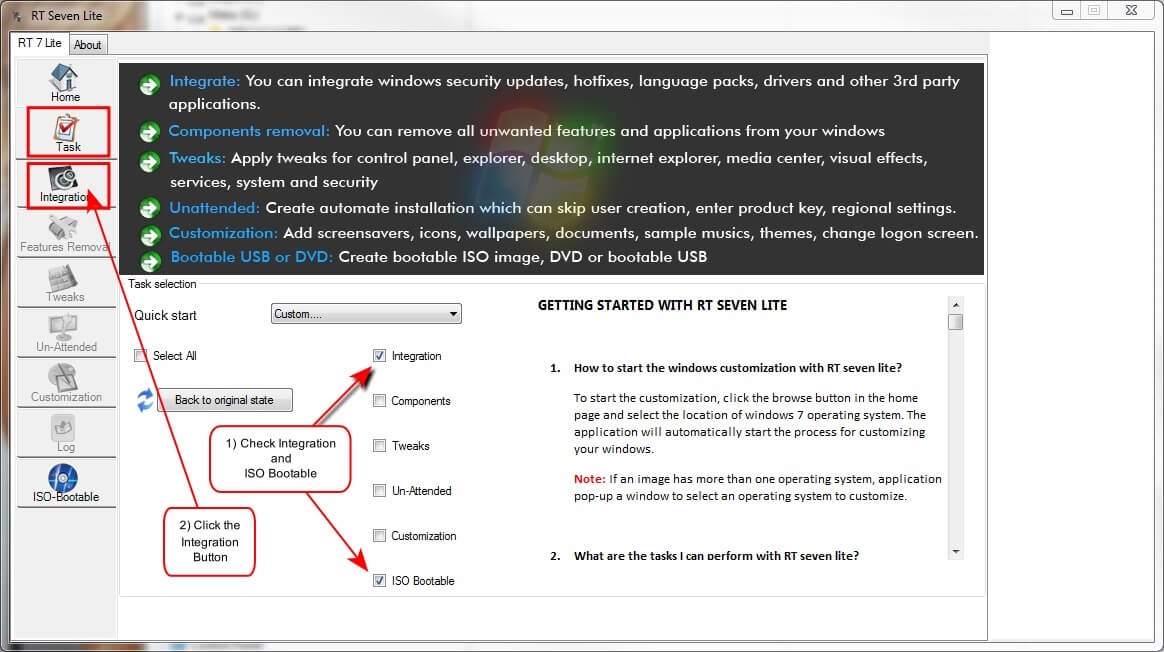
- Click the Task Button in the left-hand panel.
You can see there are many options available to customize Windows here. It is beyond the scope of this article to cover everything that RT Seven Lite can do, so I will only be discussing the Integration and ISO Bootable aspects of this great utility.
- Put a check mark in the Integration and the ISO Bootable check boxes by clicking on them.
- Now, click the Integration Button in the left panel.
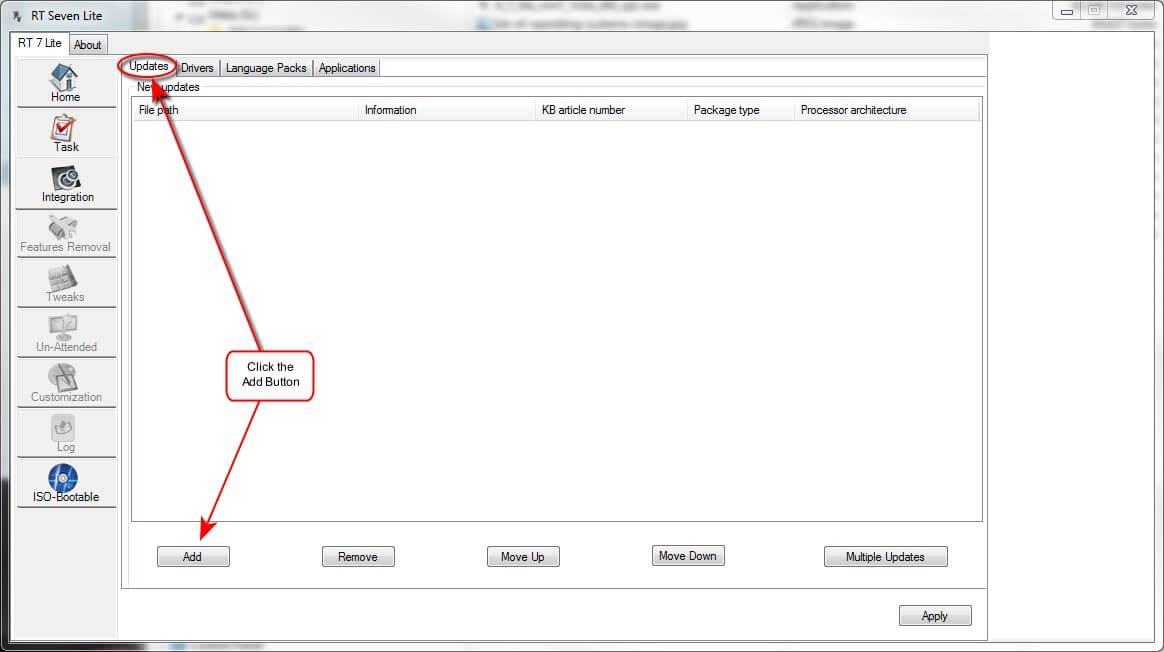
- Under the Updates Tab, click the Add Button.
A window will open from which you can choose all those updates you downloaded earlier. Remember where you put them?
You can add them one at a time, or all at once using the traditional methods including the <CTRL> key to choose non-consecutive files, the <SHIFT> key to choose consecutive files, or simply drawing a box around them using the mouse.
When you click the Apply key, the Integration window will then be populated with all those MSU (MicroSoft Update) files you have chosen.
When you get back to the Integration window shown above and all your MSU files are listed click the Apply Button to continue to the next step.
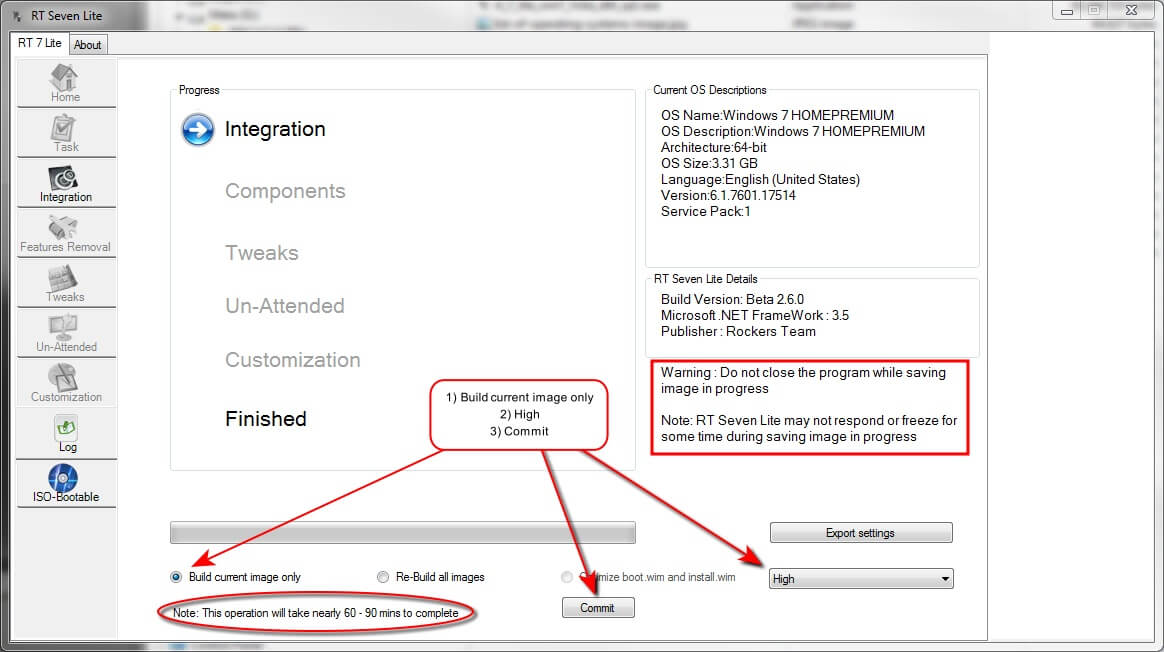
- Click the Radio Button labeled Build current image only
- Make sure the Priority is set to High
- When you are ready to begin, click the Commit Button
Take note of a couple of things here. There is a warning about possible lags and/or freezes. More importantly is that you do not close RT Seven Lite while it is processing your slipstreamed installation.
The other point to notice is the amount of time predicted. In my case you can see that it is between 60 and 90 minutes. Your times will differ dependent upon your computer’s capabilities and the number of update files you have chosen to integrate. After you note its progress, you may want to take another healthy walk.
For the purposes of this article I only chose 2 updates to integrate and it took about 5 minutes to complete– no where near the threatening 60 to 90 minutes that had been predicted.
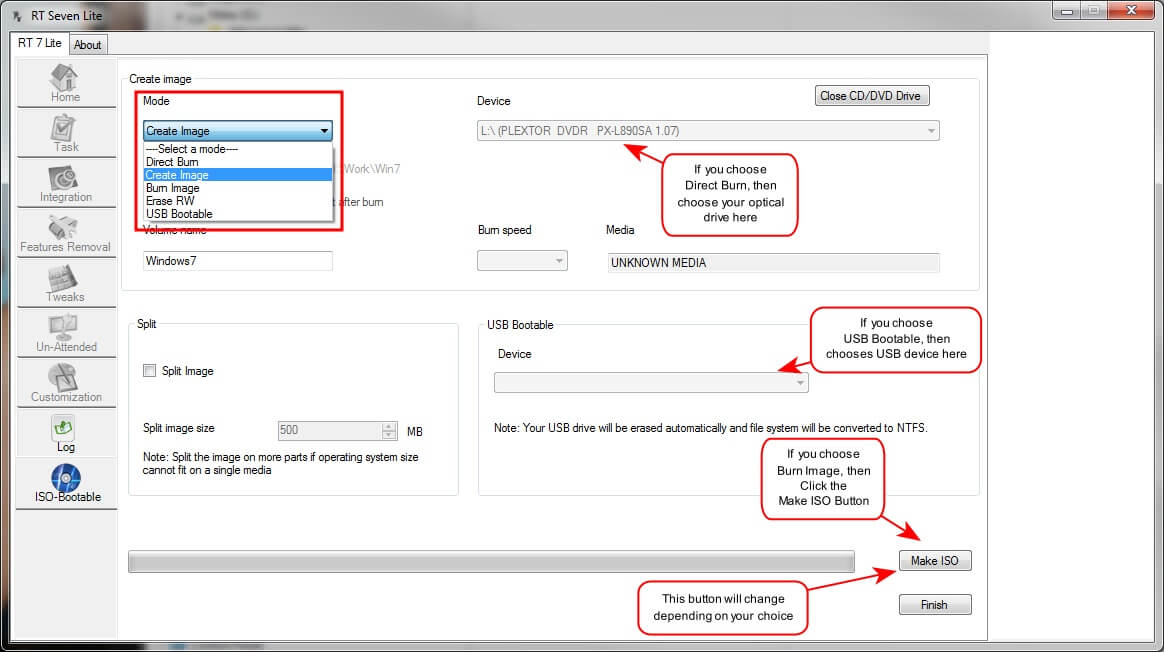
When RT Seven Lite is finished, click on the ISO-Bootable Button in the left panel.
Creating your new Slipstream Windows 7
You have 3 choices here:
- Direct Burn to a DVD
- Create an ISO image to burn later
- Create a Bootable USB Flash Drive (you must have ~5GB free space available on your USB stick and it will be formatted so back up anything that you deem important!)
The above image should pretty much explain the rest and it’s fast and easy.
- Choose the type of operation (Mode) you want. That is, where do you want to create your slipstream (DVD, USB, or ISO file).
If you choose DVD, you will be prompted for a blank DVD; if you chooses USB, you will be prompted for a USB (which will be formatted!!!); if you choose ISO, you will be prompted for a destination folder and file name.
Once you have made your choices just click on the ‘Make …’ button in the lower right corner. This button’s label will change depending on your choices but the result is the same– it will begin the process.
I chose the simple, and quick method of creating an ISO image and it took a whopping 3 minutes to finish. I didn’t even have time to go grab a cup of joe.
Final Thoughts
Congratulations for having made it this far!
As you have seen, creating a Windows 7 SP1 Slipstream is not necessarily for the faint of heart. It can take quite a lot of time and some tedious work to complete. My original estimate of 2-3 hours may be on the short side of reality. It really depends on several variables: The speed of your computer and the number of Updates you want to integrate and how much customization you plan to employ.
Believe it or not, this was the simple example. With all the customization options that RT Seven Lite offers it could add up to many hours of thought and planning.
The bright side is that once you have finished this task, you will have a much faster and personalized installation of Windows 7 in the future. Death, taxes, and the re-installation of Windows– there is no escaping it.
Some of the things you can do is remove programs and features that you never use in the first place. Take the games bundled with the operating system, for instance. If you never play them and always find yourself removing them, here’s a way to not install them in the first place! This is just one idea to get you thinking about all the possibilities of this very flexible tool.
RT Seven Lite is not difficult to use. The worst thing that could happen is that you get sucked into spending a whole bunch of time playing around with it. Don’t hesitate to check out all the customization options, but, be careful! It can be addicting. A good thing that might happen is that you end up taking a lot of healthy walks.
Have fun!
—


Is there matters i witch order you splitstream updates after SP1? I tested it: first downloaded all post SP1 updates and selected all these .msu files and splitstreamed… results is that installation crash at the end… Maybe I should to split stream IE9 in .msu-format? and splitstream after that all the others?
Hello Sami,
The Microsoft Updates site provides an ISO of all the Windows 7 updates that can be burned to a disc. I would add these to a folder on your hard drive and let RTSe7enLite know where they are so it can process these files as well.
You can get the current updates as well as the ISO here: http://www.microsoft.com/en-us/download/default.aspx
I hope this helps,
Richard
Here is a utility that you can download all the updates, but you have to dig thru the forums to find the WUD files.
http://www.msfn.org/board/topic/80713-windows-updates-downloader-250-build-1000/
Here is it the one from January 8th, 2013
http://www.msfn.org/board/topic/139877-post-sp1-updates-for-windows-7-updated-08012013/
hmmmm, I dont have a “check box to slipstream SP1”??
Win 7 ultimate 64 bit
Any suggestions??
Kind Regards
Tomas
You can download an untouched legitimate copy of Win 7 Ultimate 64 bit with SP1 from here. http://msft.digitalrivercontent.net/win/X17-24209.iso
Take note it is over two and a half gig so it may take some time. Once you have the iso, burn the image to disc.
Hi Richard,
Is there a faster way by now, to download all the win7 updates after SP1?
Greets Maurice
Hi Maurice,
Digital River has all the Windows SP1 ISO/s for download here: http://www.mydigitallife.info/official-windows-7-sp1-iso-from-digital-river/
Microsoft also offers all their updates for direct download and offline installation. Once you have them all, they could be burned to a DVD and slip-streamed. This would make a new Windows installation much faster.
Here’s a place to start: http://social.technet.microsoft.com/Forums/en-US/w7itprosecurity/thread/dd518dd8-4fb0-461d-be8f-85d7b365f647
The on-going problem is that the updates keep coming every month and sometimes more often. I don’t think it would be feasible to create a new slip-stream every month; the cost in time would outweigh the gains. If you have lots of machines to maintain, then it might be worthwhile.
Hope this helps,
Richard
The easiest way to get the updates is to use WUD http://www.windowsupdatesdownloader.com/
+1 for http://www.windowsupdatesdownloader.com/
Hi Richard,
have followed your instructions fully, but when I direct RTWin7Lite to the folder where I copied my windows disk to, it asks what flavour of Win7 I want, but when i select it says “please select a valid Windows 7 operating system”. HELP please!
Steve
Hi again,
If I use the iso file I have (which has been used to install windows 7 quite a lot of times), after RTWin7Lite as extracted it I get another error message and te folder where it extracted to contains a readme file which says: “This disc contains a “UDF” file system and requires an operating system that supports the ISO-13346 “UDF” file system specification.”
Any ideas?
Steve
Hi Steve,
1) I have never seen the “…valid operating system…”problem you are having. I can’t replicate it and therefore can’t solve the problem
2) I’ve never seen this problem, either. Sorry…
Here’s what I usually do:
1. I create two directories. One with the source files and the other with the SP1 files
2. I create another directory to use as the destination.
3. I also set up a Temporary directory for RTWin7Lite to use.
4. I delete all this stuff after I’m done.
—
Extract the ISO into the source directory and do the same for SP1 files.
This method has worked for me with no hitches or giddy-ups at any time.
I know this doesn’t help you at all. Quite frankly, I’m stymied. Without being able to see what’s happening it’s hard to be of much help.
Maybe one of the wise DCT readers will know right away what’s going on here? Come one folks, let’s try to give Steve a helping hand.
Richard
Windows Updates Downloader has all of the post SP updates bundled together.
http://www.windowsupdatesdownloader.com/
Hi Tim,
Thank you for the tip!
Richard
Well, it did create an ISO of 7GB. Even when I used the split command to divide it into 3 disks, one of the disks was still 4.9 GB.
Hi Adam,
I’m sorry to say that I no longer have this software installed and therefore cannot duplicate this error for you.
It’s been nine months since I wrote this article and I don’t remember what options are presented when you click the Split Button.
In any case, a 7GB ISO should fit comfortably on two DVD discs, not three. Something is wrong here. A standard DVD should hold approximately 4.6GB of data, accounting for overhead.
Perhaps you could refresh my memory and tell me what options are available via the Split Button?
Thanks in advance,
Richard
Richard:
Do you know anything about Alan Wade’s comment regarding the free Win 7 ‘iso” file?
ie, is it legit?!?
Hey Dan – Not sure about Alan’s download link as he has posted a direct download. However, here are a couple of links to webpages which offer legitimate Win7 ISO downloads:
http://techdows.com/2011/07/download-windows-7-integrated-with-sp1-iso-official-direct-download-links.html
http://www.w7forums.com/official-windows-7-sp1-iso-image-downloads-t12325.html
Hi Jim,
The links you provided require a legit Win7 license key (which Alan Wade’s link didn’t make clear) so thanks anyhow for the suggestion.
One last issue: Whenever I pose a question I never receive an email that you (or someone else) has posted a comment to me.
Did I miss a check-box somewhere for that to be done? Otherwise, unlike other forums, I will have to write
myself a note to re-check for a posting to my question (grrrr!).
As always, thanks for your timely replies – even if I have to remember to track ’em down :-(,
Dan
Dan, there is no way to legally download a Win7 ISO which also includes a license key. The downloads are for those users who already have a genuine license key and wish to re-install Windows but didn’t receive an installation disc as part of their purchase.
Not sure about that one Dan, that’s Dave’s domain. I’ve mentioned it to Dave and he should respond soon.
Cheers… Jim
@Dan,
There are several methods that allow WordPress to email notification about comments. Unfortunately, none of them are ideal.
The most popular is a service named Discus. However, with services like Discus the actual comments are hosted on their service. That presents several issues that I’m not particularly comfortable with.
1. We have no control over how email addresses are stored and/or used.
2. If, or when, the service decides to close down we are stuck in a position to find a replacement (sometimes in a hurry) and again we have no control over where that data will end up. I’ve personally experienced this situation before we moved to a blog format and it wasn’t easy.
3. We are sending a very large number of email when we send the newsletter and uses most of our available server resources – it can take between 10 and 12 hours to send the newsletter each week. I’m not sure if I want to risk hampering the newsletter distribution to send comment notifications to those who may comment while the newsletter is still in the sending process.
That said, I have looked into a solution for comment notification several times. When I find a solution that I feel works well and won’t affect newsletter distribution I’ll implement it.
Good tutorial. Here is a free tool that will take care of downloading all the updates for you. http://www.windowsupdatesdownloader.com/UpdateLists.aspx
This takes care of the most tedious part of it all. Enjoy 🙂
Hi John,
Thank you for the kind comment and the helpful tip,
Richard
To create a custom ISO with Windows 7 either stripped of Microsoft waste of items or with added, use RT Seven, Windows Download Updater. Thus far, those are the only two programs I have seen that do indeed work the best. Even though you have the 177 updates for Windows 7, there will also be another 100+ post installation. There is no other way around it as it is mention Microsoft comes out with more updates then anyone is able to keep up with.
So look at it from this stand point, at least the majority of updates are already installed prior to post updates. Instead of a 3 to 4 hour operation reinstalling windows, the updates and your programs. Now you have a 35 minutes setup/install and then another 30 minutes of updates post install. In the long run, this way is faster.
Hi Byron,
I just installed Win7 on a customer’s computer. She had picked up a virus and she had no backups.
After the installation, there were over 236 recommended updates and a slew of optional ones. Boy! what a pain that was.
You’re absolutely right about the advantages of having a disc prepared for this purpose.
Thanks for the comments and tips,
Richard
Here is a way to get 99% of updates. Google for this file WUD250B1002Setup.exe. Hope this helps to all
Great article, thank you, but I ran into a bit of a snafu. When I browse and add the Windows 7 source, I get an error that group policy prevents it (I am an administrator). Trying it on another computer but here’s another idea:
Has anyone found ISO FILES of a FULLY UPDATED WINDOWS 7 disc made by this? If there’s a source for Win 7 32/64 Home premium, pro, etc, it’d be a lot easier if everyone could just grab the iso and burn 🙂
Boo – rt7lite is no longer available!
Hi OhioJoe,
I did a quick search and found this page with some alternatives. I have not tried any of them so can not vouch for their worthiness nor functionality: http://alternativeto.net/software/se7en-lite/
I’m sorry to see the site is down,
Richard
the rt7lite website does appear to be dead, however I found the program is still available here http://www.softpedia.com/progDownload/RT-Seven-Lite-Download-174061.html
Of course, it may eventually be outdated and non-functional, if not already.
Hi Shayne,
There are other utilities that can help you with slip-streaming, too. An Internet search will find them.
Thanks for the link,
Richard
Hi Steve,
I had this problem also, and it turned out I had some junk files in my OS path directory. The only files visible should be the ones as pictured in this image. http://www.poweriso.com/tutorials/images/win7-install.gif. Hope this helps 🙂
I’ve just come across this thread and it was extremely useful. Thanks for that.
For those who find these instructions now, What I have done is downloaded Windows Update Downloader from http://www.windowsupdatesdownloader.com/ProgramFiles.aspx
after install download and run the relevant update list from http://www.windowsupdatesdownloader.com/UpdateLists.aspx
Then run, choose your update list, where you wish them saved, and press download.
149 downloads for me quicker than windows can download them in Windows Update.
Cut my slipstreaming down to about 40 minutes.
Richard, here’s how to download all updates all at once:
http://tech.firstpost.com/news-analysis/how-to-download-and-store-windows-7-updates-46062.html
Hello!
Thanks for the tip,
Richard
Hi,
I have a question. I just did all the process to update my WIM file. Before i did the update, my deployment with MDT took 30-40 minutes max. But now that i have an update version of Windows 7 Enterprise it take 1h40 minutes. Is it normal ?
Thanks in advance,
Jon
Hi Jon,
When you update Windows, it creates a backup copy of the old version of Windows in a directory called “windows.old’. this can easily double the size of any future backups you make.
My guess is that folder is still there. You can delete it if you like, but be forewarned that by doing so you will have no way to revert to the old system if you decide you don’t like Enterprise for some reason.
You can always resort to a complete installation of the old system if you have your original installation discs and Product Key. You will also have to re-install your programs and update all your personalized settings if you choose this route.
There are many additional log files , et al that are created during an update as well. This all adds to the mass of future backups.
If you are sure that you have no intention of rolling back to a previous version, you can run the Disk CleanUp tool to eliminate all that cruft. Be sure to use Windows Update and get that system secured as much as possible. The CleanUp Tool now has the ability to get rid of archaic Windows Updates, as well.
Richard
Yes it worked perfectly.
Thanks
Its Giving Error Message
RT Seven Lite can’t able to mount this WIM image
Cause: RT Seven Lite temporary directory in open
Have tried run as Administrator still the same
Hi Sadiq,
This question may best be asked in the DCT forums. It has been nearly two years since this article was written and I simply don’t have immediate answers for you.
Thanks for the comment and I wish you good luck,
Richard
can i add other than SP1, ms office 2010, and other third party utilities and create my own custom made personal installation windows 7. this will save me lot of time and effort.
Hi mm.rali,
As far as I know, you can mix and match to your heart’s desire.
I’ve never done this myself, so you’ll have to resort to reading the “manual”.
Richard