Main Display
Yesterday at work I noticed I had a Windows 10 update to do. So, I figured I had some time and could get it done. The computer rebooted and all of a sudden my main display was no longer the boss. I have a two-monitor setup at work and home and I like the one to the left to be the Main Display. The one to the right is just an extension of the main monitor. Now, since the update, it has flipped the two monitors.
I don’t know if you have had this problem, but you might want to know how to fix this in case it happens to you. This is also helpful, especially if you are just now setting up multiple monitors on your computer. Time to get started and show you how you can set one of your monitors as a Main Display. I tested this on both Windows 10 Pro 64-bit and Windows 10 Home 64-bit.
Set the Main Display
Step 1: Click on the Notification Icon in the System Tray. This will bring up the Action Center. Now click on All Settings.
Another way: There is another way to get to the Step 2 screen which I know some of you will point out. Click on the Start Icon. The Start Menu will appear and you will want to click the Gear Icon which will bring you to the Settings Window. Now we are at the same location.
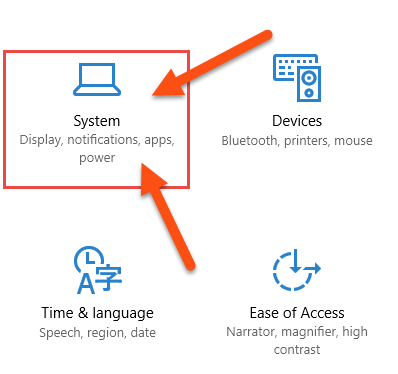
Step 2: Here you will want to select System (“Display, notification, apps, power”).
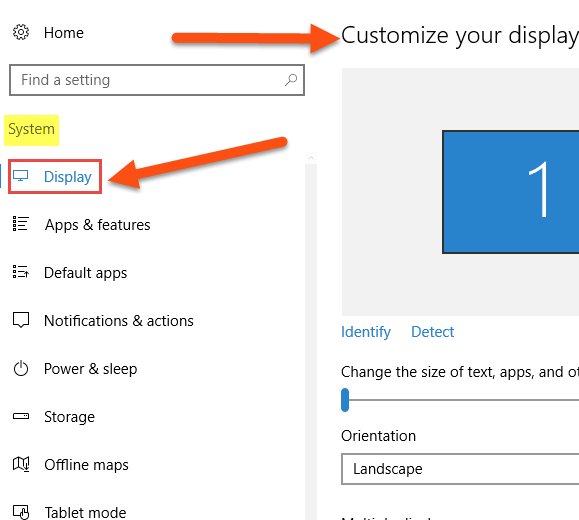
Step 3: This will bring you to the System Settings window. If you are not on the Customize your display screen, then just click on the link named Display on the left, right under the word “System.”
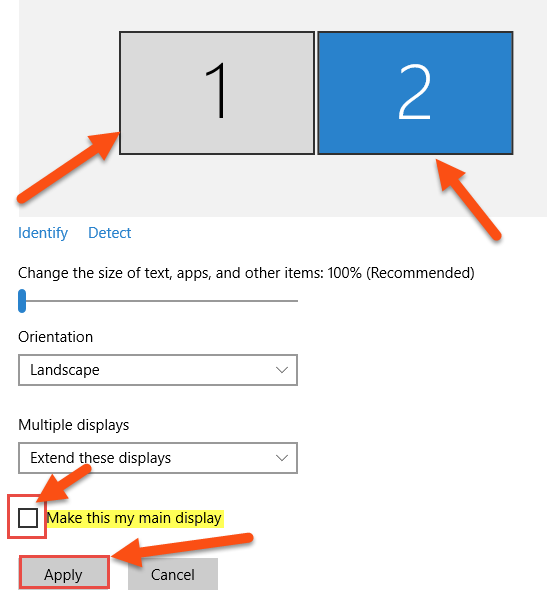
Step 4: Next, you will notice a number 1 and 2 (up to the number of connected monitors) in boxes at the top. This represents the monitors connected to your computer. The one that is highlighted in blue is the selected one at the moment. Below these you will see the settings for that monitor. Look under the wording Multiple displays and you will see a check box labeled Make this my main display next to it. If this is the monitor that you would like to be the Main Display, make sure the box is checked, then click Apply.
Side Note: If you want to switch to another monitor, just click on the Monitor you want as your Main Display.
Quick Tip: You can get to the Display Settings quicker by right-clicking on your Desktop and selecting Display Settings. (I know some of you were going to point that out so I wanted to sneak it in at the end.)
Once you do all this your icons will appear on the Main Monitor. At least, all mine moved right over after I hit the Apply button. This fixed my issue and I hope it helps you, too.
How do you have your monitors set up?
—


The box to check for “make this my main display” is greyed out and not able to be selected.
Hi Nic,
Did you click on the other monitor screen in the image at the top of the display setting screen? If you are not clicked on the monitor you wish to make the main then it will be grayed out. If it is grayed out and has a check then that is your primary monitor.
It also could be that you are not logged in as the admin on that computer so make sure you’re under the Admin account when trying to do this.
The other reason this could be happening is to do with the graphics card. Some graphic cards do not support this feature (Primary monitor). You can contact you graphics card manufacturer to find out what you can do.
Hope this helps you out.