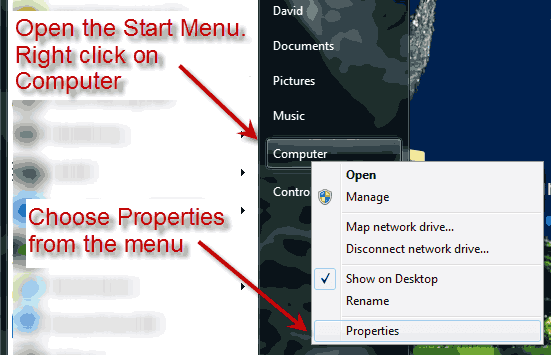
Click the Start Orb to open the Start Menu. Once the Start Menu is open right click on Computer in the right hand pane. This will open a menu. Click on Properties to open the System applet.
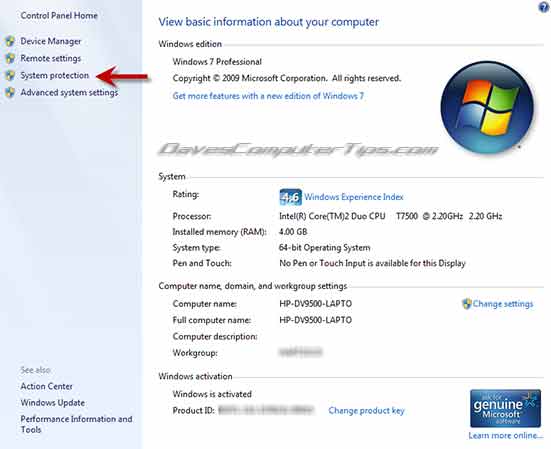
The System applet will open. Take a look around as there is useful information, but what we are concerned about is clicking on System Protection to configure System Restore.
Once you click on System Protection the System Properties window will open to the System Protection tab, as seen below. System Protection is another name for Volume Snapshot Service, or VSS. If you remember back to Vista when we had to use the VSSADMIN command from a command prompt this may make more sense.
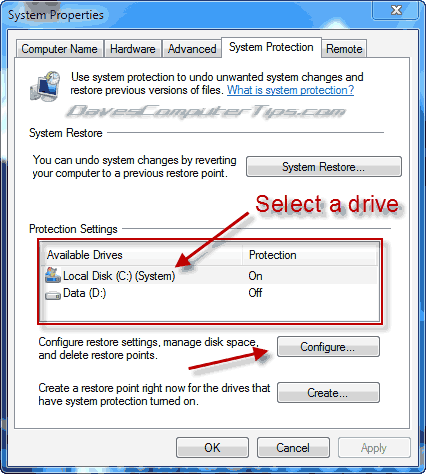
From here you can restore a previous restore point, create a manual restore point, or change the System Restore settings.
In the highlighted box you will see all of the hard drives installed in your computer. I have 2. You will probably have 1 labeled (C:)(System), but some may have more depending on the number of drives installed in their computer. Highlight the (C:)(System) entry, or the entry with the (System) label, with your mouse and click the Configure… button which will open the window below.
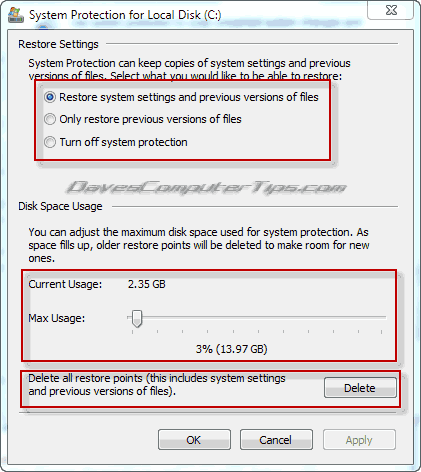
The window can be broken down into three main sections with the upper section of the window allowing you to choose what you would like to be included in The Volume Snapshot Service storage, or VSS. VSS is the “parent” of System Restore and contains both system restore points and shadow copies of files (also known as Previous Versions). The options are:
- Restore system settings and previous versions of files – This is the default setting and enables the storage of both System Restore Points and Previous Versions for files. This setting is recommended for use on the primary (system) drive of all but the most advanced user. Users who store personal files on secondary drives, or who have a bulletproof backup method may choose the second option.
- Only restore previous versions of files – This option disables System Restore while retaining Previous Versions of files and is not recommended for most users. Users who store personal files on secondary drives may be interested in this for secondary drives.
- Turn off system protection – This option disables both System Restore and Previous Versions and is not recommended for less than the most advanced user. A good example for this option is on a drive that is used for temporary storage of files that can be replaced. Another example would be users of SSD drives who are very limited due to drive size.
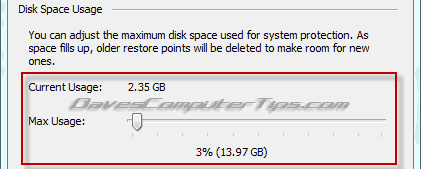
The second section of the window is where the “magic” happens. It consists of a slider, which allows you to adjust the amount of drive storage space dedicated to VSS, and a display of both the percentage and actual amount given to VSS. You should find the slider at, or near, 5 percent which is a decent amount on today’s hard drives. Moving the slider to the left decreases the amount of storage available to System Restore and Previous Versions and moving the slider right increases the amount of storage available. Once you’ve made a change click OK to close the window if you are finished with changes, or Apply if you intend to make additional changes. There are a few points to keep in mind:
- Increasing the amount of storage for VSS will decrease the free space available on the drive. This may be of concern to SSD users with limited storage.
- Reducing the amount of storage available to VSS will reduce the number of system restore points saved, which many limit your options if you need to use System Restore to recover you computer.
- System Restore will not function if VSS is set to 300MB or less. The default of 5% is a good setting for most users.
- System Restore takes priority over Previous Versions. Reducing VSS size may limit your future access to Previous Versions of files.
- System restore operates as a First In First Out (FIFO) system meaning older restore points are deleted to make room for newer restore points.

The third section of the window allows you to delete all system restore points and Previous Versions in the VSS. It’s not likely you will have to use this, but nice to know where it is when you need it. A good example of a need to delete restore points and previous versions is an infected system(Virus, malware, rootkit, etc). If the infection is cleaned from the system it may still live in restore points. Should the user restore a previous restore point they would also be re-infecting themselves – not a good thing.
Hopefully this information will allow you to make informed decisions about the storage usage of your computer!