If you are like me, you have bookmarked your favorite websites in your Google Chrome browser. You may have been doing this for many years. Over time it might have become very disorganized and in my case it is now chaos. Since I like to show my readers how to keep organized, today will be no different. In this article, I want to show you how you can take back control of your Bookmarks. Before we get into this, make sure you check out some of these other articles on Dave’s Computer Tips about Google:
- How To Set Up Auto-Delete On Google
- How To Insert A Table In Google Docs
- How To Change Google Docs Cell Color
- How To Create And Use Browser Profiles
Now that you have that new knowledge, it is time to start your new lesson.
How To Manage Google Bookmarks
This will be shown using my Windows 10 Laptop. In this how-to, I plan to cover a few of the options that will help you manage those Google Bookmarks.
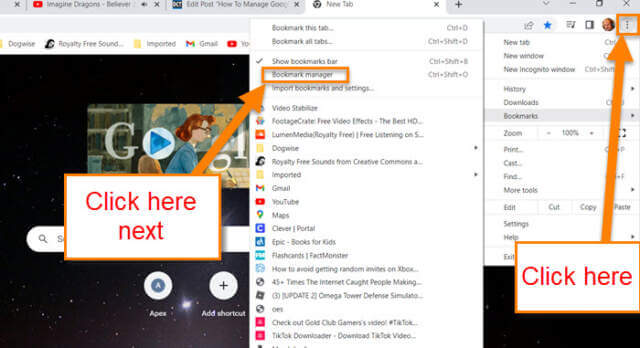
Step 1: Head over to your Google Chrome Browser. Once there, look to the top right for the 3 dots. Click them and a menu will appear. From that menu, click on Bookmarks and then Bookmark Manager.
Step 2: You will now be on the Bookmarks Manager screen. From here, click on the 3 dots at the very top right.
Step 3: After clicking that, you will get a menu that gives you some choices:
- Sort by Name
- Add new bookmark
- Add new folder
- Import bookmarks
- Export bookmarks
- help center
Since we are trying to manage this area, I will be showing Add new folder for this article. Click it.
Step 4: The add folder window will appear. Here you can name the folder and after that click the Save button. I find if you want to organize your bookmarks, it is important to know how to create folders.
Step 4.1: Another one from this menu I want to go over is adding a new bookmark. Click on Add new bookmark and this window will appear. Here you can name it and paste the URL in the provided box. After that, click on the Save button at the bottom right.
Step 5: Now go back to the main Bookmarks screen and look to the left menu of bookmarks. Right-click on one of the folders to get a menu:
- Rename
- Delete
- Cut
- Copy
- A few others
It is nice to know you can Rename a folder in case the need arises. If you do not want the folder at all, click the Delete option. I find those two to be the most important on this menu.
Step 6: Time to move over to the middle where your list of Bookmarks resides. Depending on the folder you have chosen from the left menu, a list will show of the bookmarks in the middle. Next to each bookmark, there is the 3 dots (Menu link) to the right. Click on one to get a menu to appear:
- Edit (a way to change the link and name of the bookmark)
- Delete (remove it from your bookmarks)
The two most important options when trying to organize your Bookmarks.
Step 7: Another cool thing you can do is reorganize what order the Bookmarks are in. All you need to do is hold the left mouse button down on the bookmark you want to move. Then all you need to do is drag it to where you want it on the list. This also works to move bookmarks to other folders by dragging them to the folder in the left menu. Done…
You might need to play with this area a little bit to get the hang of it. This will at least get you going in the right direction in organizing and cleaning up your bookmarks.
—


I really needed this. Now I can be a bit more organized without having 60 or 70 tabs open just because I think I might want to come back to them.