What is PC Refresh and PC Restore?
 We often nag about backups based on the number of incidents we’ve encountered over the years where users have lost valuable business and personal files. As a result the unofficial Daves Computer Tips Motto has become “You can never have enough backups!” As a result of past experiences (and our cool motto) I was very excited about two new recovery features built into Windows 8 named PC Refresh and PC Reset. Their functions are well described by their names, but here is a brief explanation:
- PC Reset – Also knows as Push Button Reset, returns the system to a factory fresh state. Think of this as dropping a nuclear bomb on the OS and everything returns to square one. No installed apps, personal files, or programs. This is similar to a little known option that several PC manufacturers include on new PCs where they include a (often hidden) partition and boot menu option to return the system to a factory fresh state, but is contained within the OS. Before PC Reset users would have to hunt down their OS media and license key information before manually initiating the process. Caution: This is a clean slate approach and you will in essence have a fresh Windows install with no programs, apps, or settings!
- PC Refresh – Performs the same function as PC Reset except it leaves your personal files, settings, and Metro apps in place. Everything except Desktop Programs should be retained on a default Windows 8 installation. However, if you follow the instructions below desktop programs, Metro apps, personal files, and Windows settings will all be included!
Windows 8.1 PC Refresh and PC Reset Broken after Upgrade
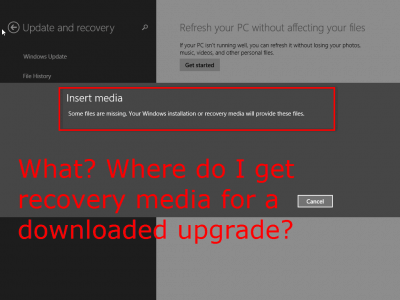
While PC Reset isn’t a backup option, per se, PC Refresh did grab my attention as a solution suitable for those who are less technically savvy. More importantly, as time passes more and more programs will be developed for WinRT and the Metro interface making the PC Refresh option an exponentially more valuable feature. However, it appears my hopes have been dashed – at least many users are reporting so. If you are running Windows 8.1 and you upgraded from Windows 8 using the Windows Store you may be in for a very unpleasant surprise if you need to use either PC Reset or PC Refresh. Many users are reporting that when they attempt to perform a PC Reset or PC Refresh that the process stalls almost immediately and asks the user to insert the Installation media. Unfortunately for those affected they have no Windows 8.1 media as it was downloaded through the Windows Store and their original Windows 8 media or recovery partitions are not accepted as valid. I haven’t been able to find a definitive reason why this occurs, but an educated guess is that Windows does not recreate the images used for these two features during the upgrade process.
Windows 8.1 PC Refresh Workaround
While I haven’t yet discovered a workaround for PC Reset I do have a workaround for PC Refresh and it is something that everyone running Windows 8 or Windows 8.1 should find useful! What would that workaround be? Simple. Create a custom PC Refresh image. Think of a custom refresh image as an updated version of the default image which contains all the information regarding programs, apps, personal files, settings, and Windows itself at the time the image is created, which should be useful to Windows 8 users as well.
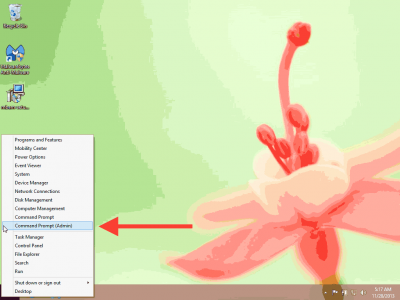
1. Move your mouse to the lower left corner of the screen and right click to open the Power Menu.
2. Move your mouse up to Command Prompt (Admin) and left click it to open a command prompt with Administrator privileges.
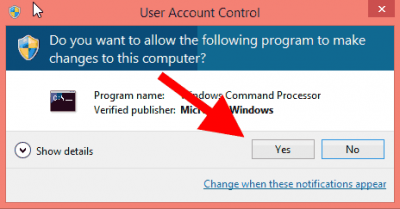
3. Click Yes on the User Account Control warning dialog box to approve the use of the Command Prompt with Administrator privileges.
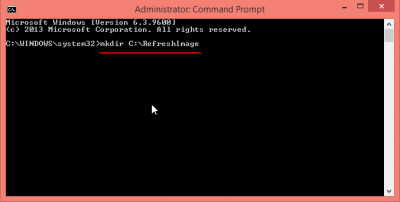
4. When the Command Prompt window opens you will see a flashing cursor after C:\\WINDOWS\\system32>. At the flashing cursor you want to type mkdir C:\\RefreshImage (M K D I R {space} C {colon} {backslash} R E F R E S H I M A G E) followed by pressing the Enter key. This will make a new directory named RefreshImage at the root of your C: drive. (Note: The above location C:\\RefreshImage is an example – you can create the folder and image on any storage device by changing the location of the command, but remember the device must be available for the PC Refresh to be successful.)
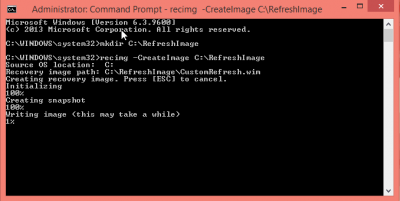
5. Type recimg -CreateImage C:\\RefreshImage (R E C I M G {space} {dash} C R E A T E I M A G E {space} C {colon} {backslash} R E F R E S H I M A G E) at the flashing cursor followed by the Enter key. This will begin the process of creating a new Refresh Image in the new directory we created above.
6. Windows will create a snapshot, which won’t take very long at all, before writing the file to the C:\\RefreshImage directory. The actual writing of the file to the hard drive will take a while, so be patient.
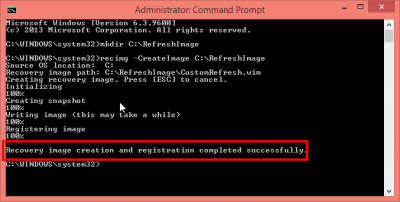
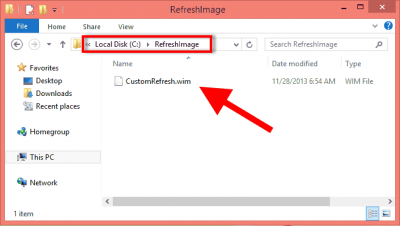
7. After the image is written to the hard drive you will receive confirmation and the new image will become the default image for the PC Refresh function. If you open a File Explorer window you’ll find your new image in the RefreshImage folder on your C:\\ drive.
Final Thoughts
You now have a valid Refresh image which will work if you need to actually use it. Of course you also need to know how to perform a PC Refresh, don’t you? Don’t worry, here is a link to a comprehensive guide with screenshots which shows you how to do just that: How to Perform a Windows 8.1 Refresh.

Will the same commands as above work for w7 64 bit?
@Bill D
Refresh and Restore are features introduced with Windows 8 so they are not available in Windows 7.
Dave, you have hit upon an ‘eternal truth” about Refresh. And you missed an important point about it too.
Refresh “ignores” (ie wipes them out) “desktop” applications because they are not included in the factory “image” file it uses to “refresh”. This is no surprise when you think about it.
Secret hint: in Win 8 as well as 8.1, if you generate a new “image” as you describe, it will INCLUDE all currently installed DESKTOP applications, like MS Office. Neat huh!?!
In other words, every time you install a new “desktop” application, after you finish updating it and doing any customization you want, you should use RecImg.EXE to create a new “Refresh” image file that includes it.
Too bad MS still “forgets” to tell people about this important part of the Refresh tool. Just because they want to force people to use Metro craplets.
@Ron,
Thanks for pointing that out! My primary backups are through Server 2012 Essentials and images created with Acronis True image so I had taken MS at their word about the contents of the image, but it makes perfect sense and I have verified that the image does contain the whole kit and caboodle! I’ve updated the article to include the new information.
Rather than create the restore directory on your C; drive, it might be better to put it on external media, like a USB hard drive or a network drive or a second drive installed in the computer. Or at least create a separate partition on the drive, if your drive is one of the now standard huge ones.
Additionally, using this method over the one built in Windows (which only restores the metro apps), this one will also restore all of your installed desktop apps too.
@ Paul D
You are correct. I was trying to keep the instructions as simple as possible, but that information is important so I’ve added a note explaining that the image can be created virtually anywhere. Thanks for the input!
I followed your directions, but after “creating snapshot,” action stops and I get a pop-up window stating “The procedure entry point ??0BufferedStream@UnBCL@@QEAA@PEAVStream@1@K@Z could not be located in the dynamic link library C:\WINDOWS\system32\migwiz\migcore.dll. After I press “OK” I get a second pop-up: “Recovery Image Management Utility has stopped working A problem caused the program to stop working correctly. Windows will close the program and notify you if a solution is available.” I got no notification. I tried two more times with the same result. Did I mess something up on my computer?
I am also getting that error. Has anyone come up with a solution?
Paul,
This wouldn’t be a Toshiba computer would it? It appears quite a few Toshiba users are experiencing this problem with the exact errors you are seeing.
I would suggest trying in safe mode. You can boot into safe mode by doing the following:
Open Run box and type msconfig
Press Ok
Boot tab > Safe Boot > Network
Click Apply
Reboot.
If that doesn’t work I would try to (temporarily) disable any non Microsoft services by doing the following:
Open Run box and type msconfig
Press Ok
Services tab > Check hide all Microsoft Services
Uncheck the boxes next to the remaining services
Click Apply, Ok
Reboot
Click Apply, Ok
Done. Too easy!! Thanks Dave, brilliant!!
Dave, the terminology PC Refresh is new to me and so I’m not certain of it’s precise meaning.
Is it the same as creating a backup system image, a partition image or a complete hard drive image?
Bern,
Yeah, Microsoft can come up with some interesting feature names. 🙂 I would say it is closest to an “system image” in that it is a backup of the system partition. I have not tested it with programs on a separate partition so I do not know what the result would be in that circumstance. Of course I wouldn’t recommend it as anyone’s only backup.
Well, I have followed your advice and successfully created a Custom Refresh Image. Not knowing how large the image would be, I created it on my C: drive as that has the most free space. But as the resulting image was only 9.6gb, I wish I had created it on my second hard drive or on a USB drive now 🙁 So can I move it or will Windows not then be able to find it, when next want to run Refresh?
Sheri,
I wouldn’t recommend using a USB drive, but the second internal drive would be a great place to store the image. Simply move the file then open a command prompt with admin privileges.
recimg /setcurrent Location of file
So, if the image was moved to the root of the D: drive the command should be:
recimg /setcurrent D:CustomRefresh.wim
Unfortunately it doesn’t work for me. I get an error message in the cmd box:
“The recovery image cannot be written.
Error Code – 0x80070002”
Any ideas?
Thanks.
I get a similar error message with the Error Code – 0x8004230f.
Hi Followed instructions and created the WIM image on an external hard drive USB connected. Image was OK and registered but when I go to REFRESH it cannot find the MEDIA hence stops.
Any ideas please. This was on win8.1 pro loaded form MS App Store
Is there a registry entry that point windows to the WIM image that I can look at ??
Regards
Peter, USB devices may be a little sketchy due to enumeration. However, running (from admin command prompt) recimg /showcurrent will show you the location where Windows believes the current image is stored.
Hi David and thanks.
I was aware of the USB issues so did another WIM on spare partition on the hard drive—still no luck. On doing the showcurrent command I get “there is no active custom recovery image” error 0x80070490.
Hi David—Problem solved.
I had read somewhere that if there was more than one hard drive in the system that this screwed up the refresh process. My system was dual boot win 7/win 8.1 on TWO HDD,s. I cloned the disc to another one and put it into an identical spare PC and it booted just fine. I Then removed the win7 boot option with bcdedit and rebooted again with only win 8.1 showing. So now I had an identical system to my normal one but with only 1 hard drive.
I then created a refresh image WIM as before but this time using recimg /showcurrent it returned the correct path.
When I attempted a refresh from 8.1 it worked 100%.
You never stop learning do you !!!
Thanks again—maybe this will help a few others who have two disc systems dual booting.
Hi I spoke too soon!!!. It gets to 98% on the refresh then stops with a message that setup has experienced a problem and that it needs to restart the installation. If you do that then the message appears again ad infinitum. I have tried this refresh 4 times all with the same result so have given up !!.
Will stick to my full image restore (Mecrium) should I ever get trouble. I tried refresh out of pure curiosity so glad it was not needed in an emergency.
Regards
Thanks Dave, I just stepped into the 21st century 2 years ago,so your tips are just outstanding. My wife and I are 60 and we’ve already screwed up one lap top with windows 7, now we have a new desk top that had windows 8 we up graded to 8.1 my wife almost had a stroke when we hooked it up, she couldn’t find nothing, anyhow one of my friends said I should have put it on you tube to tell people what they think of windows 8, thanks again
Interesting thing to know, only thing I’m missing in the article is the size of the new image. How large will it be? Was hoping to see it in the screen shot, but it’s not on it either 🙁
My internal drive isn’t too large and I’d be interested in the size of the image 🙂
Great blog and very useful tips. 🙂
Windows 8.1 Pro – having suffered the complete disregard that the standard “Refresh” has for installed desktop applications, this technique sounds just what I need. Unfortunately, like some other folk, I get to the “Writing image” part and it just sticks at 1%, eventually timing out with a 0x80070005 error, suggesting that i don’t have the appropraite admin rights to write to my own disk drive. Hmmm ………
Has anyone found a solution to this type of error or got any pointers where to look next? Thanks.
I had the similar problem which I tried on two attached drives, got to 27% and the error message was 0x80070037. I rebooted my machine and ran the recimg.exe again before opening any other programs and it worked like a charm.
Hi David, I have a problem. My 8.1 isn’t installing any update. After around 80% I got a message “Failed to install update”. Do you have any solution. Thanks!
I have followed this process with no luck unfortunately.
The snapshot is created no problem but the “writing image” part stalls at 47% with the following error message:
“The recovery image cannot be written. Error Code – 0x80070006”
Any thoughts on this would be greatly appreciated! Thanks!
I got:
“The recovery image cannot be written.
Error Code- 0x80070070”
Please help.
The term used by Microsoft is “custom recovery image”, not “custom refresh image”. If you read the help info from the recimg command. this is the terminology.
A glaring error in this article is stating that the custom recovery image contains “all the information regarding programs, apps, personal files, settings, and Windows itself at the time (of) the image”. That’s incorrect. Personal files and settings are NOT saved to the image. The purpose of the Refresh procedure is to return the OS to either the original install state, or to a saved state. Personal files and settings are NOT restored from the custom recovery image because they were never saved in the image. Whatever personal files and settings were on the HDD before the Refresh, they will be the same after the Refresh. The whole point of a Refresh is to restore the OS without affecting personal files. By making a custom recovery image, the image will additionally include any OS updates, as well as desktop apps (like MS Office) that were installed after the OS. So it is a very good idea to create custom recovery images periodically, but don’t expect them to include personal files or settings. For that, you need to use File History, or some other backup. For further reading, from an elevated command prompt, enter: recimg /?
You mean, after this we will be able to perform the refresh or resetPC action for windows 8.1…and after the completion of refreshing PC, do we attain windows 8 or windows 8.1…..? Reply me….
This did not work as my computer said it already has a recovery image. I’m sure it is what I don’t want as I want what is right now on my computer, but don’t know where to go from here.
Then when I open up the file location to see what is there the folder for refreshimage, it is empty
also my error code was 0x800700a1
Worked for me and looks like the refresh mode now works. I have not tried a full refresh, but the refresh mode no longer asks for external media. Thanks much for this great fix! How come Microsoft can’t make things right the first time- still no official fix from them. Thanks Dave for posting this!
Your blood’s worth bottling!!
Dave, I created a custom image for my Windows 8.1. Can this file be deleted and a new image made as I add different programs? What is the difference between a custom image and system restore. If I move the image file to my E drive would I delete it from my C drive? Daniel.