
Finding duplicate files and folders using CloneScan.
I can’t remember how I came across this program, but I downloaded it and gave it a spin. As of this writing, it doesn’t come bundled with any other software and gets a pass at VirusTotal.
I downloaded it, installed it, ran it on my CyberPC (Windows 10), and it didn’t work. I tried different folders and combinations. And nothing. So I tried it on my Acer with Windows 7. It worked right out of the box. It also worked on my Asus with Windows 10.
So on my CyberPC, I uninstalled it and tried running it in Administrative mode – still nothing.
After a little experimenting with the program on my other two computers, I found out the solution. But first …
Open the program and click the “Add folder” button to add the folder(s) containing the files you want scanned for possible duplicates. You see the list of selected folders in the “Folders to scan:” box. If you want to remove a folder from the list, click it and then click “Remove selected”.
(Ed note: Click image to enlarge.)
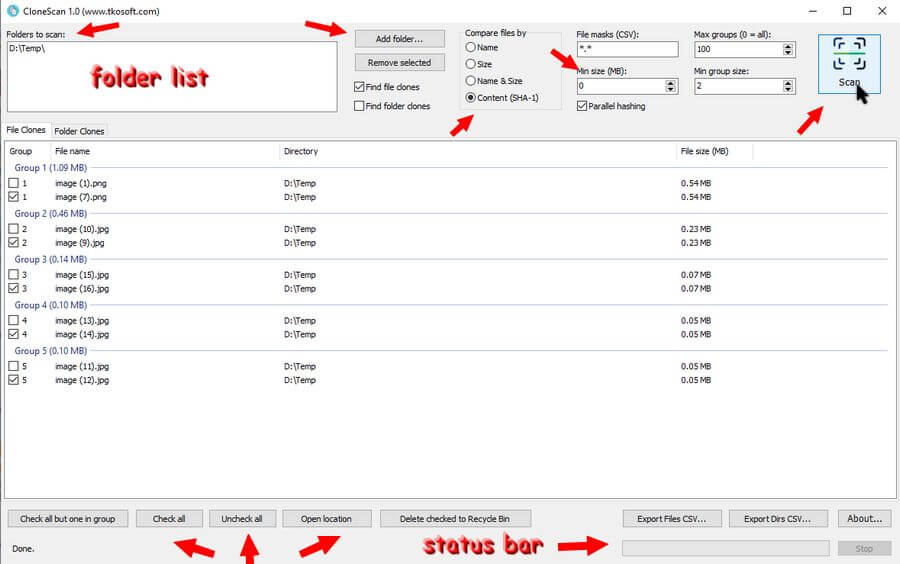
You can scan for files or folders. It’s recommended to keep the “Compare files by” option at “Content (SHA-1)” for the best results. I didn’t change any other settings except the “Min size (MB)”. By default it’s set to “1“. That means it will ignore any files that are smaller than “1 MB”, and that was the problem with my CyberPC. For some reason, even though most of my original test files were over 1 MB, it still would not work on my CyberPC until I switched that value to “0“.
Now, a simple test. I put 22 pictures in a folder, duplicated 4 of them, and ran a scan. When your folders are selected, click the scan button in the right-hand corner.
You should now be seeing a list of duplicates from your selected folder(s). Your options for dealing with the files are at the bottom of the window.
“Check all but one in group“, “Check all“, “Uncheck all“, “Open location“, and “Delete checked to Recycle Bin“. You can also “Export” the list.
You may want to check the files manually first to see if it is what you want to delete. Click a file listed and click the “Open location” button. Unfortunately, it doesn’t seem to offer any right-click options.
In this simple test, the image above, it made one mistake. It identified “image (1).png” and “image(7).png” as duplicates, but they were not. It got the rest right. This is why you might want to check them before deleting.
Deleted files go to the Recycle Bin.
Despite the initial problem with my CyberPC, I will consider this program a success and will keep it on my system for future use. Which means I might never touch it again. 🙂 “SimilarImages” is still my first choice for finding duplicate photos.
—
Okay, I have played around with a lot of them but at the top of the list are Alldup and DupeGuru.
What do you think of Duplicate File Finder from HUXSoft? One can get it at the Microsoft Store.
I am using Anti-Twin. Wow! Such incredible speed!
“You may want to check the files manually first to see if it is what you want to delete. ”
This is the crutch of the problem. I have been down this road before and the amount of duplicates on my drives is humongous.
I do not have enough time left in my life to review each and decide which to keep.
With image files, this might be OK, but with other data files, it would be difficult and time consuming to determine which to keep.
In the end, if there is no real harm, don’t even open that can of worms.
Tom, you spoke my mind. The number if duplicate files I have is overwhelming. Not enough time in my life. I struggle with this daily. I am in the process of trying out Clonescan now.